A collection of materials to help you use the system Sledenje.com
Tip of the month 2024
Alarms - january 2024
This month’s tip will be about alarms. All our customers who have ordered at least the tracking standard package from us can subscribe to receive notifications about alarms from their technical administrator. Below we will list some of the most common alarms that are already used by our customers, or they are ordered to receive a notification when a certain alarm has been triggered.
- No position for 6 hours
- Fuel drops by at least 10% (LV_CAN)
- Speeding over 110 km/h
- Unregistered driver
- Temperature above 25 in the last half hour
- Movement after 17:00
- Movement of the vehicle for the weekend
- Vehicle movement within the Letališka 33d parking lot
- Outside the territory of SLO
- An open door
- Etc
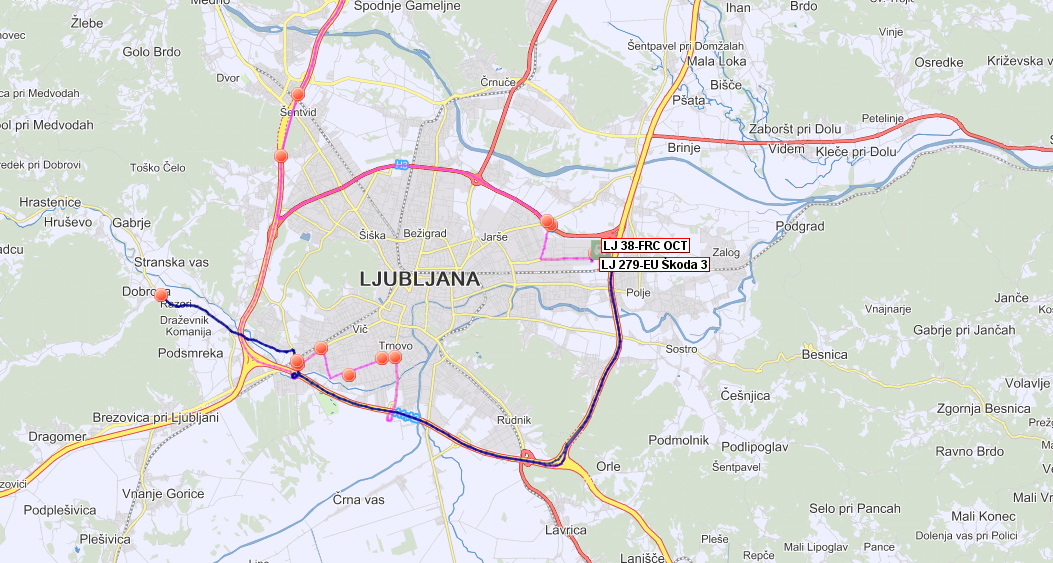
When and on which vehicle a certain alarm was triggered can be monitored in the alarm report. This report is additionally included at the customer’s request.
If you want us to turn on a specific alarm, contact your technical administrator.
Best regards!
Team Sledenje
Tip of the month 2023
Export route history in GpsWin - November 2023
In this “tip of the month” we will look at how to export all data or positions from the route history in a readable *.CSV format.
The purpose of this export is mainly in certain proving.
Is it necessary to prove that a certain vehicle did not exceed the speed limit at a given moment? Or it is simply a matter of presenting evidence in a certain accident that had happened.
First, we make a history of the journey on the vehicle for a certain period:
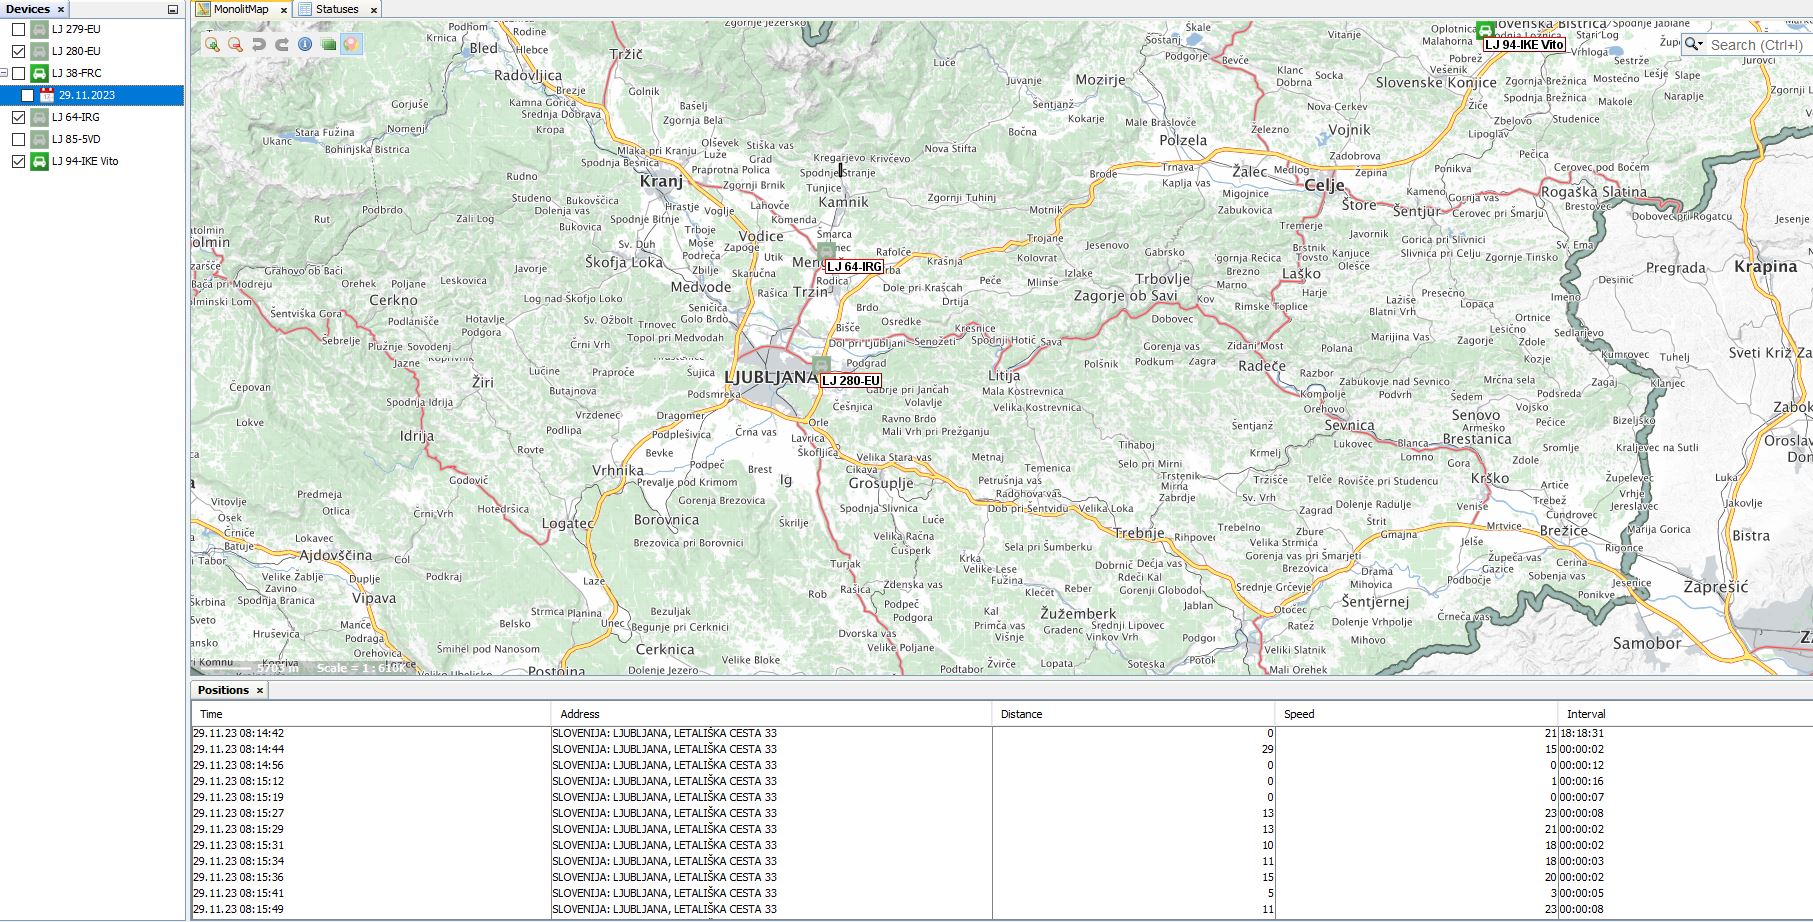
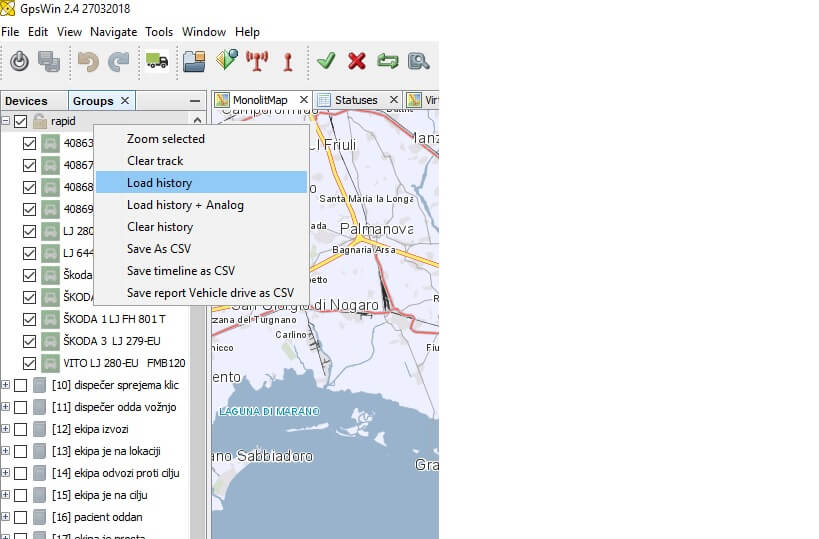
In the “Positions” window, select all positions by clicking CTRL+A on the keyboard at the same time:
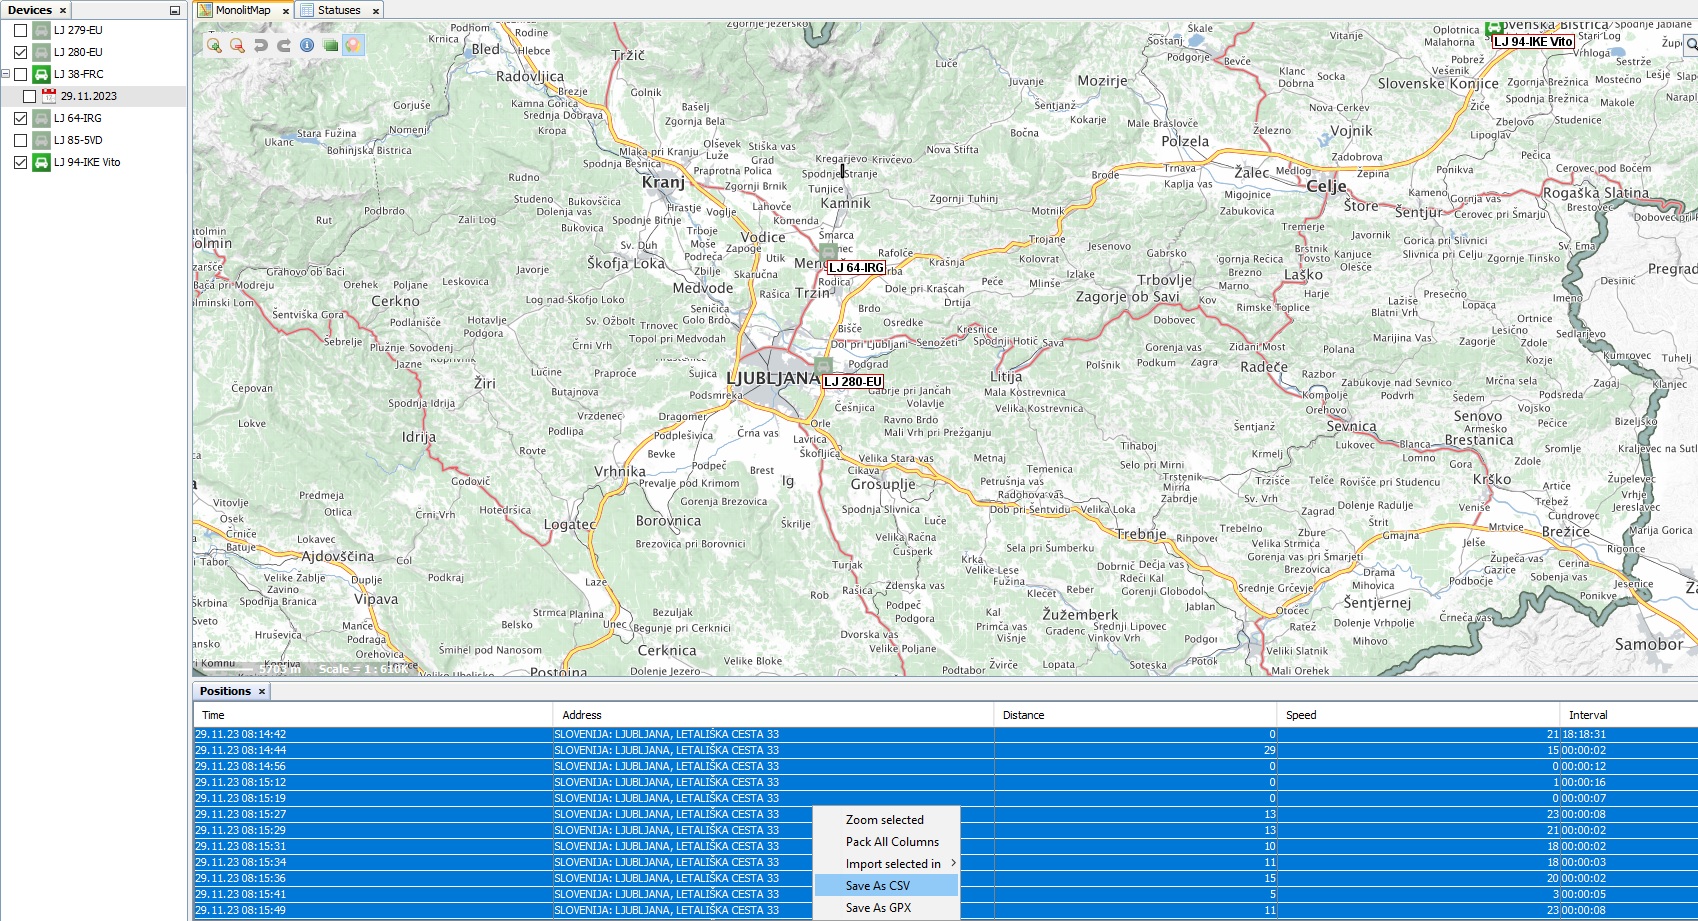
Right-click inside the “Positions” window and select “Save as CSV”.
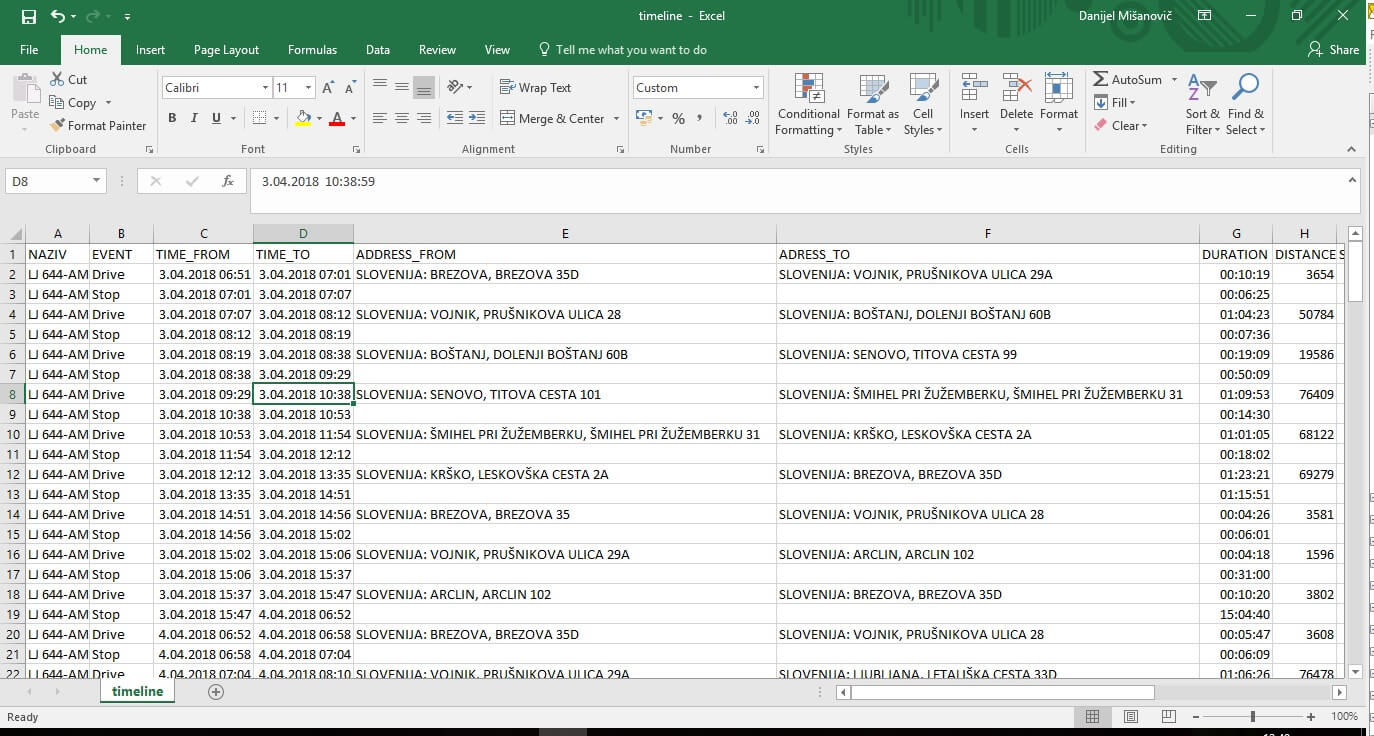
At the end, we just choose the path and write down the file name for the export we made.
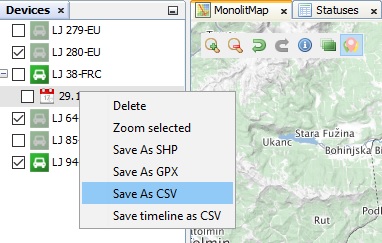
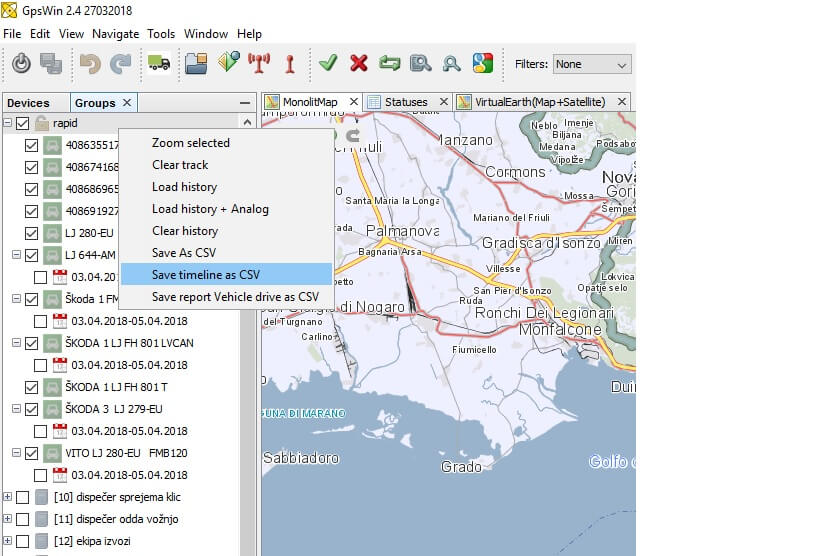
There is also another option how to export history route.
By right-clicking on the calendar, which is located under the specific vehicle where we made the query select “Save as CSV”:
At the end, we just choose the path where we want to save the file.
Until the next monthly tip, have a nice time!
Team Sledenje
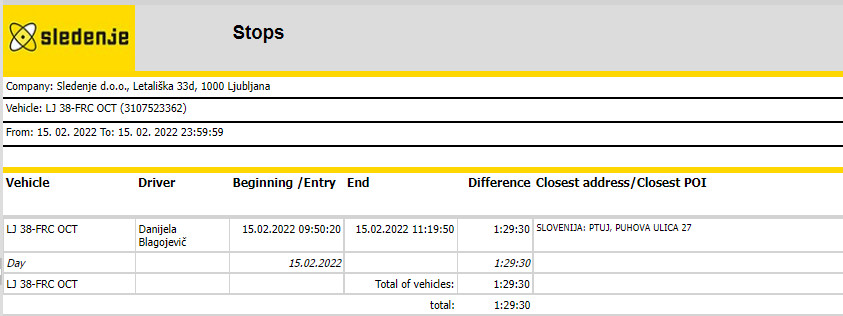
Setting stops - October 2023
Can I set a stopover period in travel orders?
This is a question that we often get from clients in order for them to get a smaller number of pages.
You can change these settings by clicking Tools > Options and selecting the »Stops Tab«.
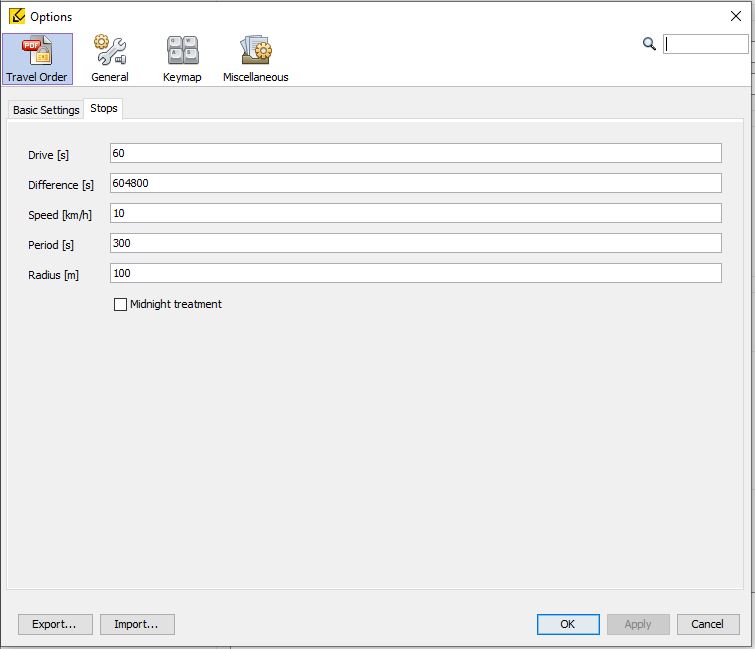
Explanation of individual parameters when setting stops:
- Drive [s] – in the event that the vehicle does not drive between two stops for more than a given number of seconds, the two stops will be combined into one
- Difference [s] – If the stop will be longer than the given number of seconds, the stop will not be displayed
- Speed [km/h] – as long as the driver does not exceed the given speed, all the positions he completes are still counted as a stop
- Period[s] – Only stops longer than the given number of seconds will be displayed
- Radius [s] – in case you also use POI / points of interest, here we can define the radius in which a certain point is recorded.
- Midnight tretment – if you check this box, it means that every event that ran past midnight will be added to the day in which it started. Otherwise, the event cuts us off at midnight so that each part is added to the corresponding day.
Team Sledenje
Vehicle reservation - September 2023
Dear users!
With the desire to facilitate your work processes and reduce the relentless pace of work, we would like to remind you of our vehicle Reservation application, which we are sure can facilitate the management of a smart fleet.
The application is accessible via our website Sledenje.com under the Costumers tab.
When you enter the application, you will be greeted by a graphic display of the occupancy of your vehicles.
The application allows you to view reservations and vehicle occupancy week by week. It is also possible to use filtering to view occupied/free vehicles or by vehicle groups.
By clicking on the new reservation button, we open a new entry and create a new bookmark with the entered data.
However, there is also an overview of the booking history on the Vehicles tab by selecting Booking history, where you can review past bookings for the selected period.
In case of any addtitional questions, please contact your technical manager.
Team Sledenje!
Second generation of smart tachographs - August 2023
Dear clients!
21st of August marks changes and first deadline for implementing second generation (version 2) smart tachographs.
We have prepared for you a timeline of upcoming dates of changes and what they will mean for your business.
TIMELINE OF CHANGES:
- August 21, 2023: all new vehicles registred for the first time must be equipped wiith a smart tachograph of the second generation.
- December 31, 2024: by the end of 2024, the second generation of smart tachographs that are active in international transport must be installed in all vehicles over 3.5 tons. The exception is tachographs of the first generation.
- August 21, 2025: all vehicles used in international transport equipped with first generation tachographs will have to be replaced by second generation tachographs.
- July 1, 2026: all newly registered vehicles over 2.5 tons used in international transport (transport of goods) or cabotage must be equipped with a second generation smart tachograph.
SECOND GENERATION SMART TACHOGRAPHS – WHAT’S NEW?
- Automatic recording/registration of border crossings
- Change in the method of work recording – unloading / loading
- Improved security policy against manipulation
- Drivers’ cards will be emptied every 56 days or data will be stored twice as long
We are at your assistance for any additional questions. You can also contact experts in the field of tachographs.
Team Sledenje
TachoLab and automatic remote download of .ddd files from Tachograph - May 2023
In this month’s tip of the month segment, we will present a process with which our clients can achieve automatic remote download of .ddd files from the Tachograph device in their vehicles with the help of telematics system sledenje.com and our team of experts.
For this process we have to create a certain setup that can be devided into a few steps, so let us see what you as a client need to establish automatic remote download of .ddd files from the Tachograph:
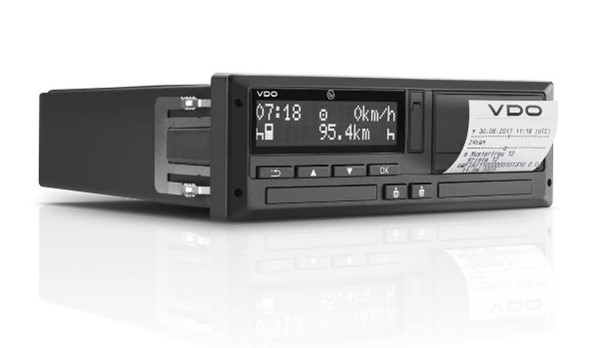
- The vehicle must be equipped with the proper telematics device that allows Tachograph connection and remote. ddd download. The installation of the telematics devices has to be performed in a specific way as to connect the device with the Tachograph through connection ports C and D.
- Establishing the connection of telematics devices and .ddd download schedules with the help of WEB TACHO program, which also synchronizes all the downloaded files with TachoLab through FTP protocol.
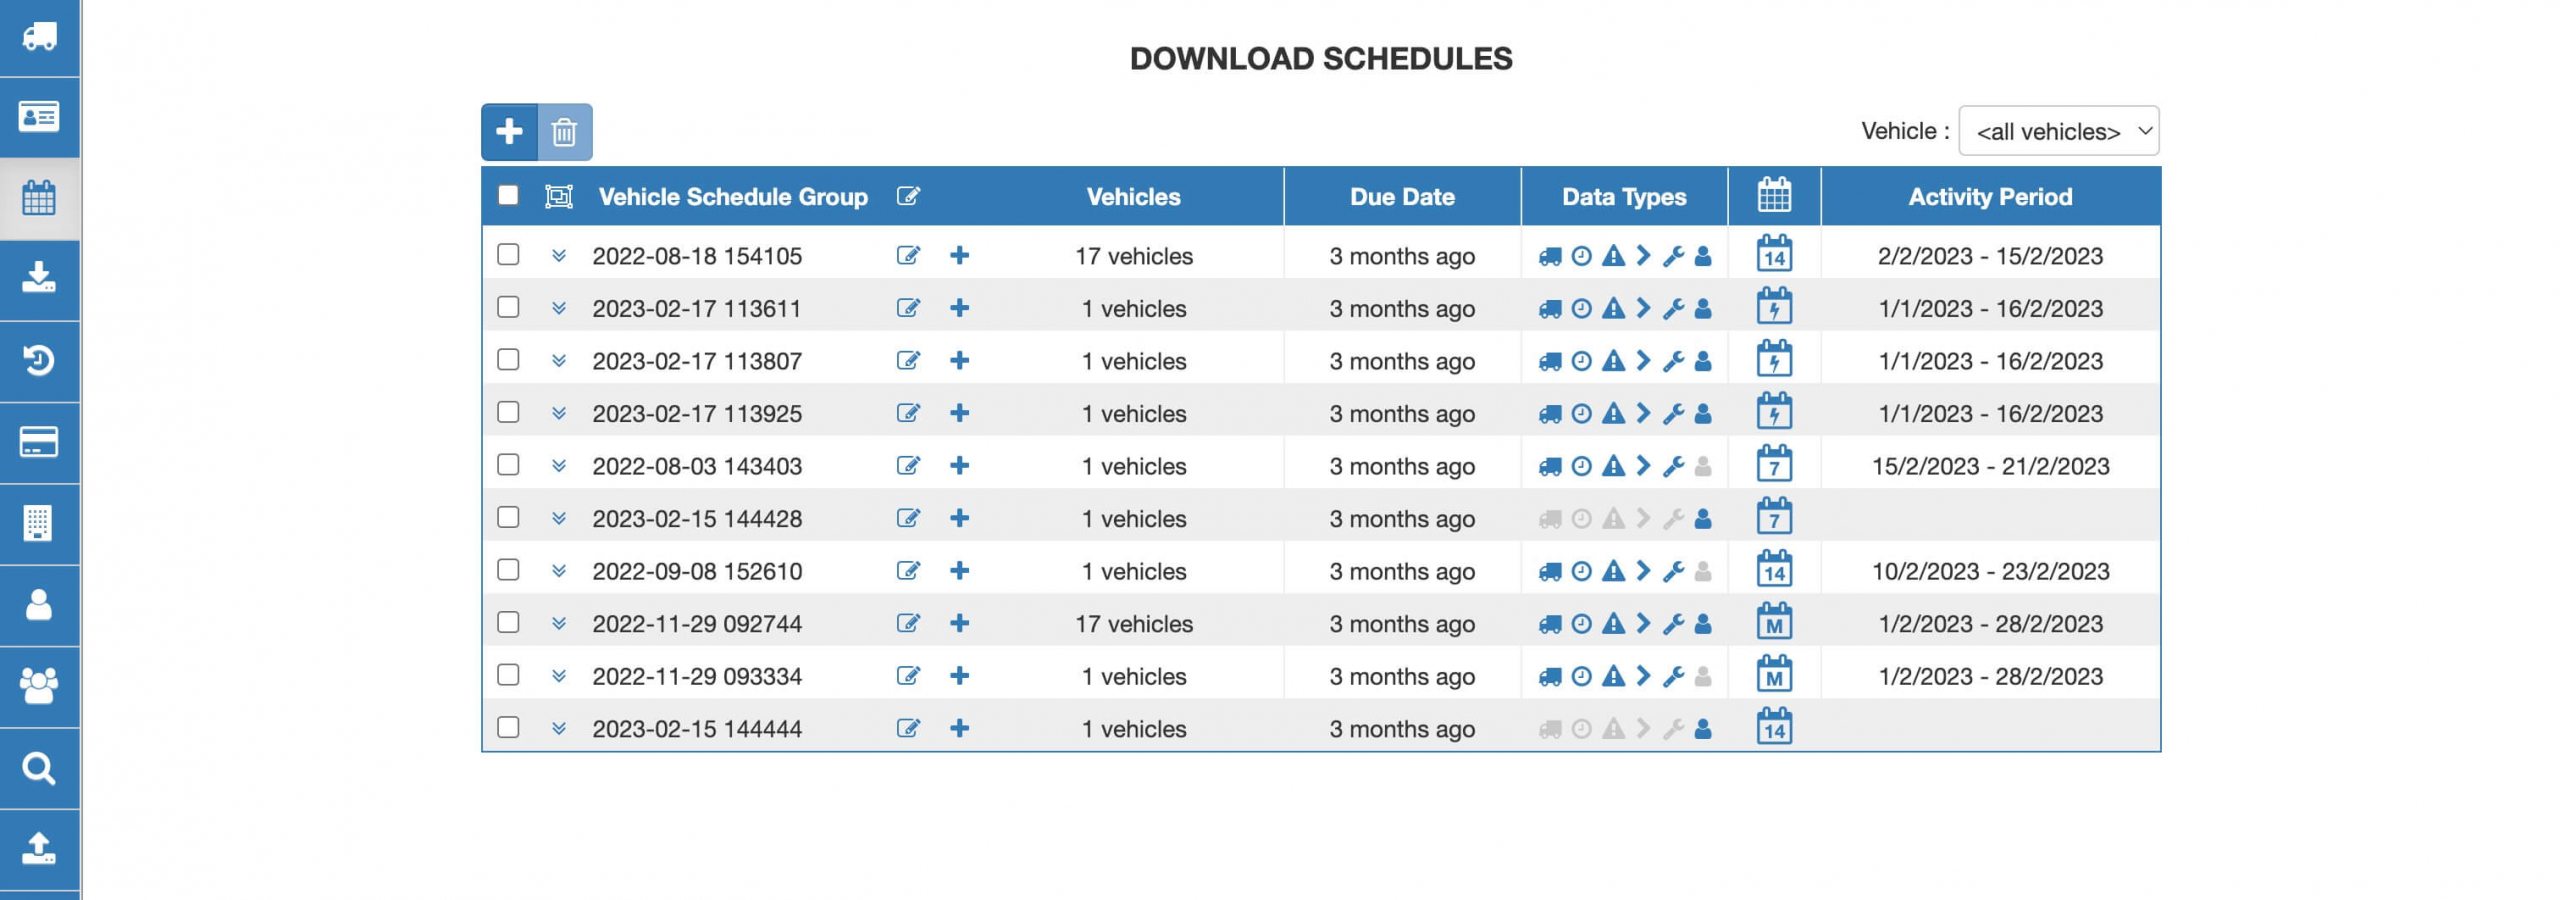
.ddd download and schedule setup
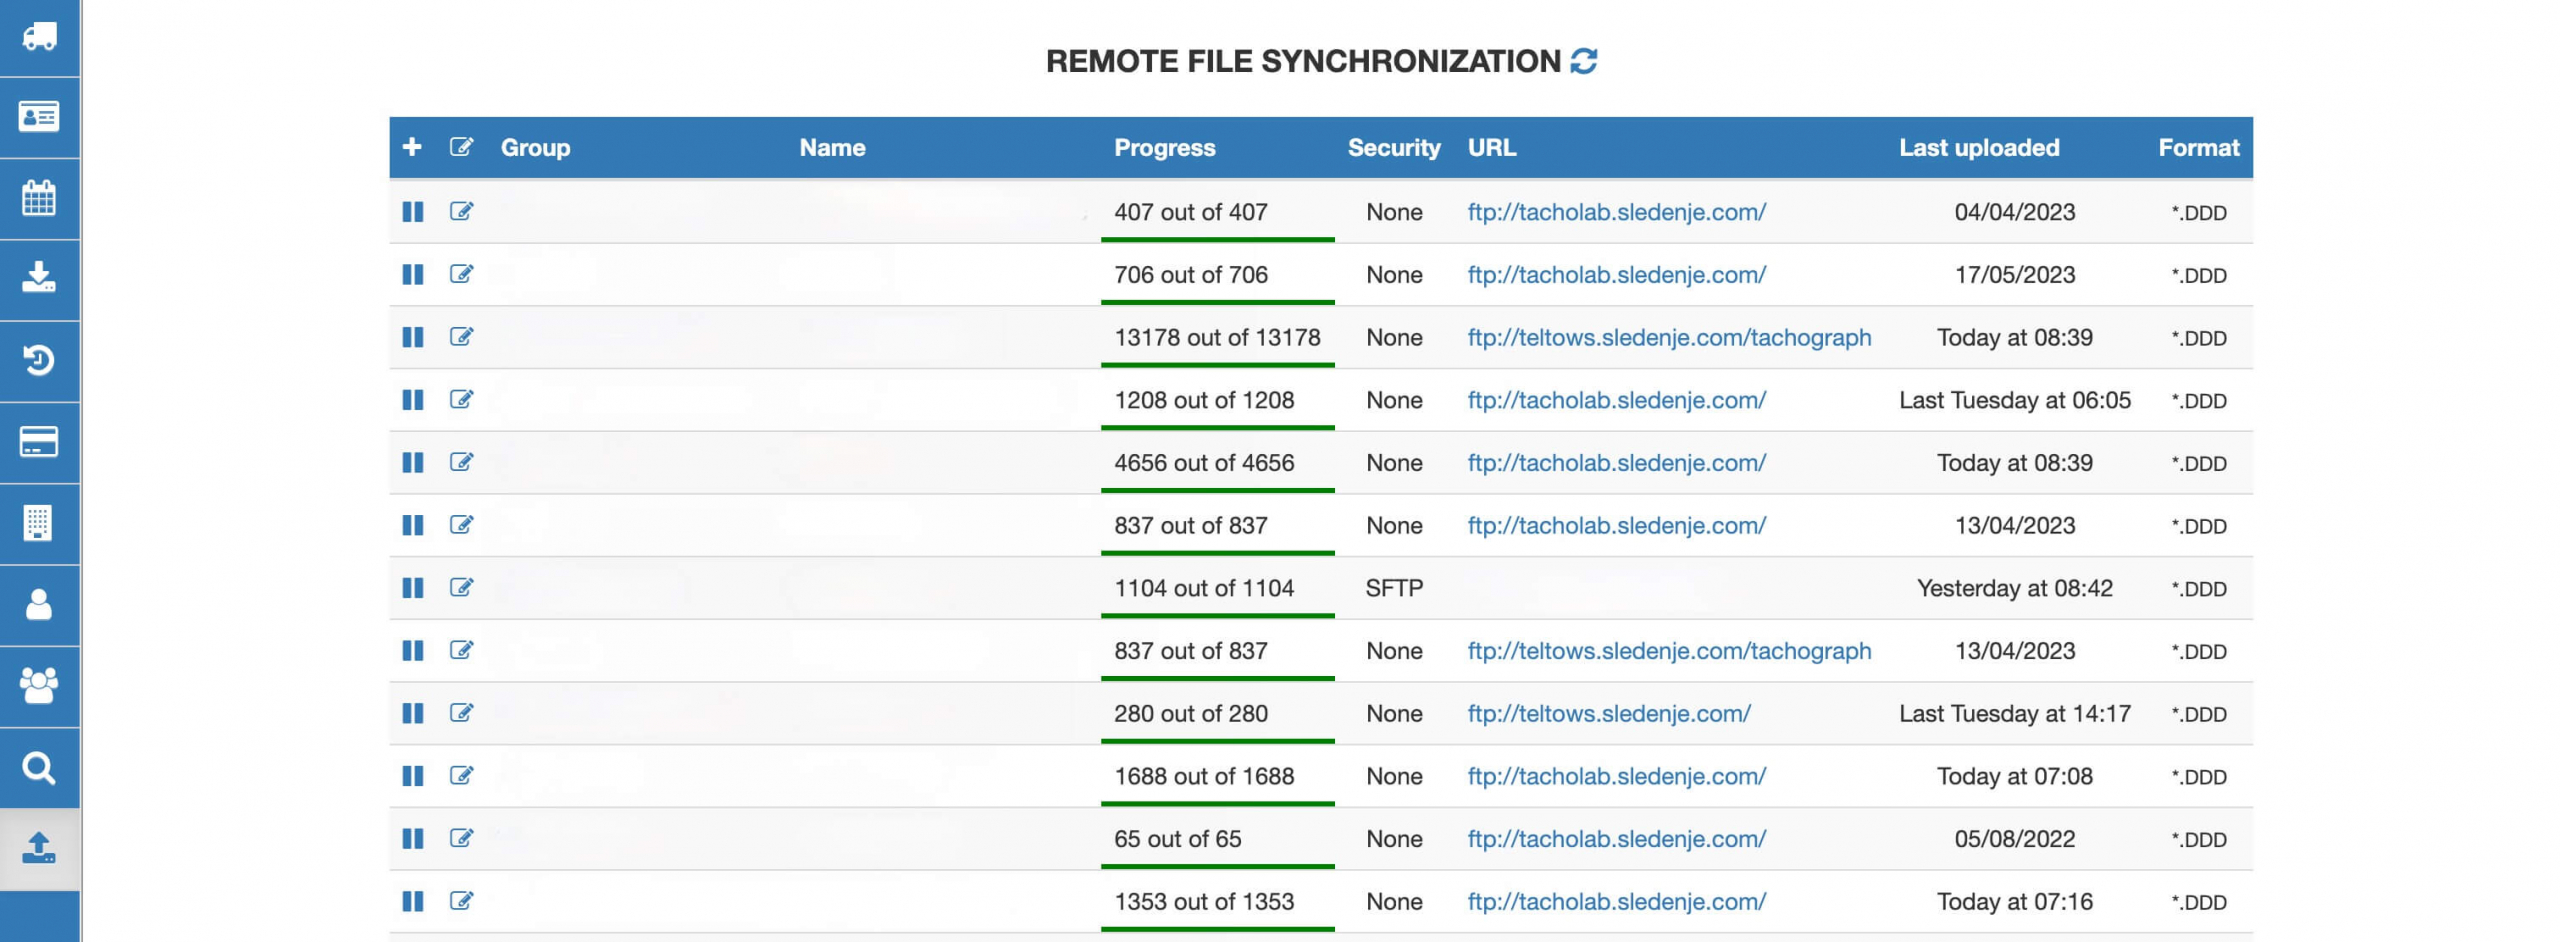
FTP synchronization of .ddd files
- Last but not least we have to enable an integration through FTP protocol in TachoLab, which allows all downloaded .ddd files to be stored in the archive and are available for further analysis.
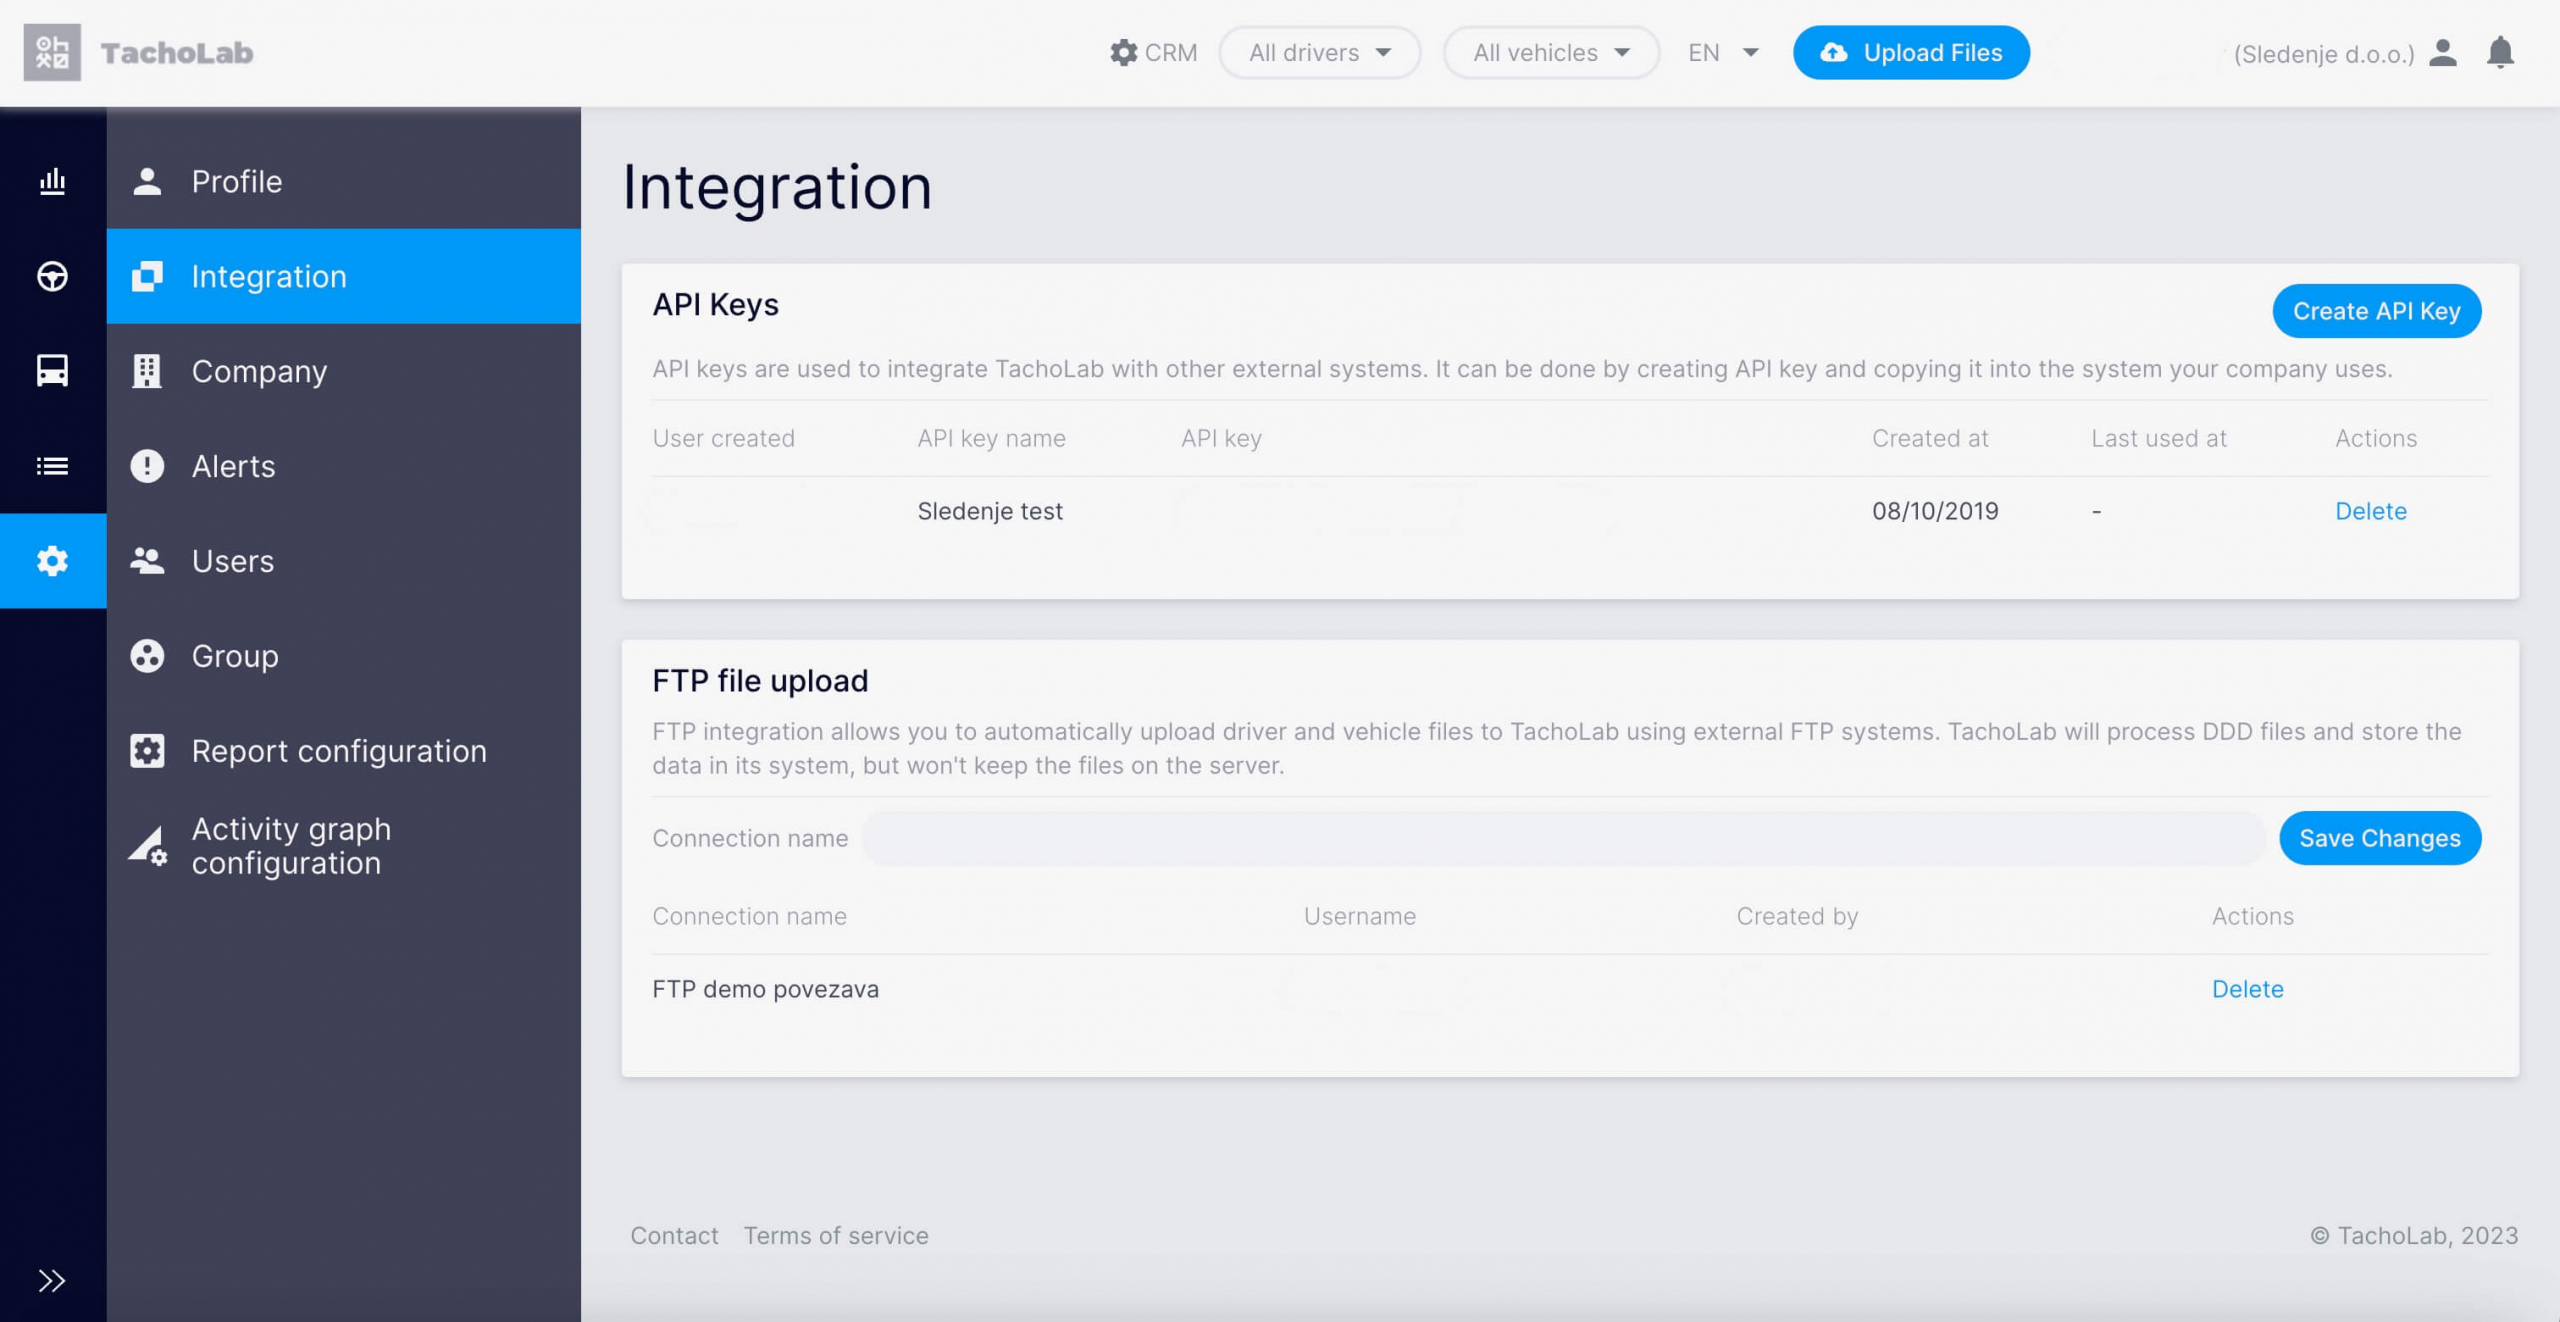
TachoLab FTP integration setup
Once this process is established, clients make sure that they comply with all the Tachograph related regulations and they also gain a great tool to further analyse the workflow of their drivers and vehicles.
TachoLab archive and .ddd analysis
If you have any questions please feel free to contact your key account specialist.
Best regards,
Sledenje Team
Guide to Route Planning - April 2023
In this edition of tip of the month we will present our solution for route planning and optimization.
Route planning or optimization is done with the purpose and goal to rationalize transport costs. An additional and very important benefit to route planning is also easier management of a companies carbon footprint. With that ecologically mindful companies are already preparing for new EU directives that are connected with emissions reporting.
Different kinds or types of route planning or optimization require specialized tools. FleetOpti is one of those tools that can be used for optimal planning of customer visits, deliveries or pick-ups and varies types of cargo hauling. For processes such as waste management/garbage collection, public bus transport and similar use cases our experts use complex tools and platforms that allow high-density data processing.
Practical experience in the last two decades have given us the know-how and shaped us into experts that allows us to deal with any challenge in the field of route planning. In our latest blog post you can find a very thorough guide to route planning which includes several practical examples. Please feel free to contact us if you encounter anything that interests you during your reading.
GpsWin user program update - March 2023
In this month, we will present how the user checks if he is using the updated GpsWin 2.5 user program with all upgrades released up to that point. The update can be done in two ways. In the first one, we can set automatic time update or the so-called silent update mode. We carry out this process in the tab Tools > Options > GpsWin > Update. When a new update is available, only this one will be performed automatically. You can read more about this in the Additional settings chapter.
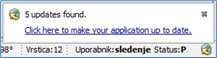
Another way is to update manually. In this case, we recommend that you pre-set the check for new updates anyway. How long the automatic update query will take depends on the preset. We define this in the Tools > Plugins > Settings tab where we define the check interval for new updates in the Automatically Check for Updates field. Manual startup is done by clicking Help > Check for Updates. If any upgrade is available, a pop-up notification will open in the form of a bubble. At the same time, a new Plugin Installer update wizard appears.
In the case of an automatic update check, the notification appears in a bubble, and to open the Plugin Installer, click on the blue text inside the bubble. If we missed the notification, we can see it again by clicking on the icon in the lower right corner of the application.
Picture 1: Update alert
Picture 2: Plugin Installer is a wizard for installing upgrades that takes us through the process of updating the application.
Explanation of fields in the wizard:
- Information about the modules for which there is an update. The version number of the upgrade for each module is shown next to it. If we change our mind during the process of an individual module, we can still interrupt it during the duration of the module by clicking on Cancel and choose another one, or end the process without updating. However, we recommend that you update at least once every six months.
- In the next step, the wizard informs us about the rights and the license. The checked box »I accept the terms in all of the license agreements« allows us to Update. With a click, the given upgrade is installed on the application.
- After the installation is complete, the wizard asks if we want to restart the application now or later. Click Finish to complete the installation.
Additional settings when updating:
You can see what all the additional update options are by opening the Options (Tools > Options) and selecting the GpsWin > Update subtab.
The following settings are located here:
- Silen update – if you chech this box, the application will silently update us automatically without notifications every time an update is availabe. The progress of the update will only show us a progress indicator in the lower right corner of the application.
- Install new module – checking this box allows a silent update so that new modules available to the application can be installed in addition to the update.
Team Sledenje
Data processing agreements - February 2023
Company Sledenje dedicated the tip of month February 2023 to appropriate regulation of relationship between providers of GPS technology for monitoring company vehicles and users of GPS technology for monitoring company vehicles in the field of personal data that are processed and collected in GPS system – in our case, system Sledenje.com.
In accordance with the General Data Protection Regulation (GDPR) from 27th April 2018, the processing of data that are automatically collected and processed in Sledenje.com system and all comparable GPS systems for vehicle monitoring is considered as processing of personal data. The processor (provider of GPS technology service) and the controller (user of GPS technology service) have to arrange their relationship with a contract or other legal act, in which appropriate technical and organizational measures are defined as a guarantee of compliance with requirements of data protection.
In company Sledenje, as provider of the Sledenje.com system for the purpose of monitoring company vehicles, we regulate mentioned above with data processing agreements.
Considering the importance of the topic, we suggest that you check whether you concluded data processing agreement with us and if this is not the case, we suggest that you get in touch with us and we arrange our mutual relationship accordingly.
We are available for any questions.
Team Sledenje
Tip of the month 2022
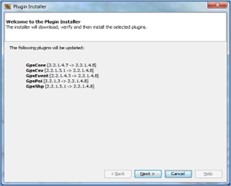
Vehicle maintenance report - December 2022
In our last tip of the month this year, we’ll present you with a customized vehicle maintenance report. This report is intended for all our clients that use the vehicle maintenance module in GpsWin.
For those of you who might not know it yet, this feature allows you to enter all registration and regular service events, as well as other tasks related to vehicle maintenance in GpsWin. The system, then automatically notifies you via the app and/or e-mail that the date or mileage for a certain event is approaching.
Based on this, we also made a special report for vehicle maintenance. With the help of this report, you can identify which events are coming up for a certain vehicle within the next month or months. This report is not accessible by default but we can give you acces to it upon request. Therefore, if you need it in the future, please contact your administrator.
Vehicle maintenance report
The picture above shows the content of the report with an example.
Displaying points of interest on the map - November 2022
This time we will present the latest feature implementation we have released in the GpsWin application. This allows you to display points of interest (POI) and related data on the map. The feature is available no matter what map base you are using, MonolitMap, VirtualEarth or any other map supported in the application.
The feature is activated by clicking on the icon in the left upper corner of the map, which enables the presentation and access to information for individual points of interest.
The icons that represent the location of points of interest automatically become visible to the user once the map zoom is high enough.
Presentation of points of interest
To access and review the content, a user can just click on a specific point of interest and specific metadata will appear such as name, address and contact information, if available. The feature allows the information to be copied and pasted into other programs.
Additional information for point of interest
Integration of the DKV expense file in Travel Orders - October 2022
With the goal of streamlining company work processes, we have prepared a NEW integration for card business or expenses in our Travel Order application for our clients.
![]()
In addition to the already integrated Magna-Petrol cards and the OMV card, we now support the import of the DKV cost file.
Do you know the benefits of importing expenses in the Travel Orders application? Below is a list of just a few of them:
- Fast and simple cost and quantity control with access to total fuel consumption per vehicle and average fuel consumption per vehicle,
- Review of invoices according to specification (tolls, fuel, accessories, services,..),
- Automatic calculation and printout of all costs on a monthly and annual basis,
- Annual fuel consumption report.
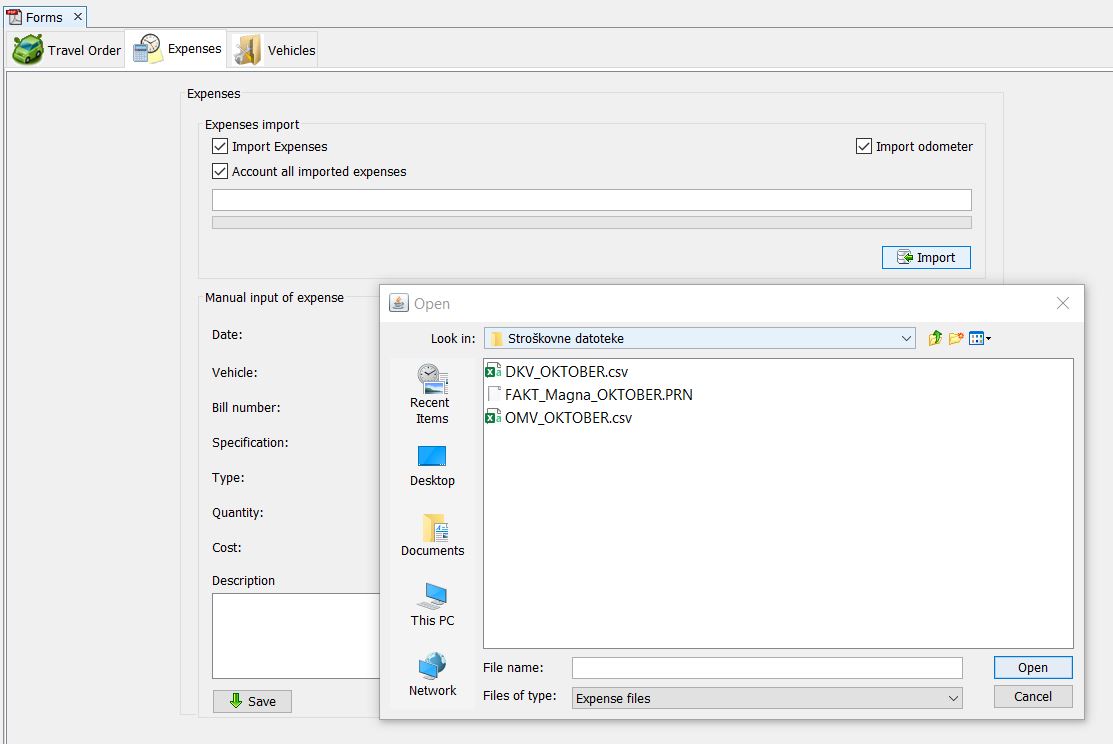
Import of DKV expense file
The import process is easy and will only take you a few minutes. In case of any questions or problems, you can always contact your technical system administrator or write to us at skrbniki@sledenje.com.
Go to previous document in GpsWin - July 2022
This time we will present you with a small tip that talks about the function with which we return to the previous window.
For example, if we are positioned on the “MonolitMap” window in GpsWin program and then we clicked on the “Statuses” window.

Previous document example in gpswin
Afterwards we want to go back to the “MonolitMap” window. We can do this by clicking on the “Navigate” menu and selecting “Go to previous document”.
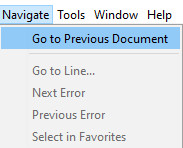
Go to previous document
In an instant, we are then placed back onto the “MonolitMap” window.
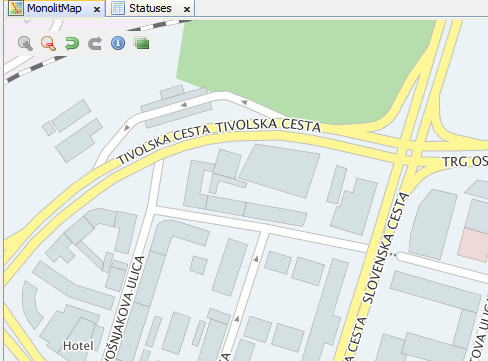
Previous document example in gpswin (cont.)
SmobileX mobile app update - June 2022
We are pleased to inform you that we have updated our SmobileX mobile application in two ways, by adding new functionalities.
Continuous login
Continuous login
This new feature allows users to stay logged in without needing to log in again unless they intentionally logout by choosing Logout in the Menu tab of the app. No more re-entering user data. If a user only minimizes or closes the application, they will remain logged in!
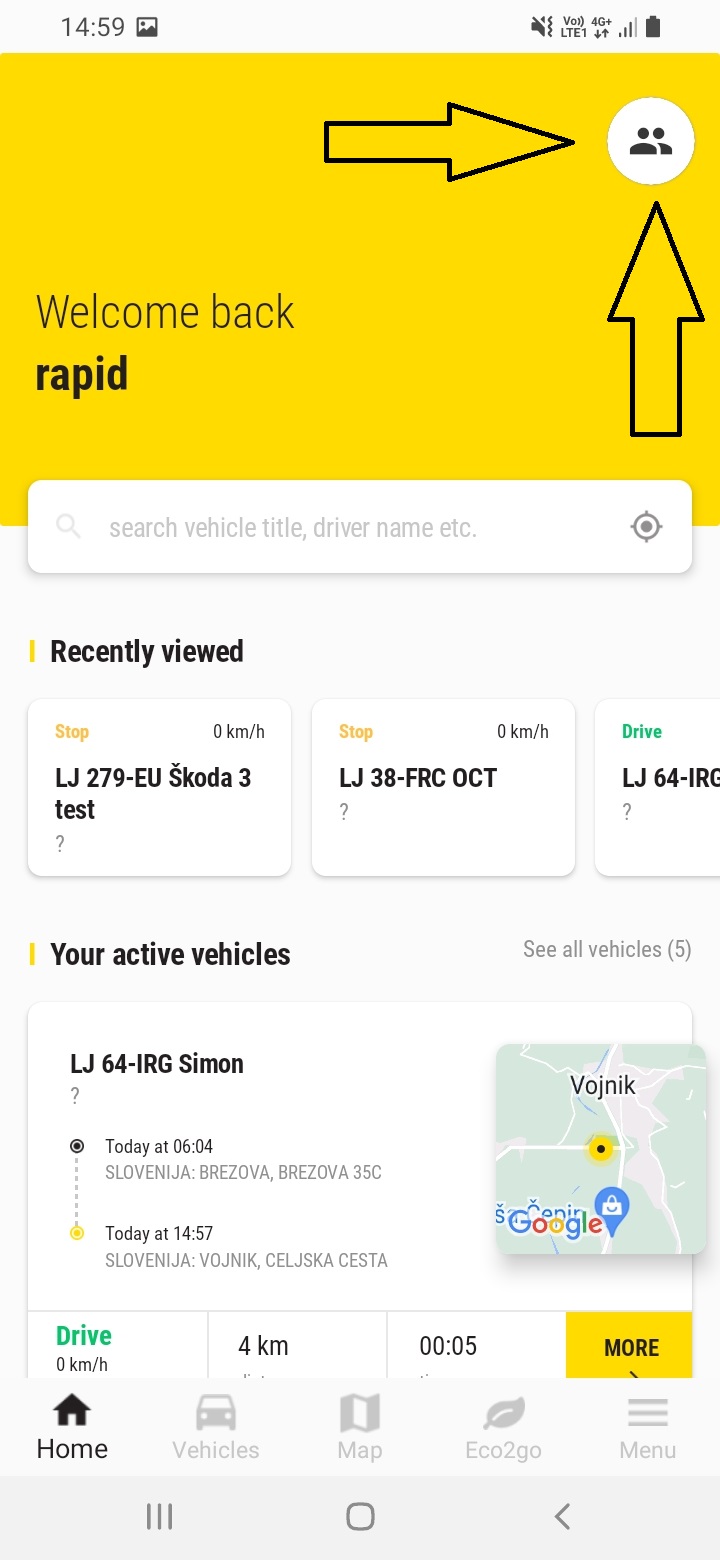
Multiple user accounts
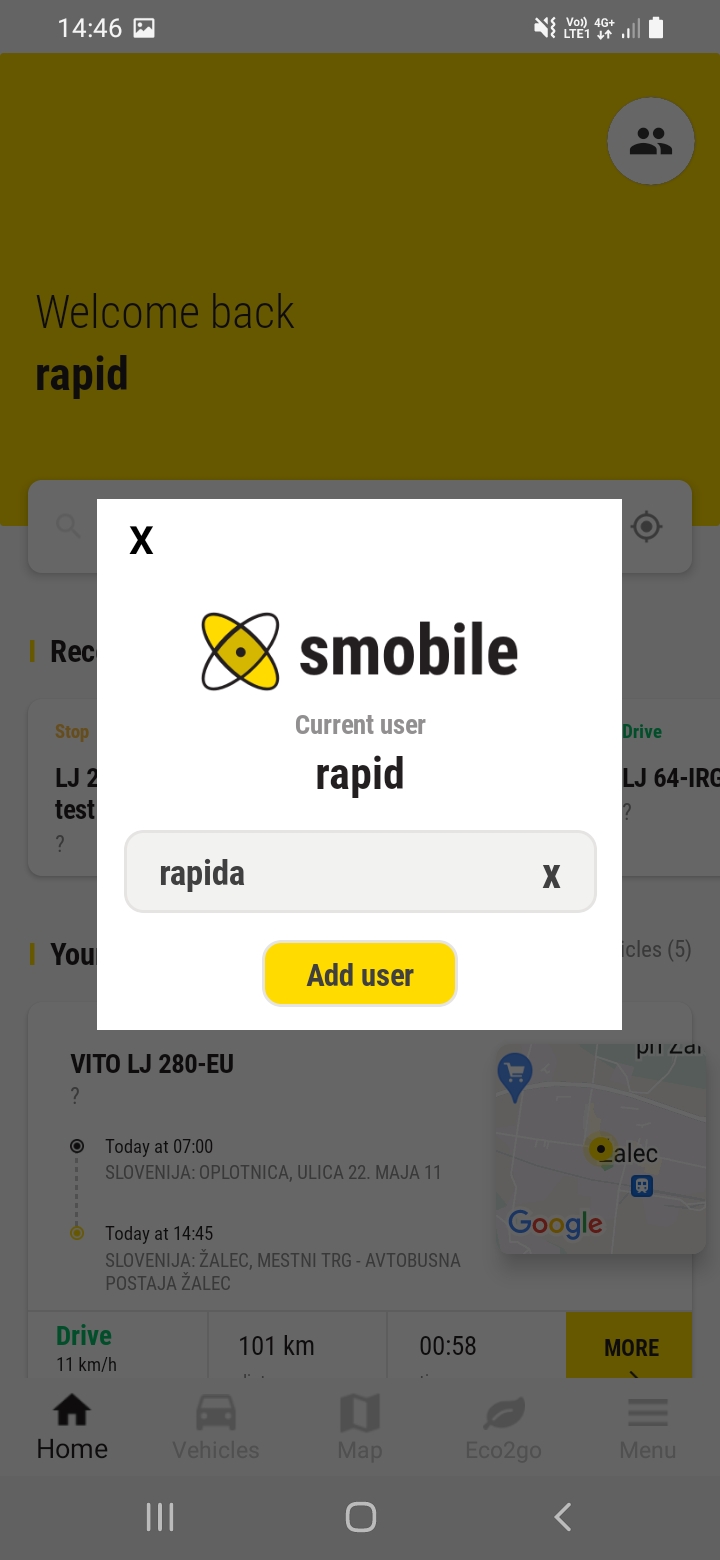
Add more users
This new feature allows users to have more logins saved within the application, which allows them to switch between multiple users freely by choosing one of them like it is demonstrated in the screenshots. Afterwards, there will be no need for a new login each time. The usefulness of the function is often demonstrated where the company is obliged to monitor vehicles of subcontractors.
Additional user accounts can be added directly by clicking on the button in the top right corner of the Home tab or in the Menu by selecting Change user.
Switching between users
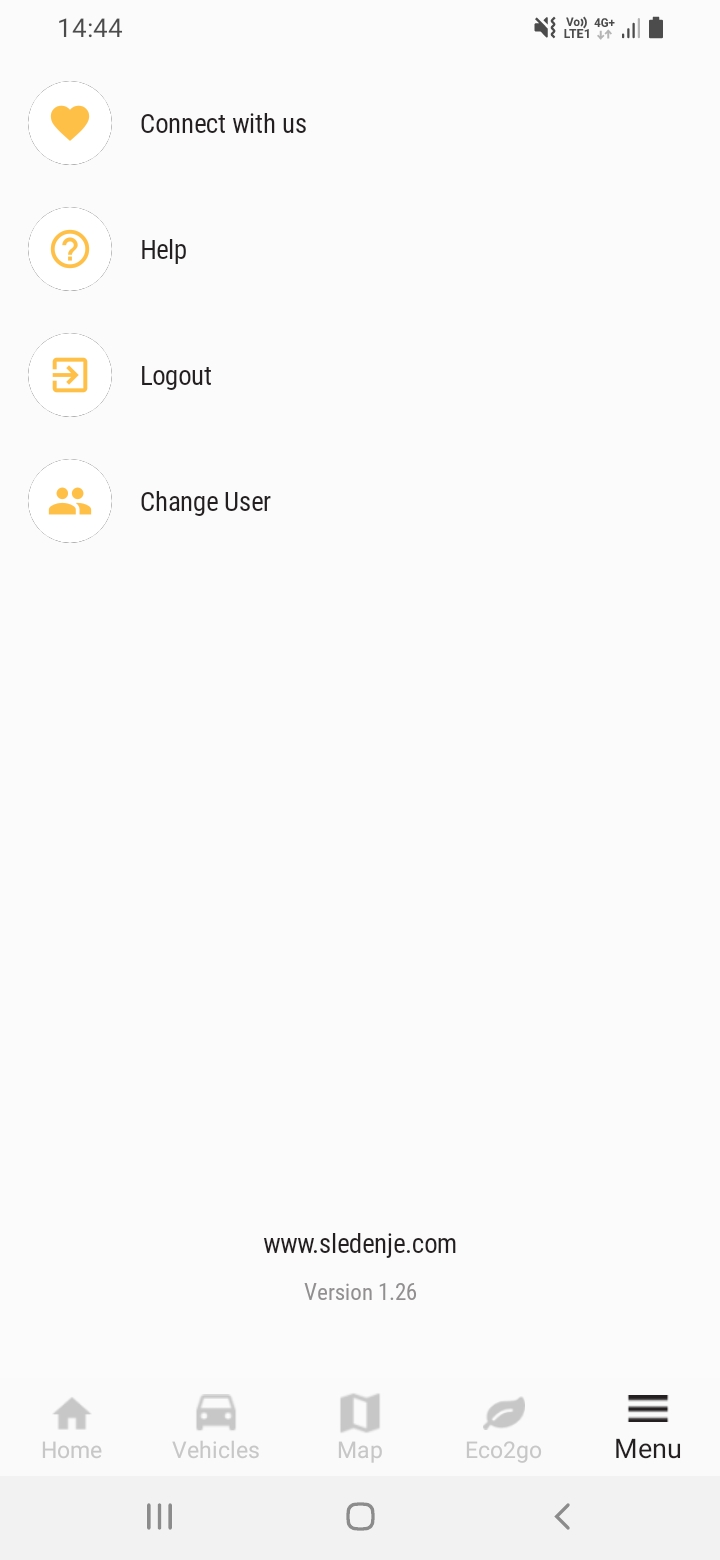
Switching or adding users in Menu
Report stops by address - February 2022
Lately, we have gotten a lot of questions from our clients about whether we have any reports that would only print out stops at a particular address. To this end, we have made a report we call stops by address. You can only access the report if you are subscribed to it, or if the report is included in your subscription package.
You can find the report under the serial number 03a_Report on the searched address. Under the parameters specified as Filter naslova you have the option of entering up to three different addresses.
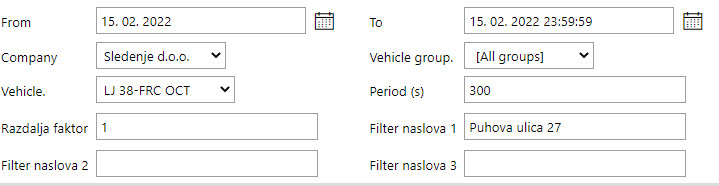
Report based on address search parameters
When the the report is initiated, we only get the results for the addresses that we previously specified within the Filter naslova parameters.
Report by search address example
New application for shipment tracking - January 2022
We all know a feature called shipment tracking, which is accessible via GpsWin. A feature that allows an external participant access to tracking a specific vehicle/device for a limited period of time.
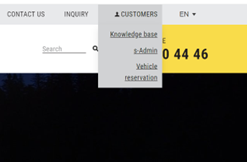
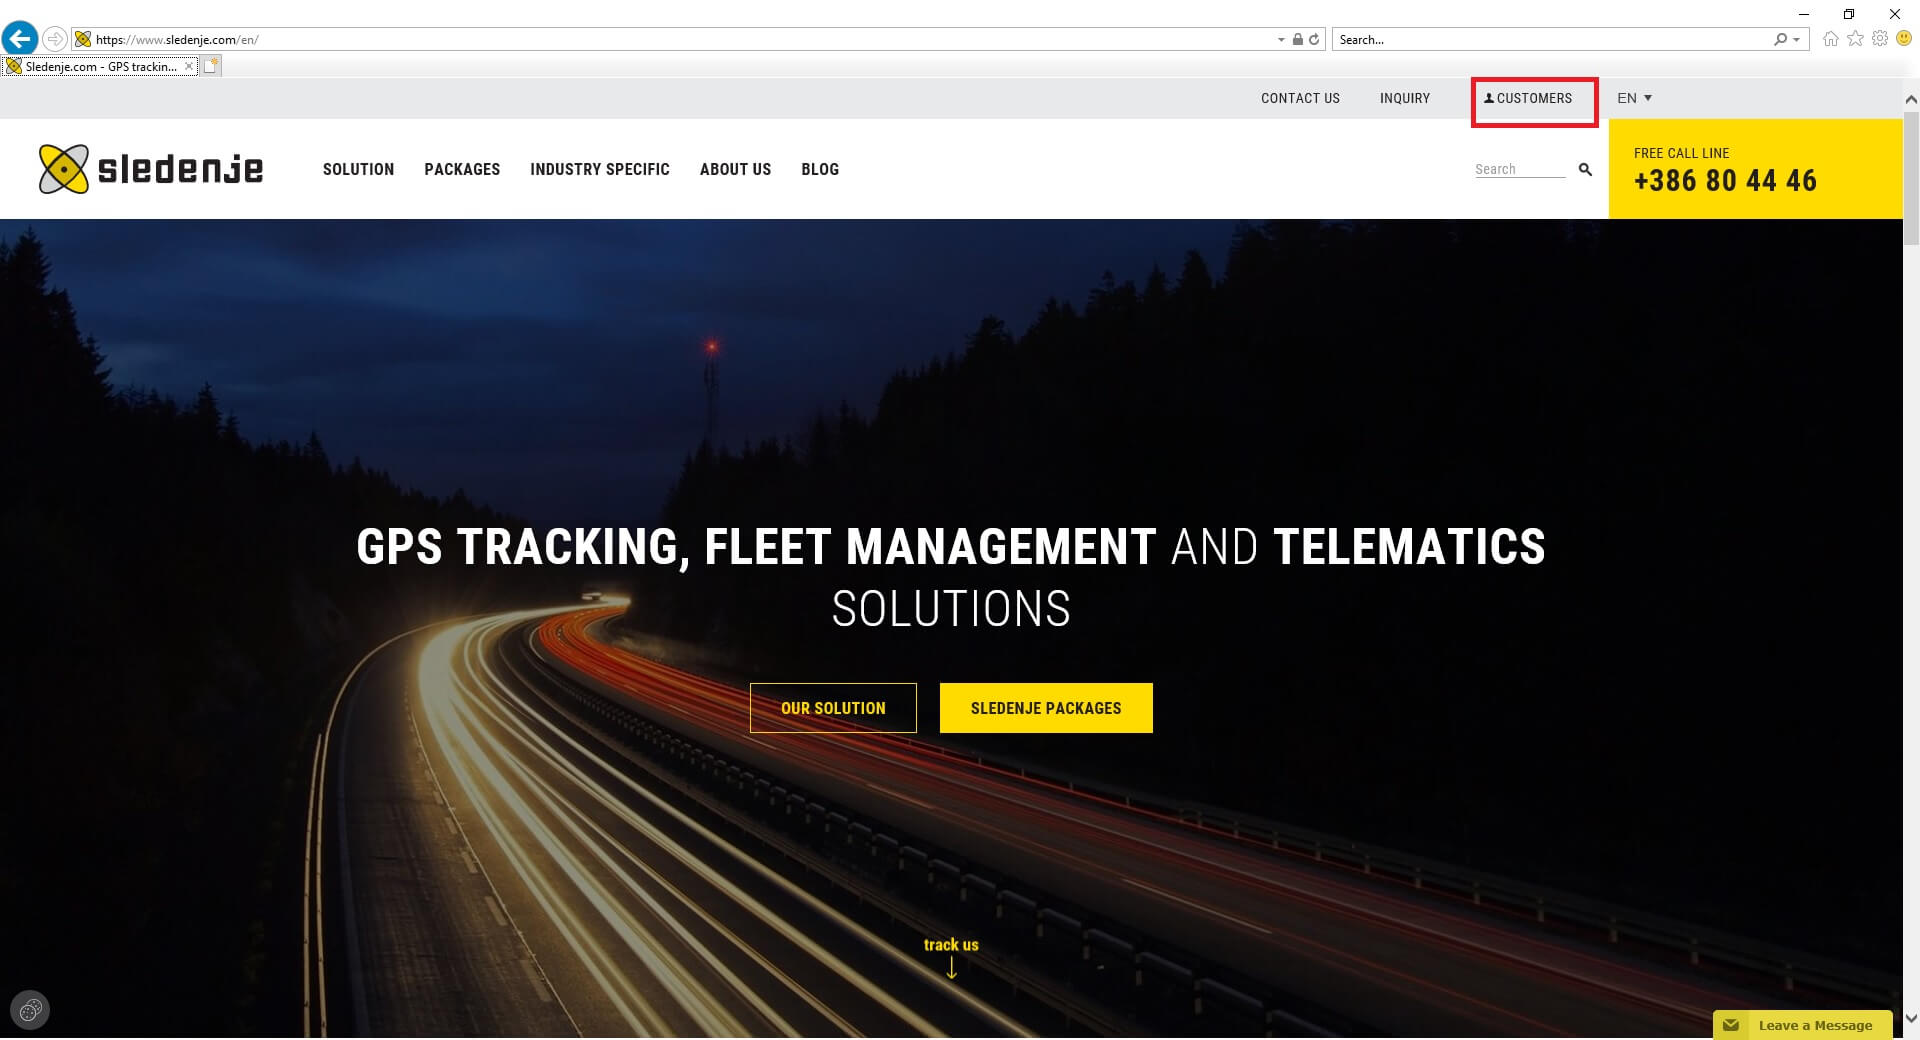
We wanted to improve the performance and stability of this important feature by completely revamping it, in addition we threw in some new functionalities and a new much more modern look. The feature is now available via s-Admin. Access to s-Admin can be found on our official website sledenje.com, there you will find the s-Admin link under the CUSTOMERS tab.
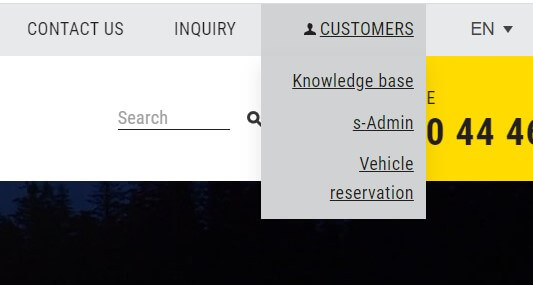
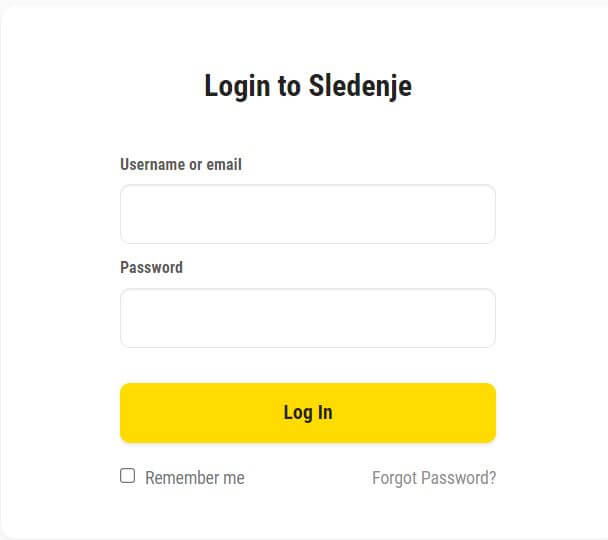
Access to s-Admin
By clicking on s-Admin, a new login window opens in your Internet browser, as shown in the image below. Note, that the login requires an administrative username and password. In case you forgot it, please contact your key account manager.
Login in s-Admin
Once you are in the application, select the vehicle for which you want to create a monitoring link from the list of vehicles available in the »Vehicles« tab and click on the button.
This will open a new window Tracking Link Management, where you can select the connection validity period (date and time). The connection validity »from« date can be set from the moment the connection is created, or it can be set somewhere in the future.
Tracking link management window
You can simply send the tracking link directly via e-mail or copy it and send it via another communication channel.
Tip of the month 2021
New reporting system - November 2021
Have you noticed the new look of our reporting system? If you used any of our reports this month, then the answer is most probably yes.
We decided on the new reporting system mainly because of increased reliability and a more modern look, which user are accustomed to. You will notice a new graphical image from the user experience.
We have also added some new reports that you can access based on the package you have. If you find a report that seems useful, but you cannot access it just contact our user support team.
You can access the new reporting system the same way as the previous one, by clicking on the report ![]() icon, which most of you already know. Then the image opens in your internet browser. The reporting system supports all major internet browsers Chrome, Edge, Safari, and Mozilla.
icon, which most of you already know. Then the image opens in your internet browser. The reporting system supports all major internet browsers Chrome, Edge, Safari, and Mozilla.
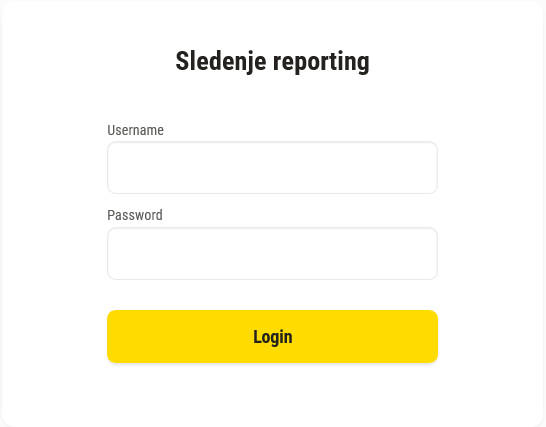
Sledenje reporting login screen
After entering the username and password, a new reporting system will open.
Reporting homepage
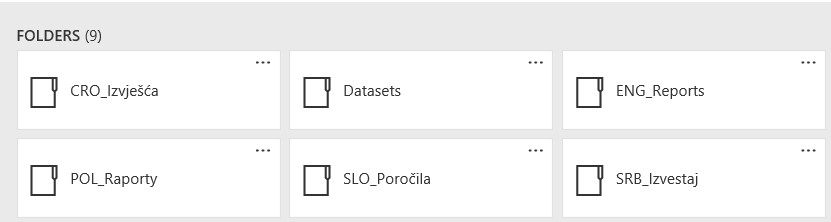
Then click on the folder »ENG_Reports«, where all the reports are available.
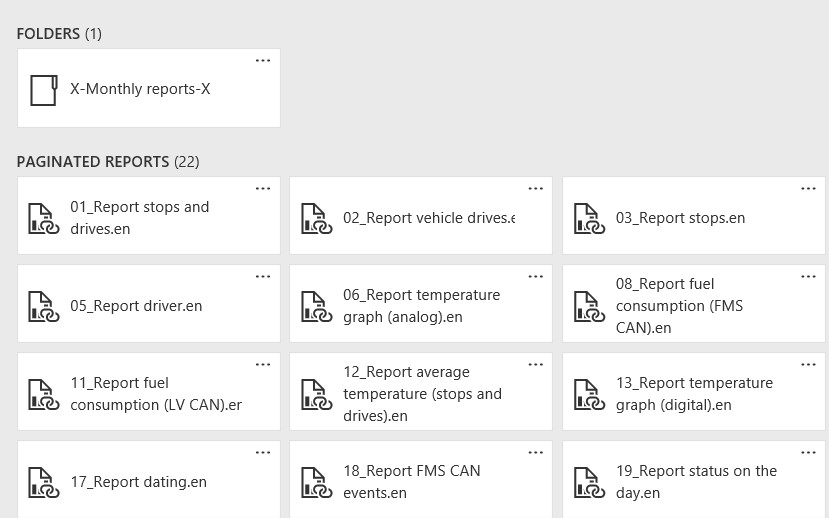
Reporting list of available reports
At the end we would like to mention that by clicking on … of an individual report, you can find out more information about the content of the report.

Report details
Color change of vehicle history in GpsWin - October 2021
In this issue of Tip of the month, we will show you how to facilitate your work by changing the color of the tracks on the map that come from the vehicle history, which makes it easier to distinguish them from one another. The functionality comes is super handy in some scenarios as it enables graphical analysis and review of routes traveled for different vehicles at the same time or another example one vehicle with different drivers.
The first step it is to load the route history for the selected vehicles by using the window »Devices« and choosing »Load history«.
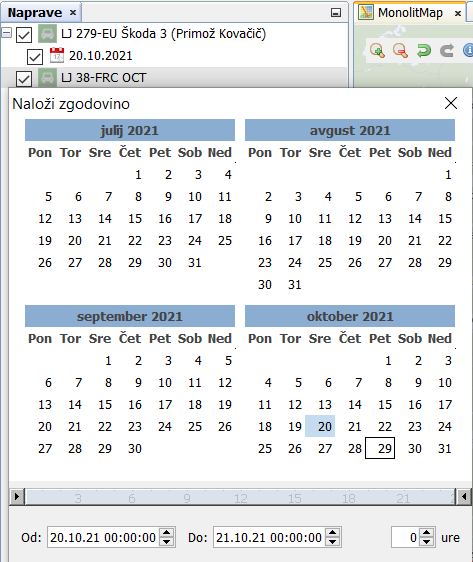
Calendar to select route timeline
To display the historical data (routes) on the map mark the checkbox next to it as you can see above.
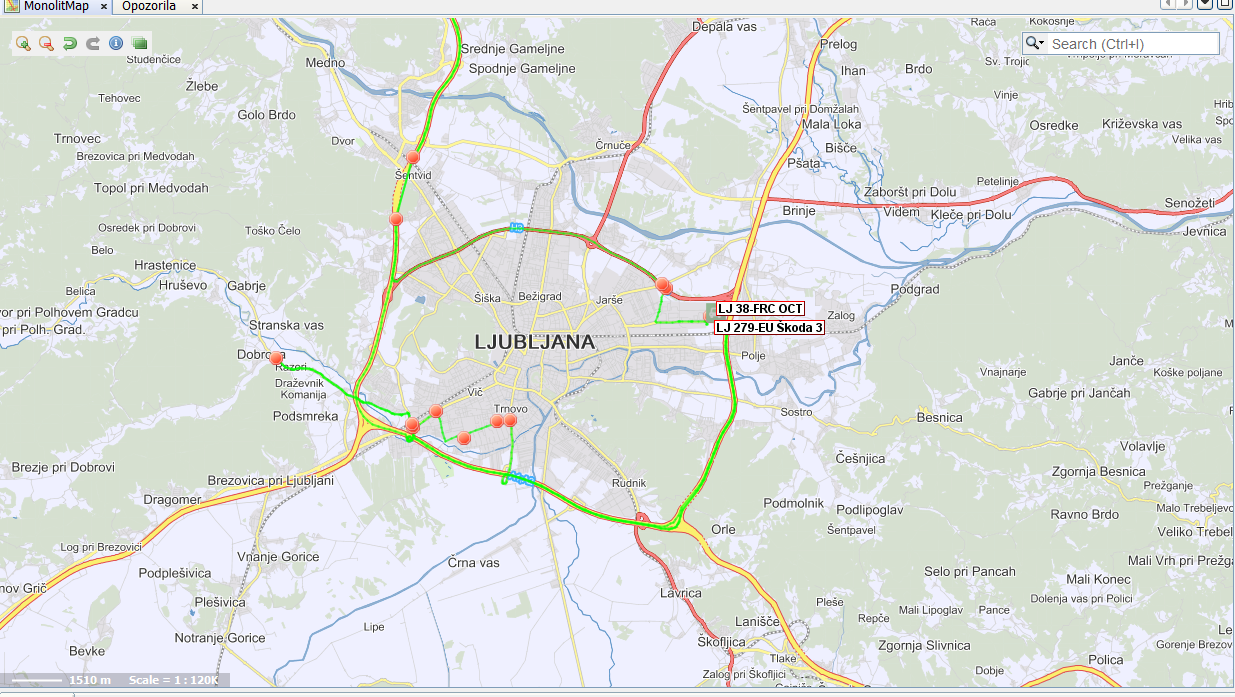
Initial track color on the map
The default color of the route history is green. The question now is how to change it? In window »Devices« click on the selected date to mark it.

Devices window
When the vehicle history is highlighted, choose window »Device/Properties/Color« and click on the box color under the property color, which opens the color pallete, there you can select the desired color and confirm the selection by clicking on »OK«.

Color pallet for choosing color
The color of the route now has changed and you can now analyze the completed routes from the graphical overview.
Map with different track color
Simple and practical, right?
Changing charts colours in GpsWin - September 2021
This month we would like to show you how you can change the color of the graphs located in the Analog, Speed, and Temperature windows.
For starters let us see how we even get to these windows?
If we click on the Window menu and hover over Charts an additional selection menu will pop-up. It is good to point out that the Speed window is visible to all customers, while the Temperature and Analog windows are only for those customers, who use our connection to digital temperature or analog sensors.
Changing colours on charts – step 1
Once we have a window open on which to view the graph, we can also change the color of the lines. We can find this in settings for GpsWin, which can be accessed by selecting Tools –> Options and Charts.
Changing colours on charts – step 2
Once the chart settings are open we can adjust the colors of the lines on the graphs to our liking.

Changing colours on charts – step 3
GpsWin access to older historical data - August 2021
In the previous tip, we talked about the new feature for viewing route history just for the current day.This time let us take a look at another feature in the route history segment.
We have noticed that client, when loading a route history, sometimes think they can review historical data only for the past four months.
This is not the case; the historical route data can always be reviewed for the past and current year. Usually sometime at the start of the year all the positions for all the data before the previous year is archived, which is then still available upon special request from the customer.
In the window for history data, clients often overlook the two calendars located in the lower left corner.

Load history calendar button
By clicking on the calendar located in the far-left corner, we can move back an additional four months one view at a time.

Load history calendar button continued
In the end it is possible to move back and forth for each 4 month period at a time, with the help of the two calendar buttons.
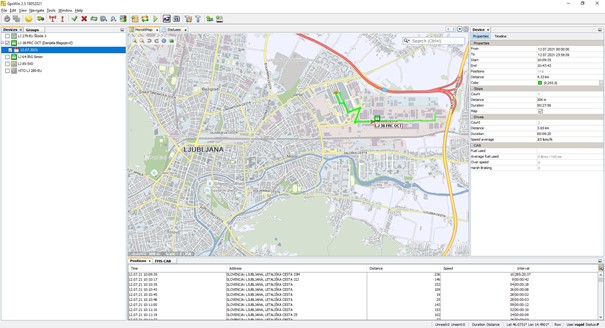
GpsWin history today - July 2021
We have recently implemented a new function in GpsWin, which we would like to introduce here. It is a shortcut for that makes loading the historical data for the current day much easier and quicker. The way to do it is to just right click on the device in question and click on History today.
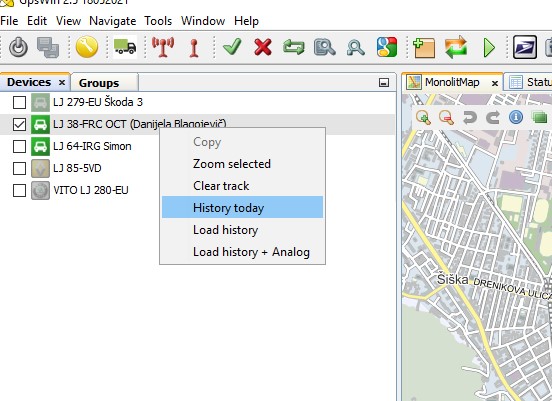
History today in the menu
By clicking on the newly added History today we removed the calendar step and the data for today is shown under the vehicle automatically.
History today
The new functionality is also available for vehicle groups.
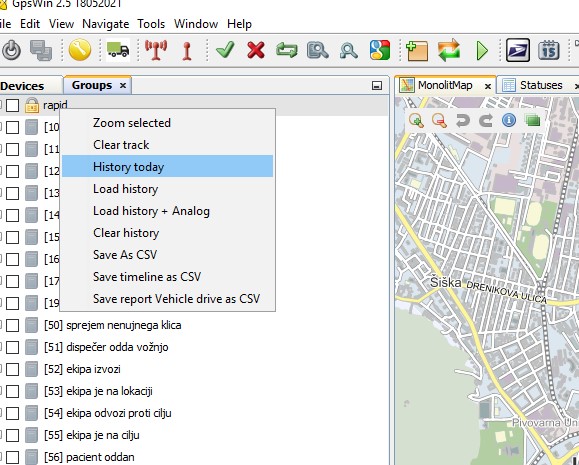
History today for vehicle groups
Smobile replaced by SmobileX - June 2021
Mobile application SMobile is being replaced with improved SmobileX
In the past few tips of the month, you could have noticed that with July first, we will be deprecating the mobile application Smobile. This means, it will be removed from the list of our supported apps as well as GooglePlay and AppStore. For those that are still using the application on your phone, it will work but there will be no more updates for it in the future.
We recommend that you replace Smobile by the newer application SmobileX. It has been in usage for nearly two years and has many improvements.
SmobileX is available for download on GooglePlay and AppStore. You can find it by typing smobilex in search and download it to your phone.
Some of the main advantages/improvements/new functionalities of SmobileX are:
- Monitoring all vehicles at once on the map
- Vehicle location on the map beside the information about his location
- Easier access about sensors data
- Improved data transparency about vehicles
- Ability to choose different maps
- Possibility to use traffic info
- User-friendly graphic display of eco2go data
And many more…check it out and download the application:
AppStore: SmobileX on the App Store (apple.com)
GooglePlay: SmobileX – Aplikacije v Googlu Play (google.com)
Adding a logo and electronic signature to Travel orders - April 2021
Travel order forms can be equipped with a company logo and an electronic signature of an authorized officer. When a company logo and signature are imported into the program, they are shown on every travel order created. It is possible to import and use either only the logo or only the signature.
Both the company logo and signature are shown on the first page of the travel order and order for business trip.
To import we select Tools/Options in the menu line. A new settings window opens and in the bottom half of the window we can import a logo and signature.
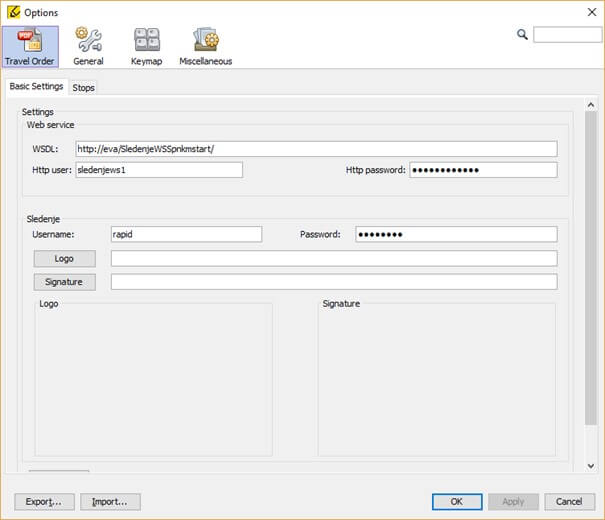
Travel order settings
By clicking on the logo button another window opens, which enables us to choose a picture file with the logo on the computer. File must be in jpeg or gif format.
Choosing a logo for travel order
By selecting Open, we confirm the file choice, which is then imported into the program. A preview is shown first and if it is ok, we finish the process by clicking Save.
Saving logo for travel order
If the import is successful, a notification pops up saying Import successful. The same procedure is used to import signature of an authorized officer.
When we open a travel order, the imported data is displayed.
Preview of travel order printout
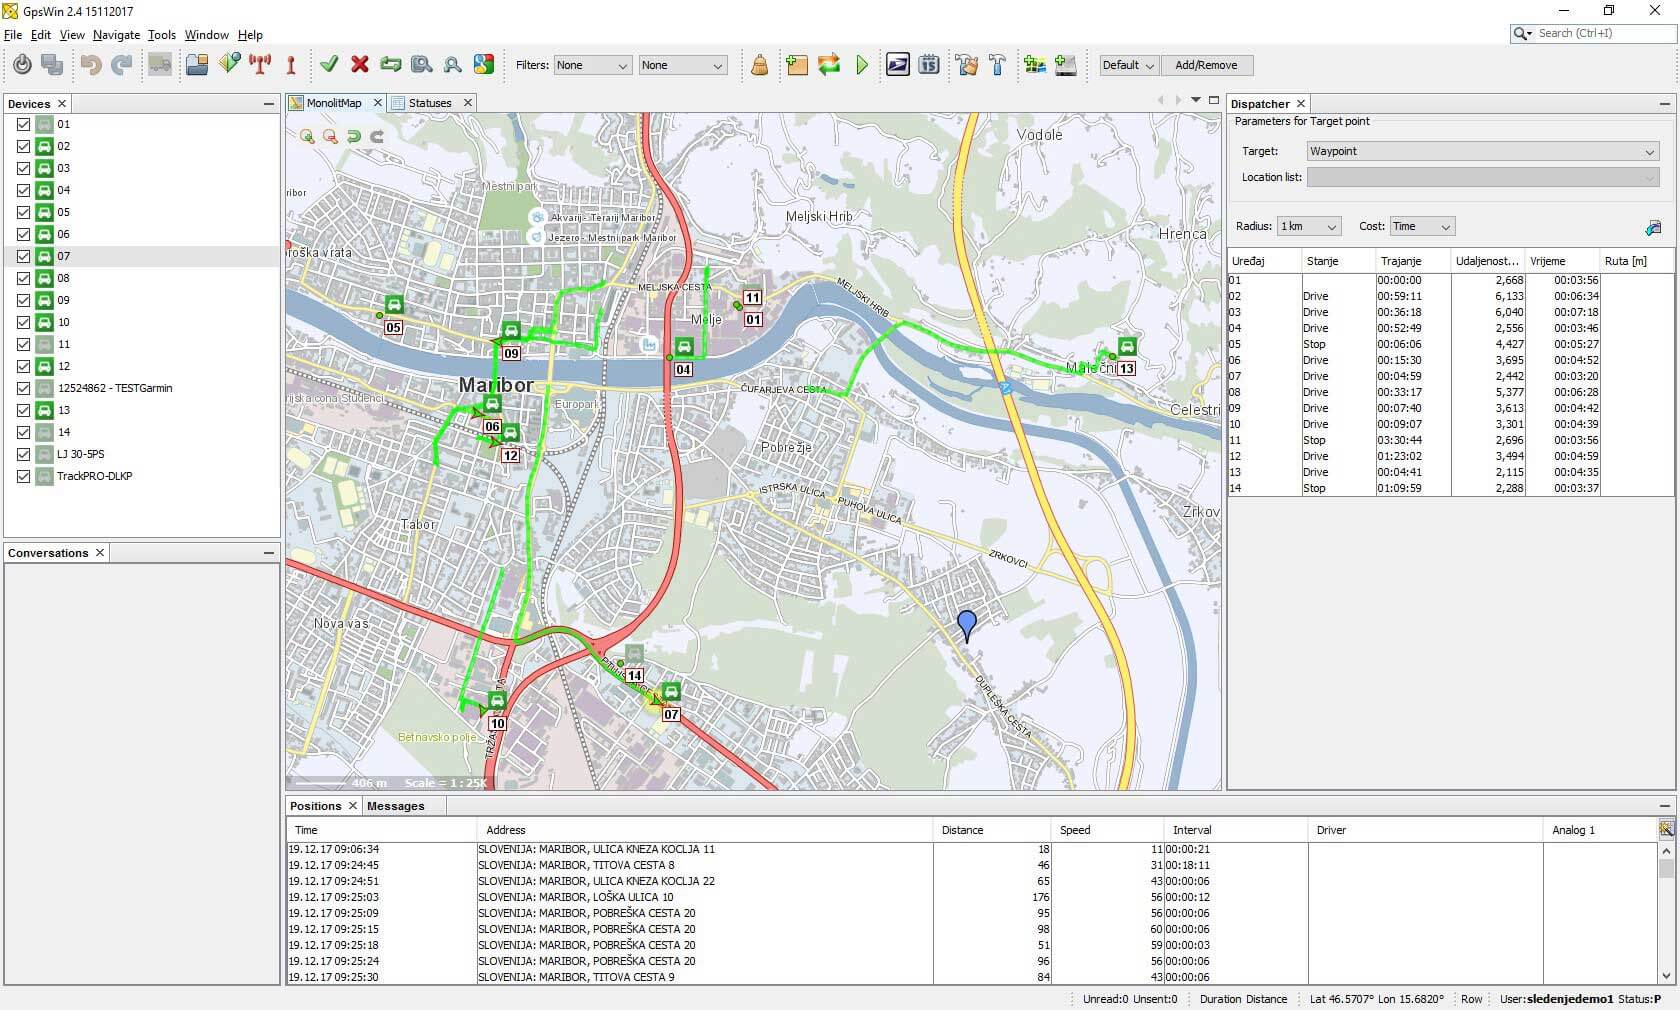
Location point in GpsWin - March 2021
Often times our clients call us with the question how to remove the blue “drop” that represents location point. There are two possibilities.
Location indicator
- Move the location point. This can be done by left-clicking the drop and dragging it somewhere out of our usual field of view, where we will no longer be bothered by it (eg the sea),
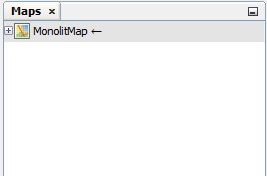
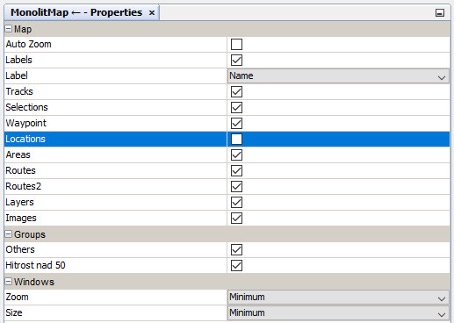
- Remove the location point. We can do this by firstly opening the two extra windows: Maps and Properties. We can find the first one under Window -> Spatial data -> Maps window. Properties can be accessed via Windows -> IDE Tools -> Properties.
Map settings for specific map type
We can then select MonolitMap in the Maps window and adjust the setting in the Properties window under line Location point by unchecking the box.
MonolitMap properties
We must make sure that MonolitMap is marked in the Maps window otherwise, the settings for this map will not be displayed in the Properties window.
GpsWin map activation - February 2021
When a new installation of GpsWin is made, the map is grey and has white circles on it. How to activate the map?
There are two possible ways:
- A click on the button Zoom visible devices that located in the button line on the toolbar.
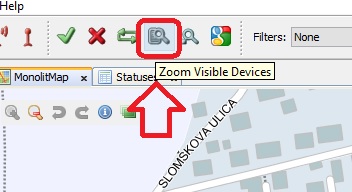
Map zoom to selected vehicles
- Double click on any of the vehicles in the Devices window. With a double click the vehicle selected is zoomed into the center of the map and the map is activated at the same time.
The map activation process is the same for all the different maps in the application (Monolitmap, VirtualEarth, OpenStreetMap,…).
FleetOpti - January 2021
In the first tip of the new year, we want to introduce you with a new product called FleetOpti, a web application that allows real-time daily planning where orders change daily.
Basically, the application is divided into three basic segments: customers, fleet and timetables or plans.
Below we have written down some of the main features of the application:
- manual order manipulation with advanced geocoding function,
- creating individual driving plans or simulating different situations and combinations of service sequences etc. It also allows exporting plans to a vehicle tracking application for analysis or sending individual routes to the driver directly in the field,
- importing customers/vehicles/plans with one click based on a standardized file in the currently most widely used exchange format (csv).
FleetOpti interface
P.S .: From 1.7.2021, Smobile mobile application will be deprecated and removed from Google Play as well as the App Store, therefor we ask all those who it to install the new app called SmobileX.
Tip of the month 2020
New Search and Event manager in GpsWin - December 2020
Last month GpsWin experienced two major updates of existing components. The first one is Search and the second one is Event manager.
SEARCH
The change you will notice first is the new location of the search window. It is now positioned in the upper right corner of the map view. Change is not limited only in the location but also in its functionalities. The search itself is much better and capable of finding results based on a variety of differ types of terms. You can search coordinates now. Additionally, we have combined al the search categories to make the experience more uniform.
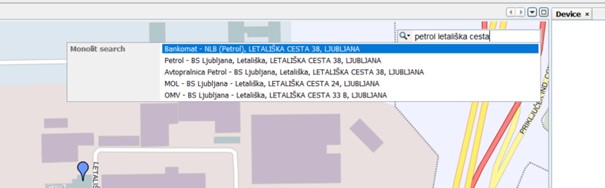
Search in GpsWin
By clicking in empty search recent searches are displayed.
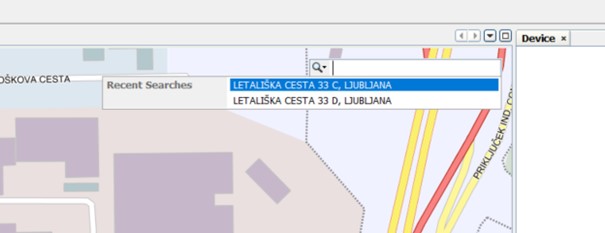
Recent search results
EVENT MANAGER
Creating events is now possible through step-by-step “wizard”. Direct access is available via Create event button in the toolbar.
Create event button
A new window opens where you create events/warnings/notifications you want in 4 steps.
- Step: Naming the event
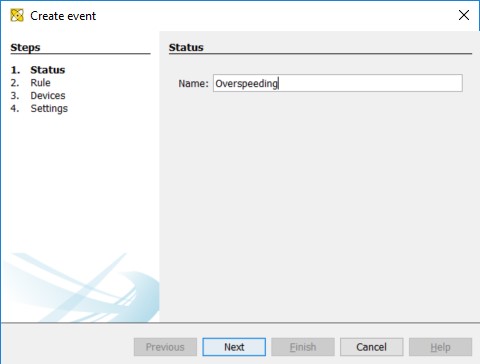
Event name
- Step: Choosing the type of event
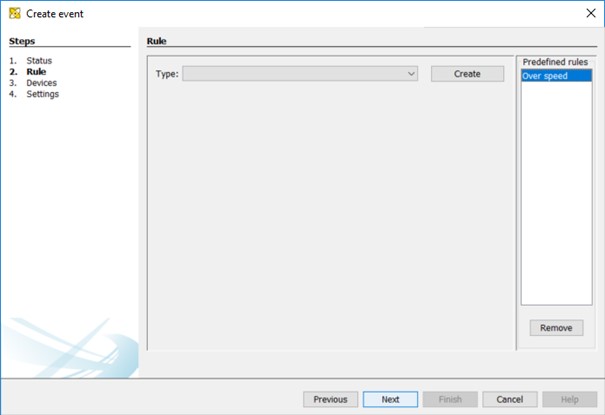
Type of event
- Step: Determining the vehicles

Devices for event
- Step: Event settings
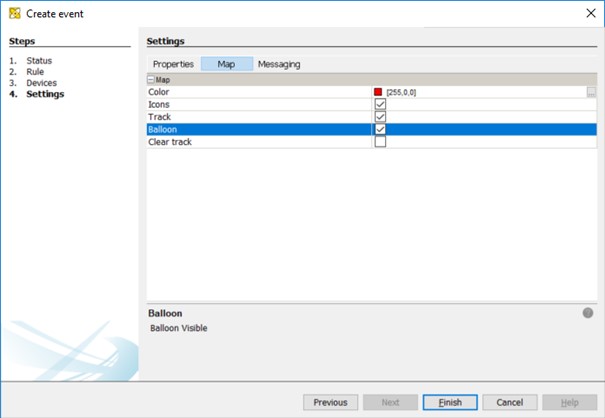
Event settings
Lastly please allow us to wish you happy holidays, Merry Christmas and a Happy New Year to all of you!
SmobileX and Eco2go - November 2020
We have added eco2go module to SmobileX mobile application, which can be accessed by clicking on  button.
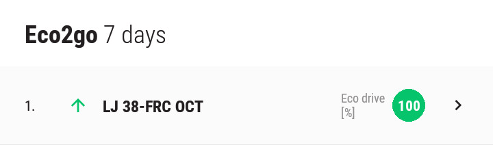
Eco2go list
If we click on a specific vehicle, we get information about how ecological and economical driving has been in the last seven days.
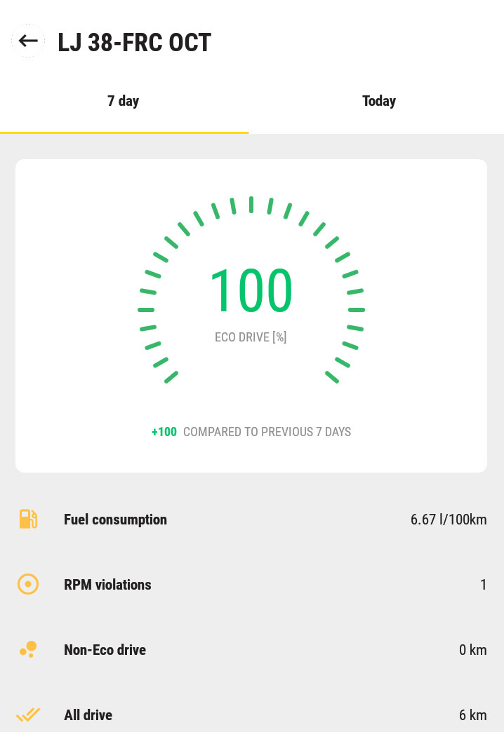
Eco2go details 7 days
By clicking on “Today”, we get information about ecological and economical driving for today.
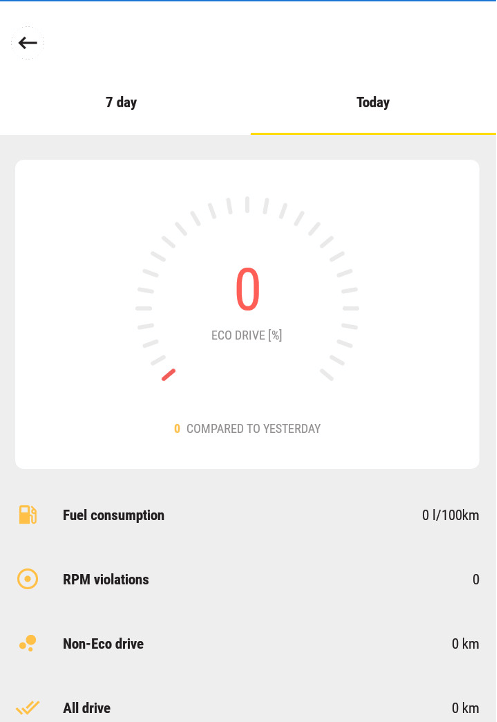
Eco2go details today
We would also like to inform you that with the last upgrade of SmobileX, we have eliminated an error that occurred if you switched the app to the background. Namely, then the application no longer worked if you switched it back.
P.S: Today we bring you another little hint related to the operation of magnetic ID keys. Namely, the ones who use it have probably already noticed that the magnet carries a certain spring inside. It is not good to press it too many times because it can get stuck and in this case, the driver identification is not recorded properly.
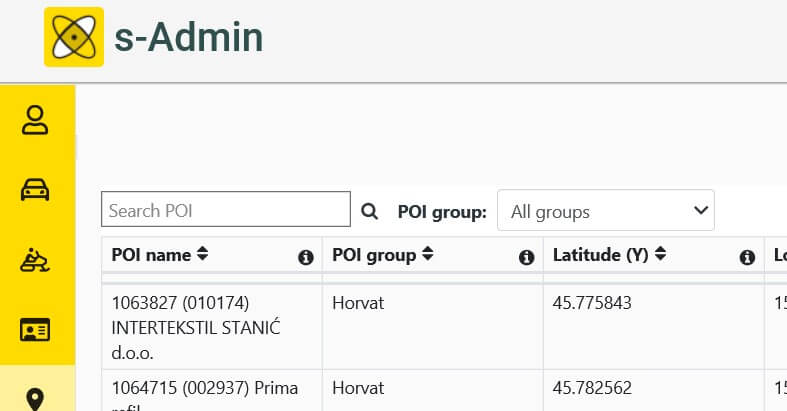
POI Management - October 2020
In s-Admin application we arranged a new tab where you can now edit your POI list (the list of regular locations/clients). Entry of the whole database is at the moment still possible only from our side but in the future, we will be adding the option here as well.
By editing your POI base you have the chance to change, delete and add POI points. When you enter in s-Admin, you will find POI management icon on the left side of the application.
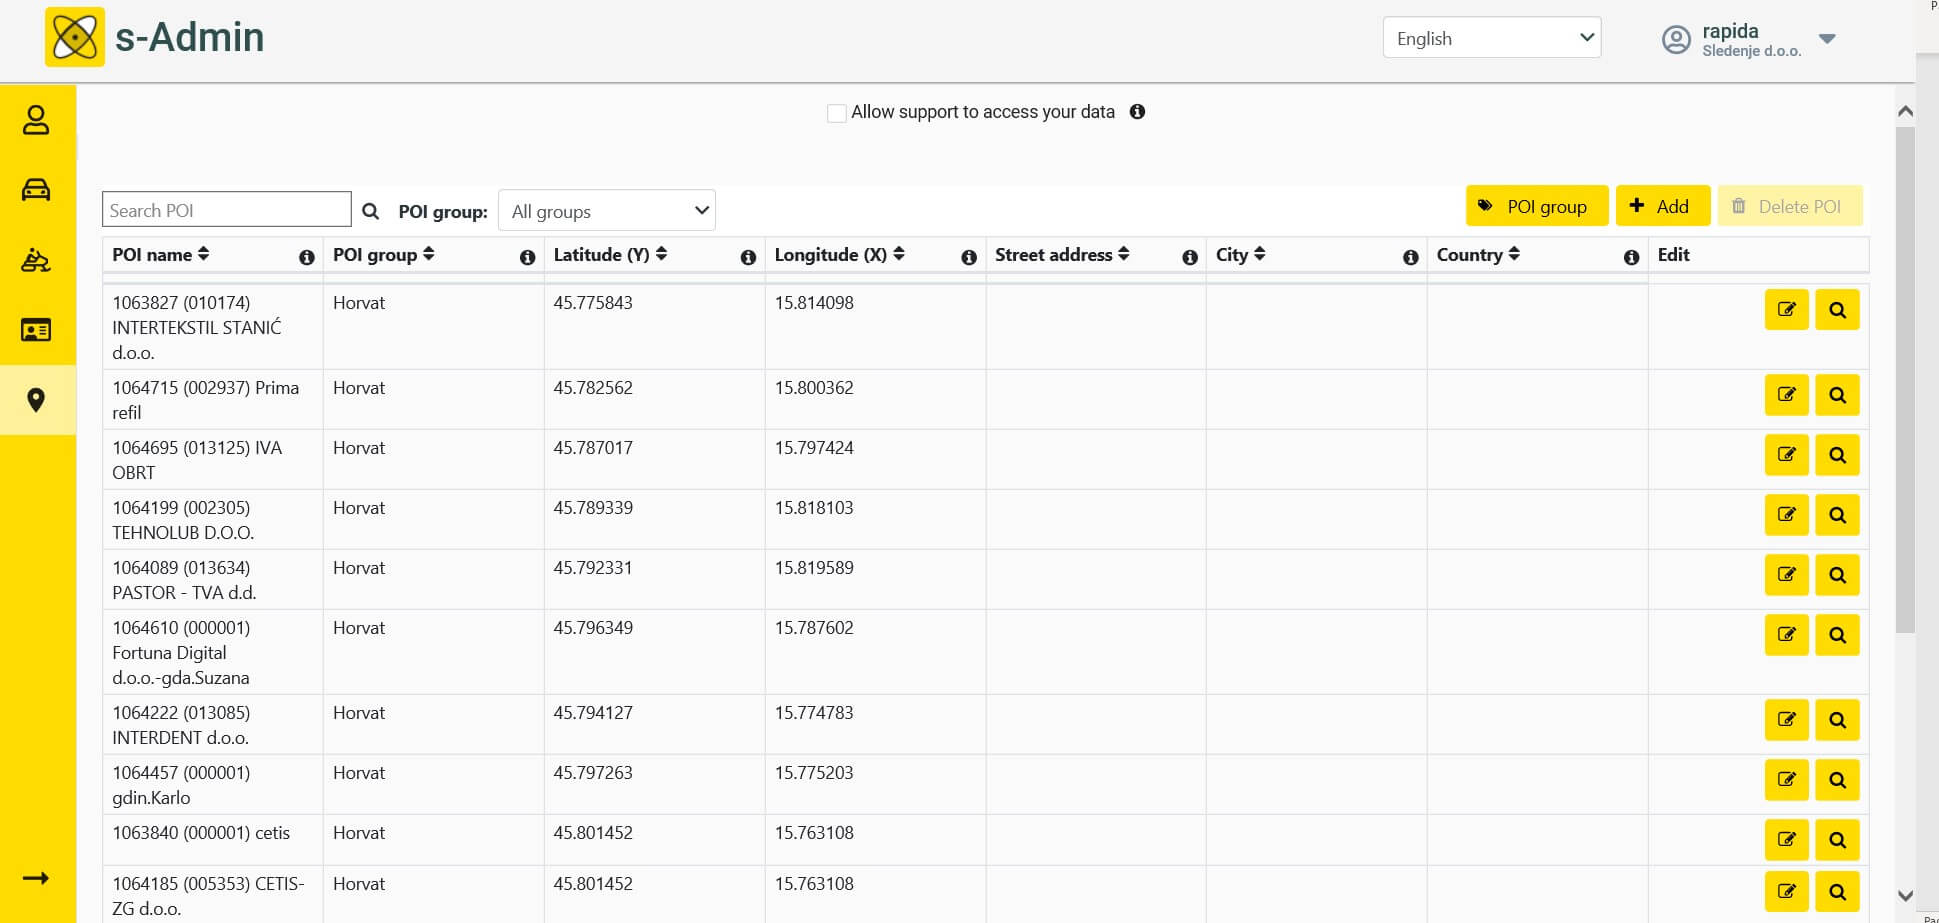
POI Management
After selecting one of the locations, option for editing becomes active. Beside the editing button there is also a button for showing the point on the map.

Selecting POI
By clicking on the edit button ![]() , we open a new window where you can change data for a certain POI point.
, we open a new window where you can change data for a certain POI point.
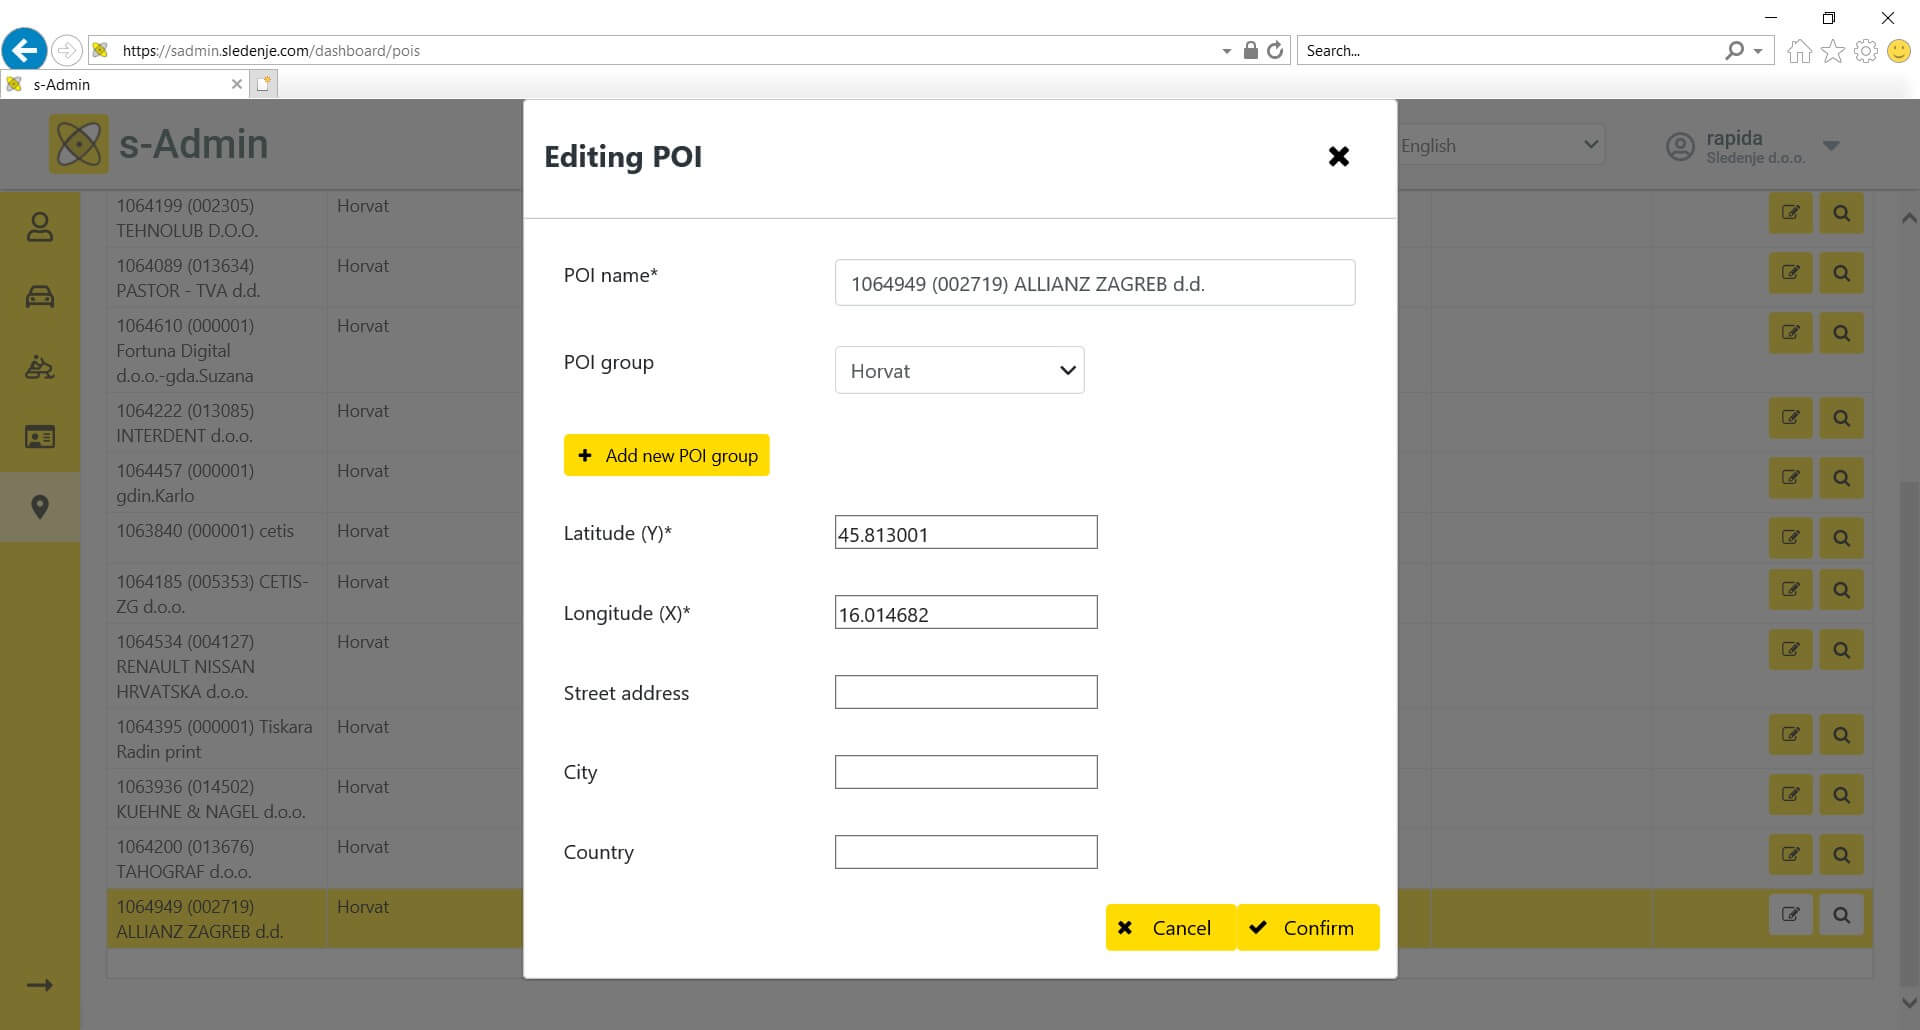
Window for editing POI
Beside the button for editing there is also the button for showing the location of the point on the map.
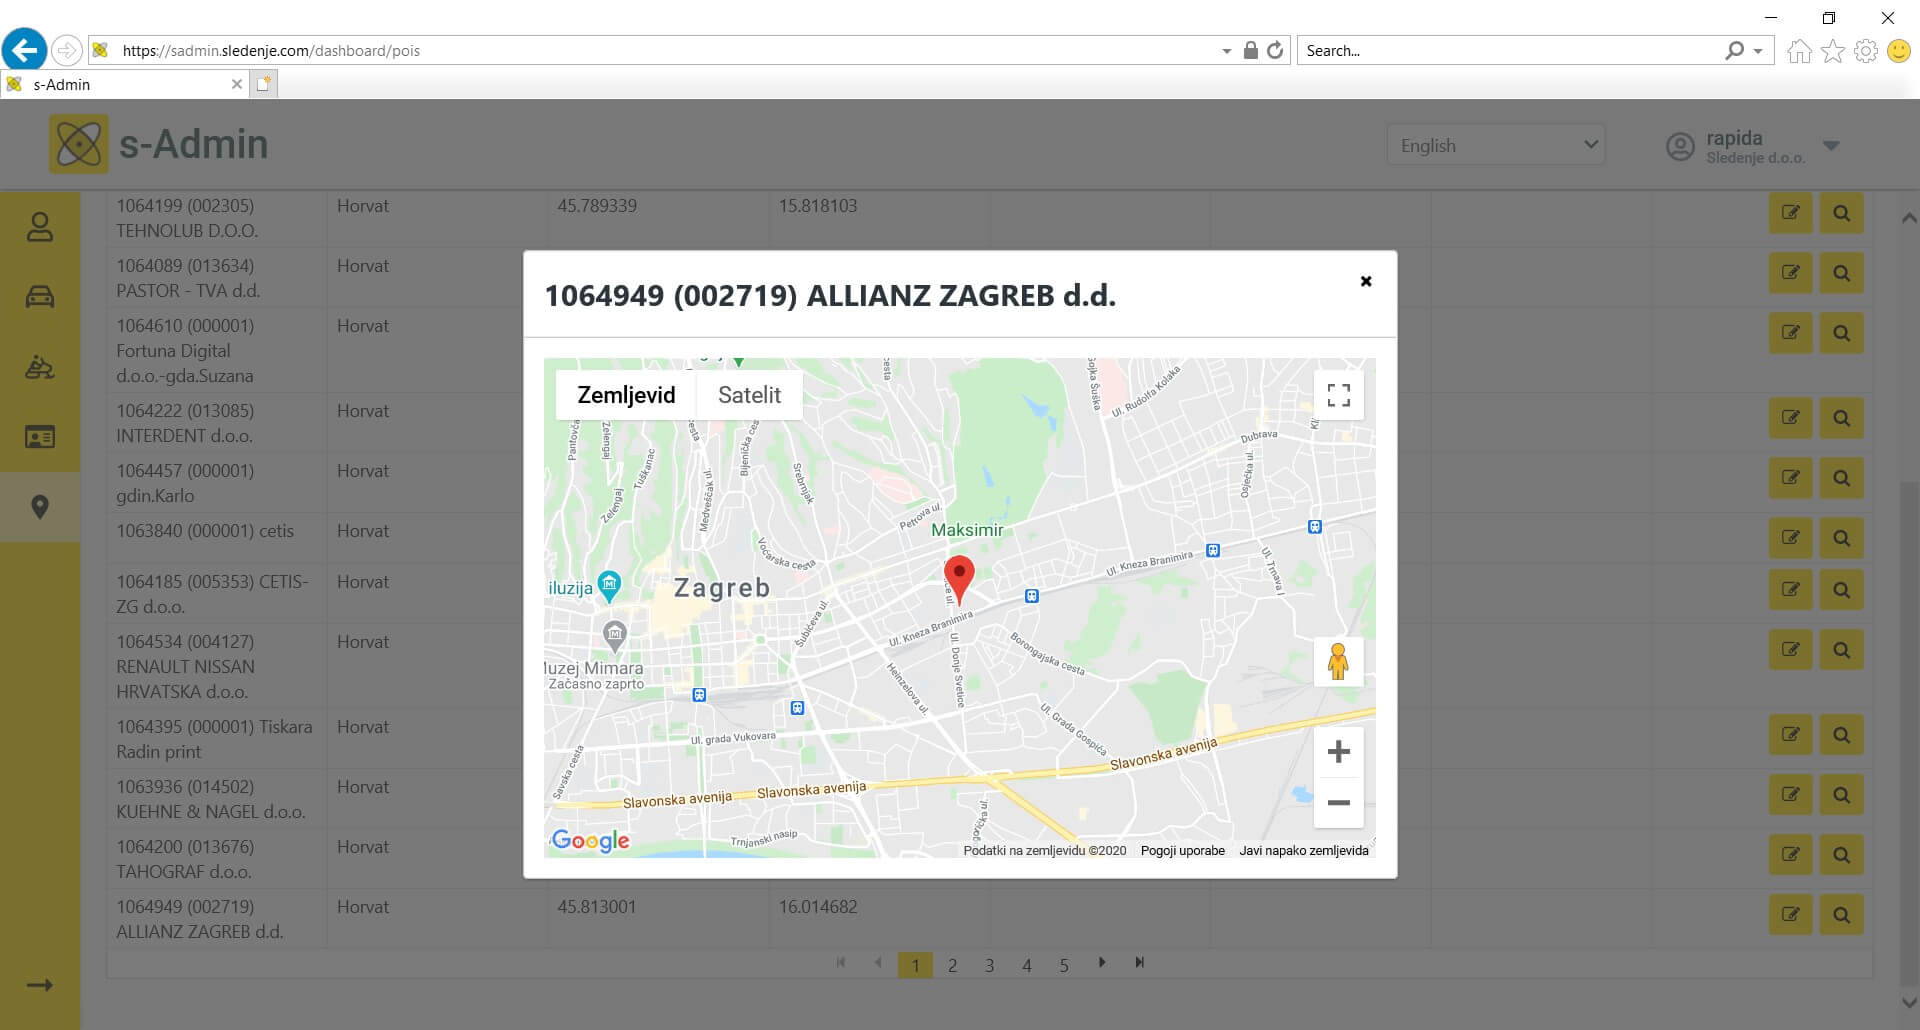
POI on map view
On the upper right side, you can find the buttons that enables you to delete/remove selected points.
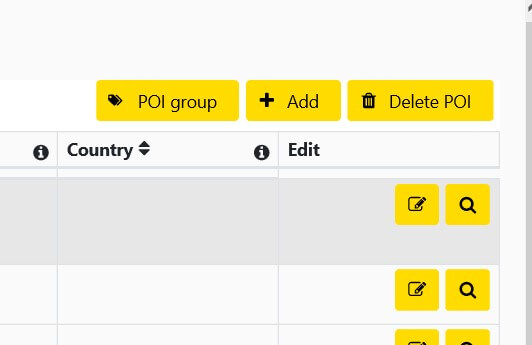
Button to delete POI
For adding a new point we pick button up right ![]() .
.
A new window opens where we insert all the data for a new point. Fields which are obligatory are marked with a sign*.
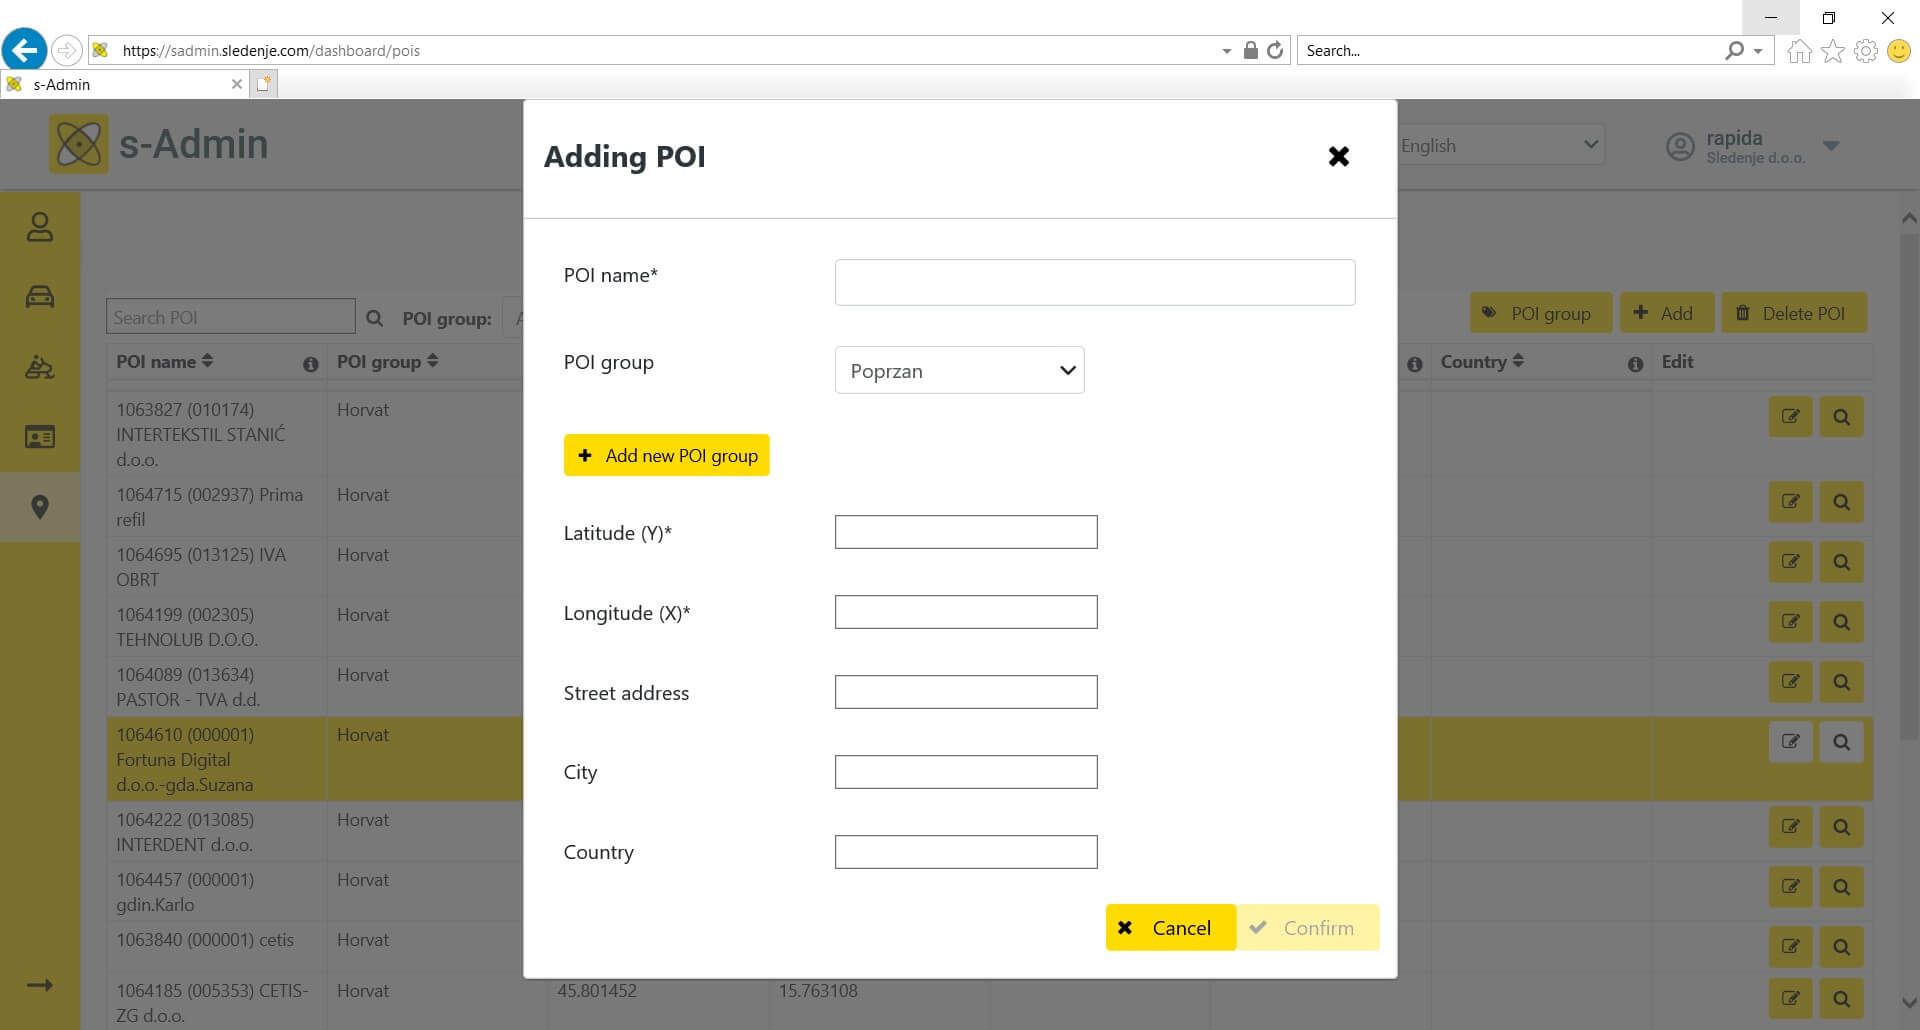
Window for adding POI
In the upper left there is also a search by POI points.
POI search
Travel order wizard - September 2020
This month, after quite a while, we will turn our attention to travel orders. We will show you the easiest and fastest way for you to create travel orders for your vehicles.
For this purpose, we will use the program wizard to add new travel orders.
First you need to click on the “add travel orders” icon ![]() . The wizard for adding travel orders will open.
. The wizard for adding travel orders will open.
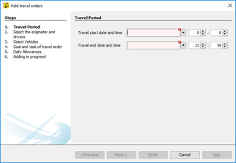
Add travel order wizard
In this window, we select the date and time of the start and end of the trip.
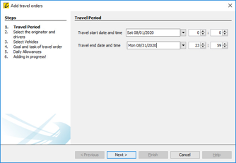
Selecting date and time for travel order
After clicking on the “Next” button, we move to the driver selection.
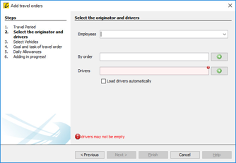
Driver selection for travel order
In this window we select the driver from the list located in the “Employees” line. In the “By order” box we must write down the person who issued the order. Afterwards, by clicking on “Get drivers automatically”, drivers are automatically retrieved. Of course, this is only possible if you also have driver identification included in the system.
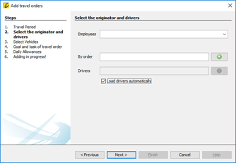
Automatic import of drivers
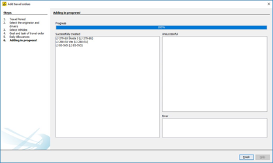
In this next step, the vehicle is selected.
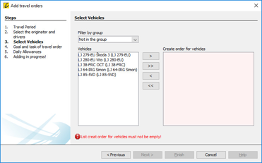
Vehicle selection
In this view, you can select one or more vehicles and move them to “Create order for vehicles”.
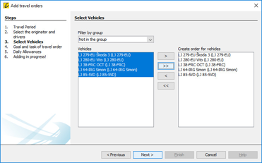
Vehicle selection 2
We then indicate the goal and task of the travel order.
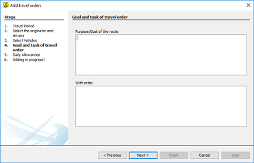
Goal and task of the travel order
If necessary, we can also charge Allowances.

Charging allowances
In the end, we just click on the “Install” button and travel orders are created.
Creating the final order
Digital temperature chart - August 2020
Graphical printout of digital temperature now has additional two new parameters. With these indicators the chart becomes even more transparent. It is now possible to determinate minimal and maximal limit of the temperature regime. The limits are seen on chart (max. threshold in red and min. threshold in yellow. If these are not specified, the report will be the same as it before. To enter the threshold temperatures, you have to uncheck NULL first, once the field is not grey anymore and you can enter the threshold values. Only whole numbers without decimals are allowed.
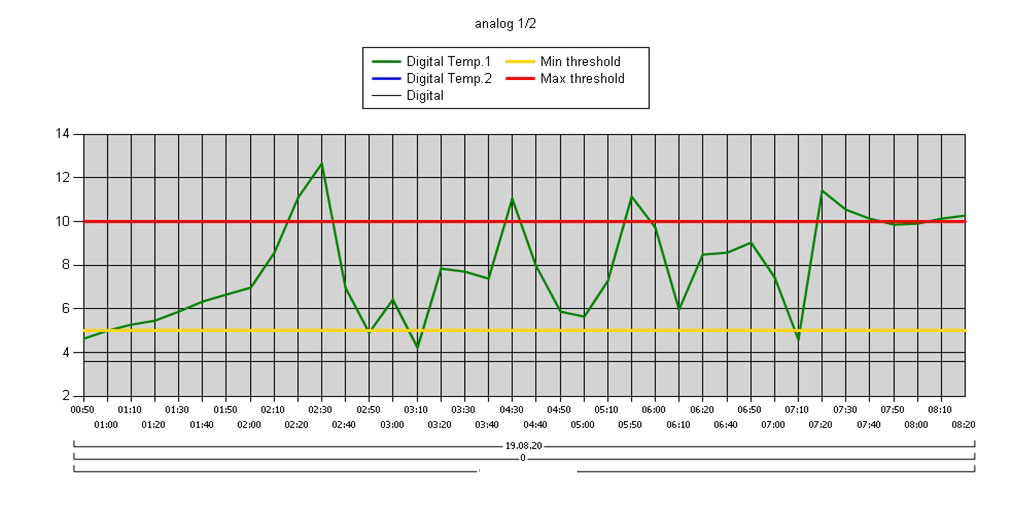
Digital temperature chart
Drivers list in GpsWin - July 2020
For all customers who are also using driver identification, it is good to know that you can already take a look at the list of your drivers in GpsWin application.
To retrieve the list, click on Window à Monitor and then select the Drivers window.
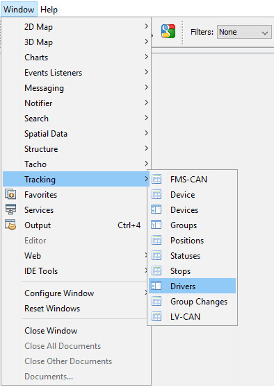
Access to drivers in GpsWin
Once you click on the Drivers window, a list of all entered drivers will open.
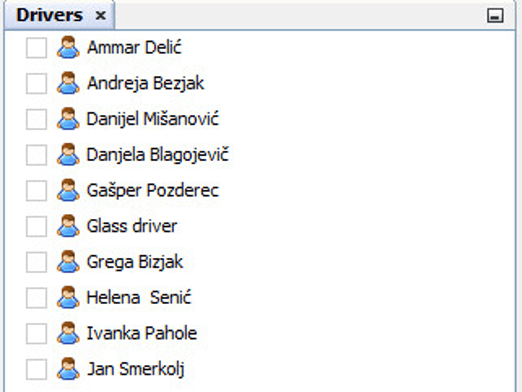
Driver window in GpsWin
Remember login credentials in GpsWin - June 2020
In this month’s tip we would like to point out a new feature in GpsWin, which allows you to store user login information upon Login into GpsWin. The automatic login is configured or added once we are in the GpsWin program. For those of you who might not know this yet, you can set it up by clicking on Tools> Options> GpsWin and then selecting the »Login« tab.
The new feature, as already mentioned, works so that you can save your username and password before entering the program, and you do not have to enter login credentials manually in the future.
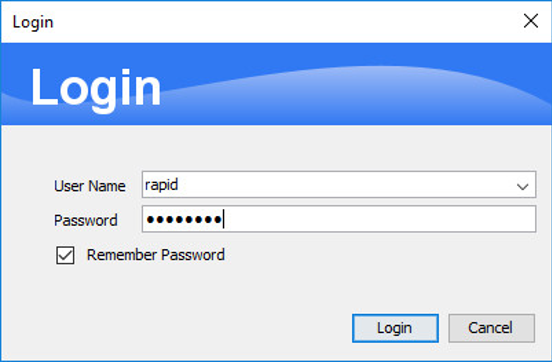
Remember login credentials in GpsWin
We should also mention that there is an additional possibility here to store multiple usernames and passwords at the same time.
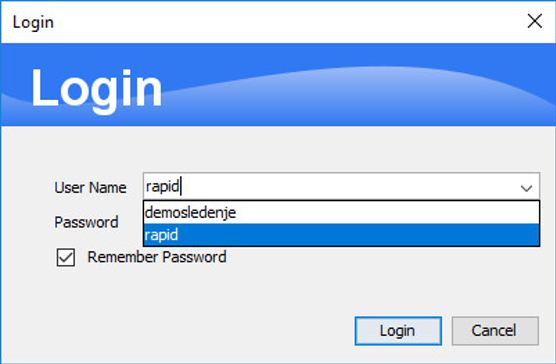
Stored login credentials for GpsWin
Choosing a language in GpsWin - May 2020
With the new update of the GpsWin app, we have introduced an option to change the language of the program user interface. Check for the update by selecting Help and click Check for updates. Once GpsWin is updated you will be able to choose the language in which you would like to use the application.
The language settings are accessible under Tools/Options/GpsWin/Language.
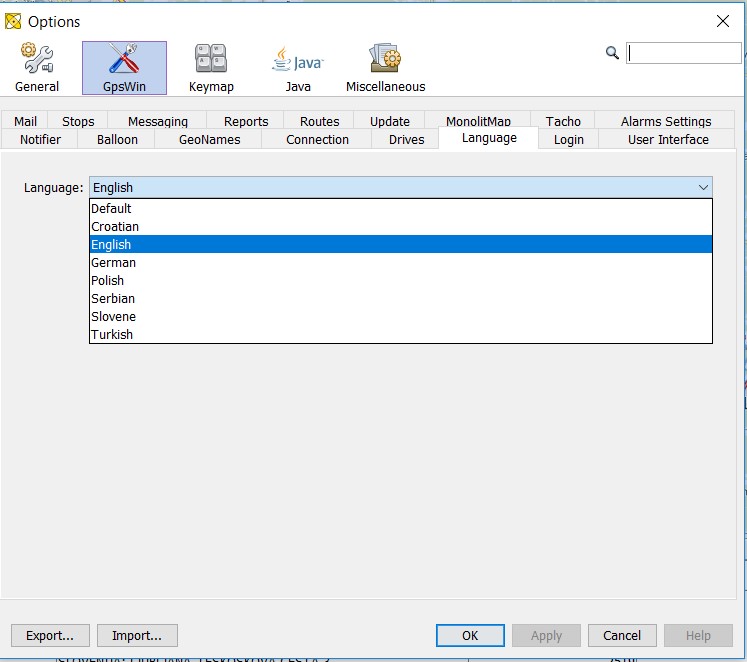
Choosing a language for GpsWin
Once you have selected the desired language you click the button OK. The language change will be applied once the application is restarted.
At the same time the GpsWin update came with a few system updates, that cause the columns in windows Statuses and Positions to reset. You can reconfigure the columns based on your needs by clicking on the row with column names within the Statuses or Positions windows, select the columns you want and click OK.
Vehicle reservation - April 2020
Vehicle reservation is a very important and lately more and more sought-after elements in the process of smart fleets operations. Recently, a new graphic outlook was developed for our vehicle reservation application and with it also more user-friendly functionalities.
It is accessible on our website at tab Customers: https://reserve.sledenje.com/login/en.
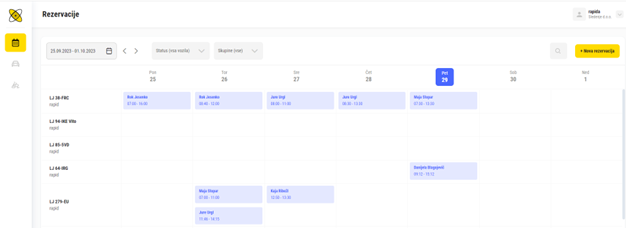
When we enter the application, there is a graphic overview of fleet occupancy.
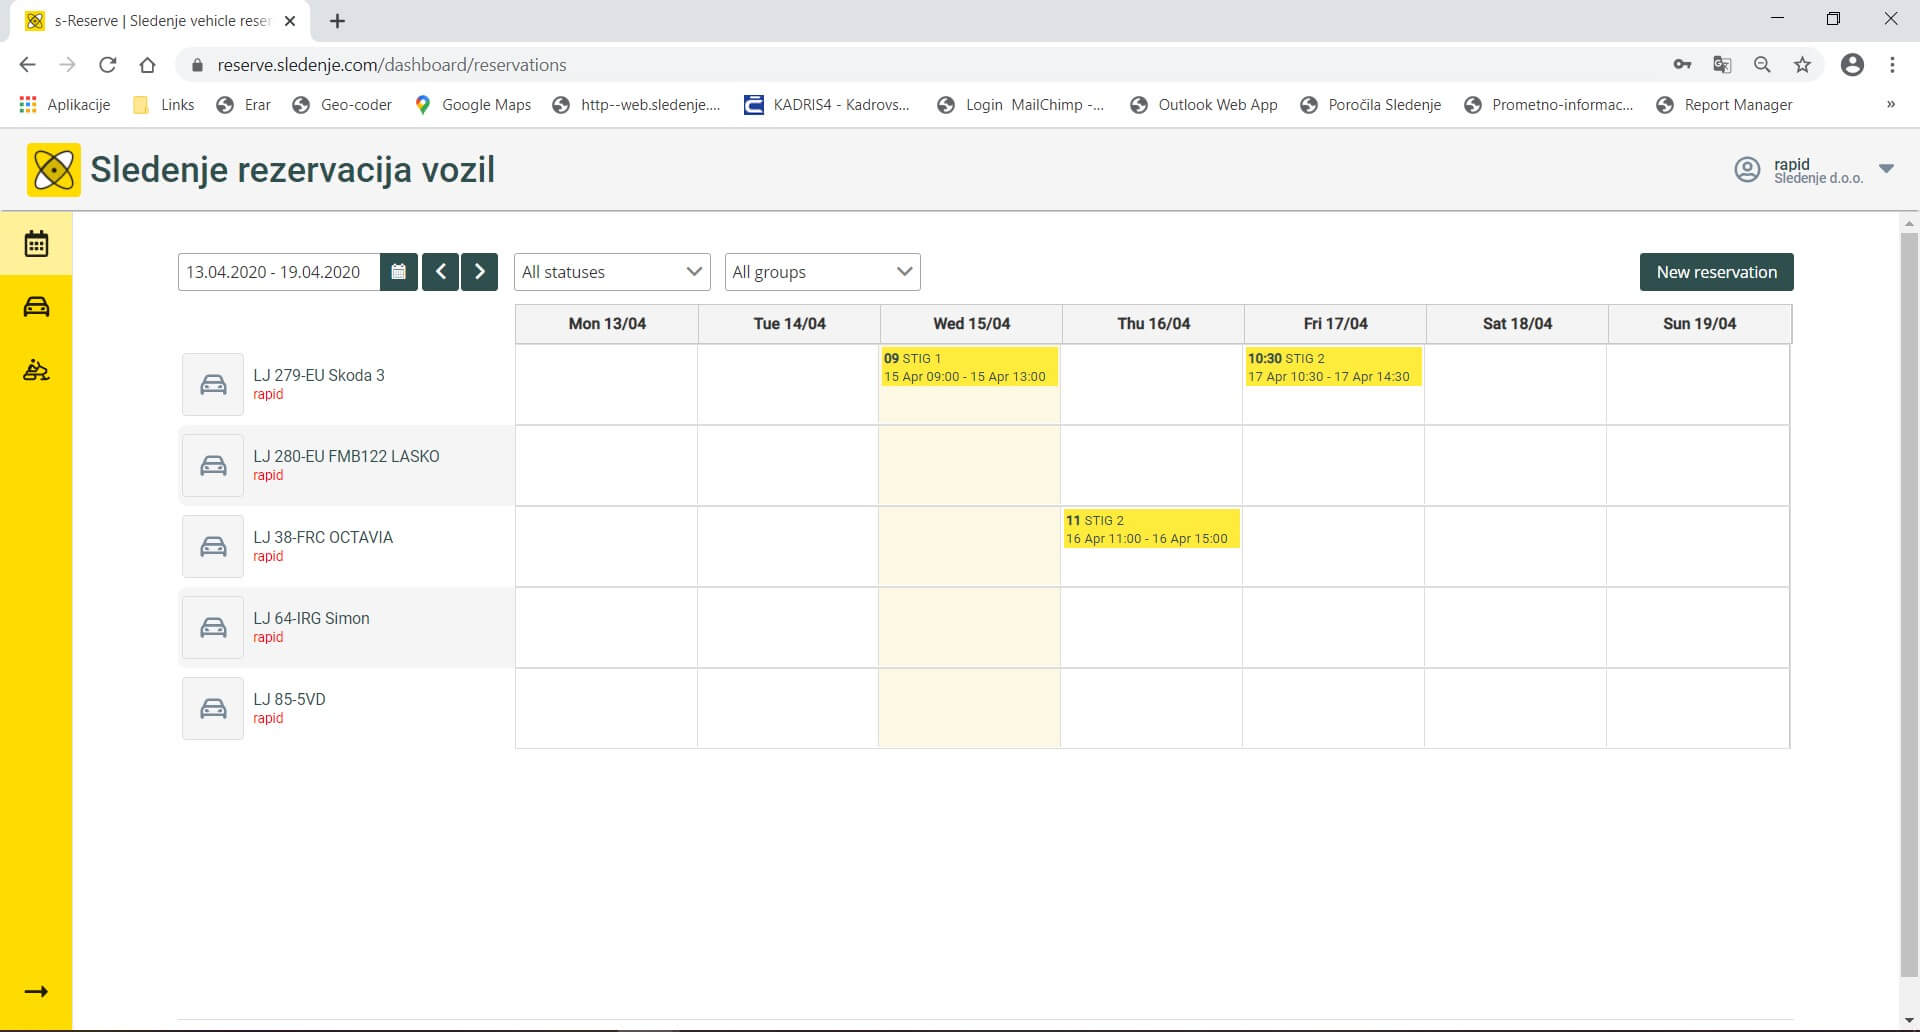
Vehicle reservation calendar
In this view we can move from week to week on the calendar and filter the view by vehicle occupancy (reserved/available) and by vehicle groups.
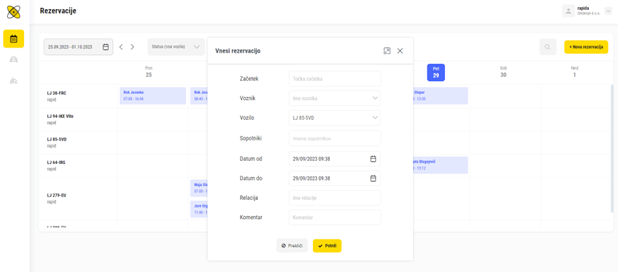
By clicking on the button New reservation window opens, where we can enter information about a new vehicle reservation.
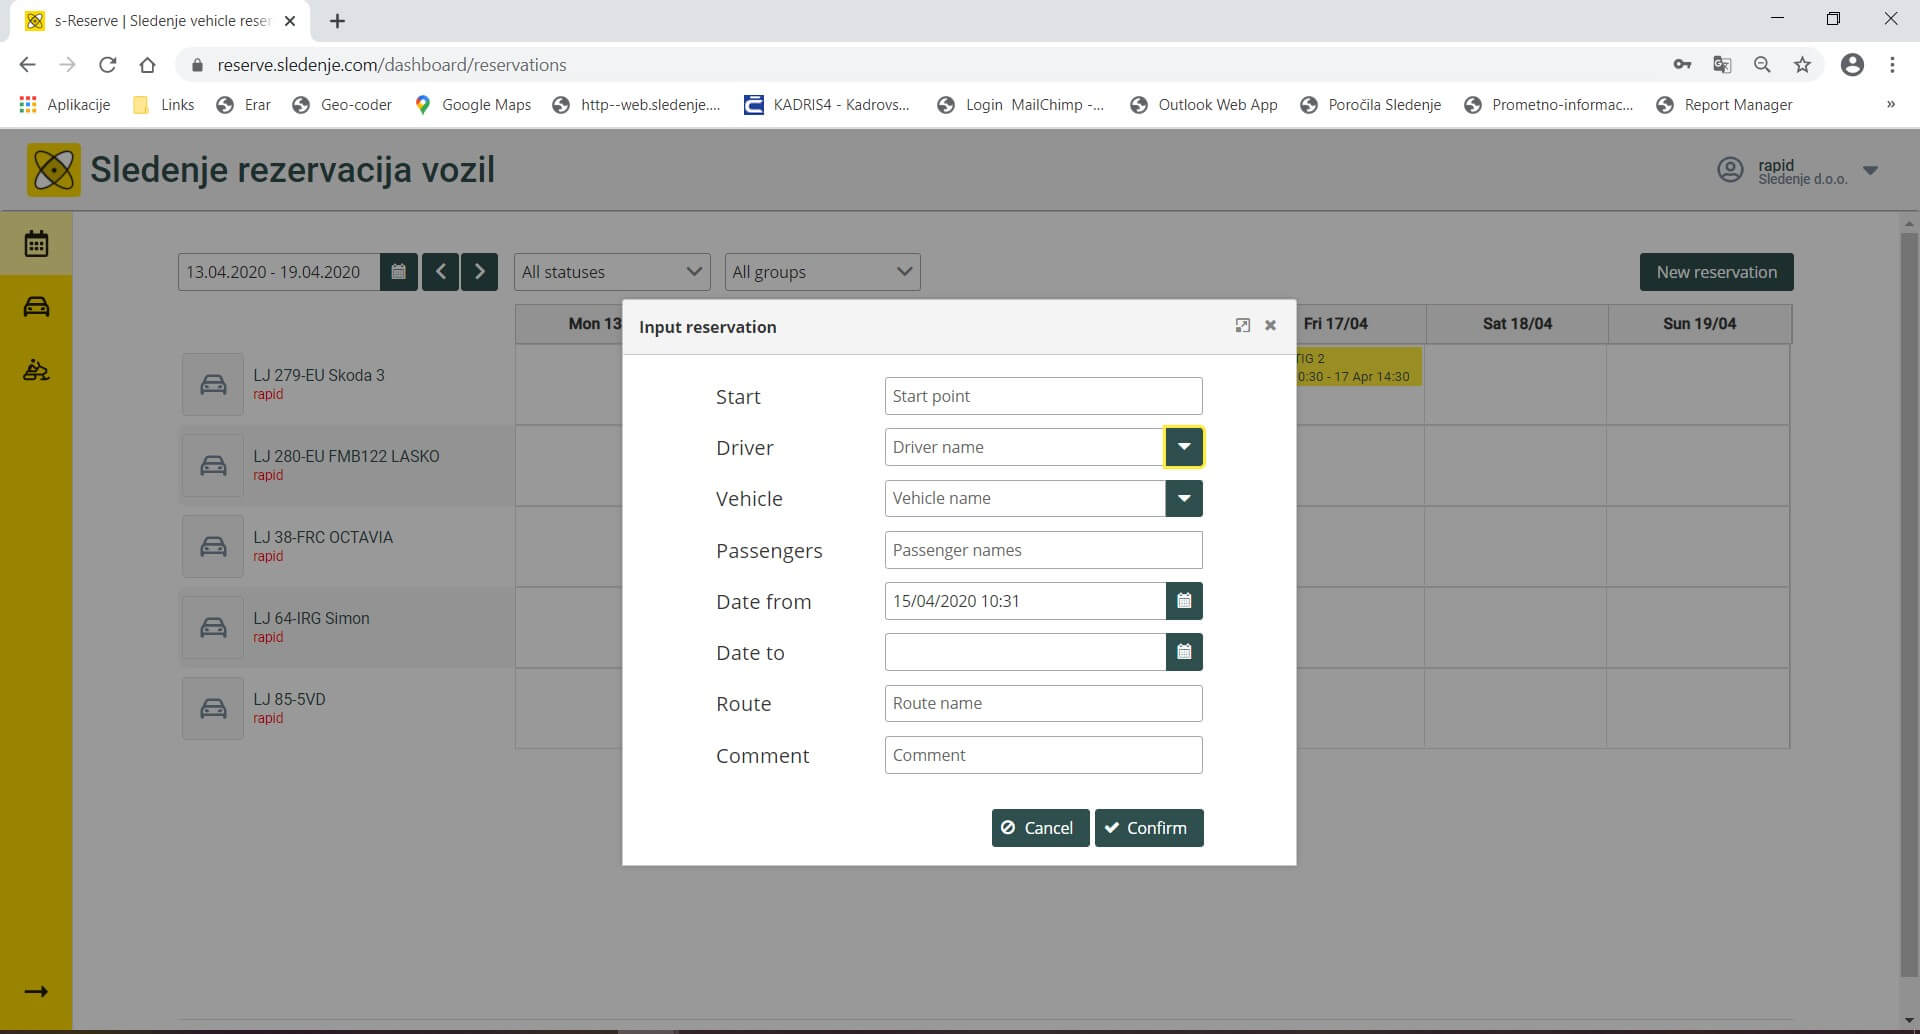
New vehicle reservation
In vehicle tab we get information about the number of reservations made this month compared to the number of reservations in the past month. Again, we can filter the table by vehicle status, group or vehicle type.
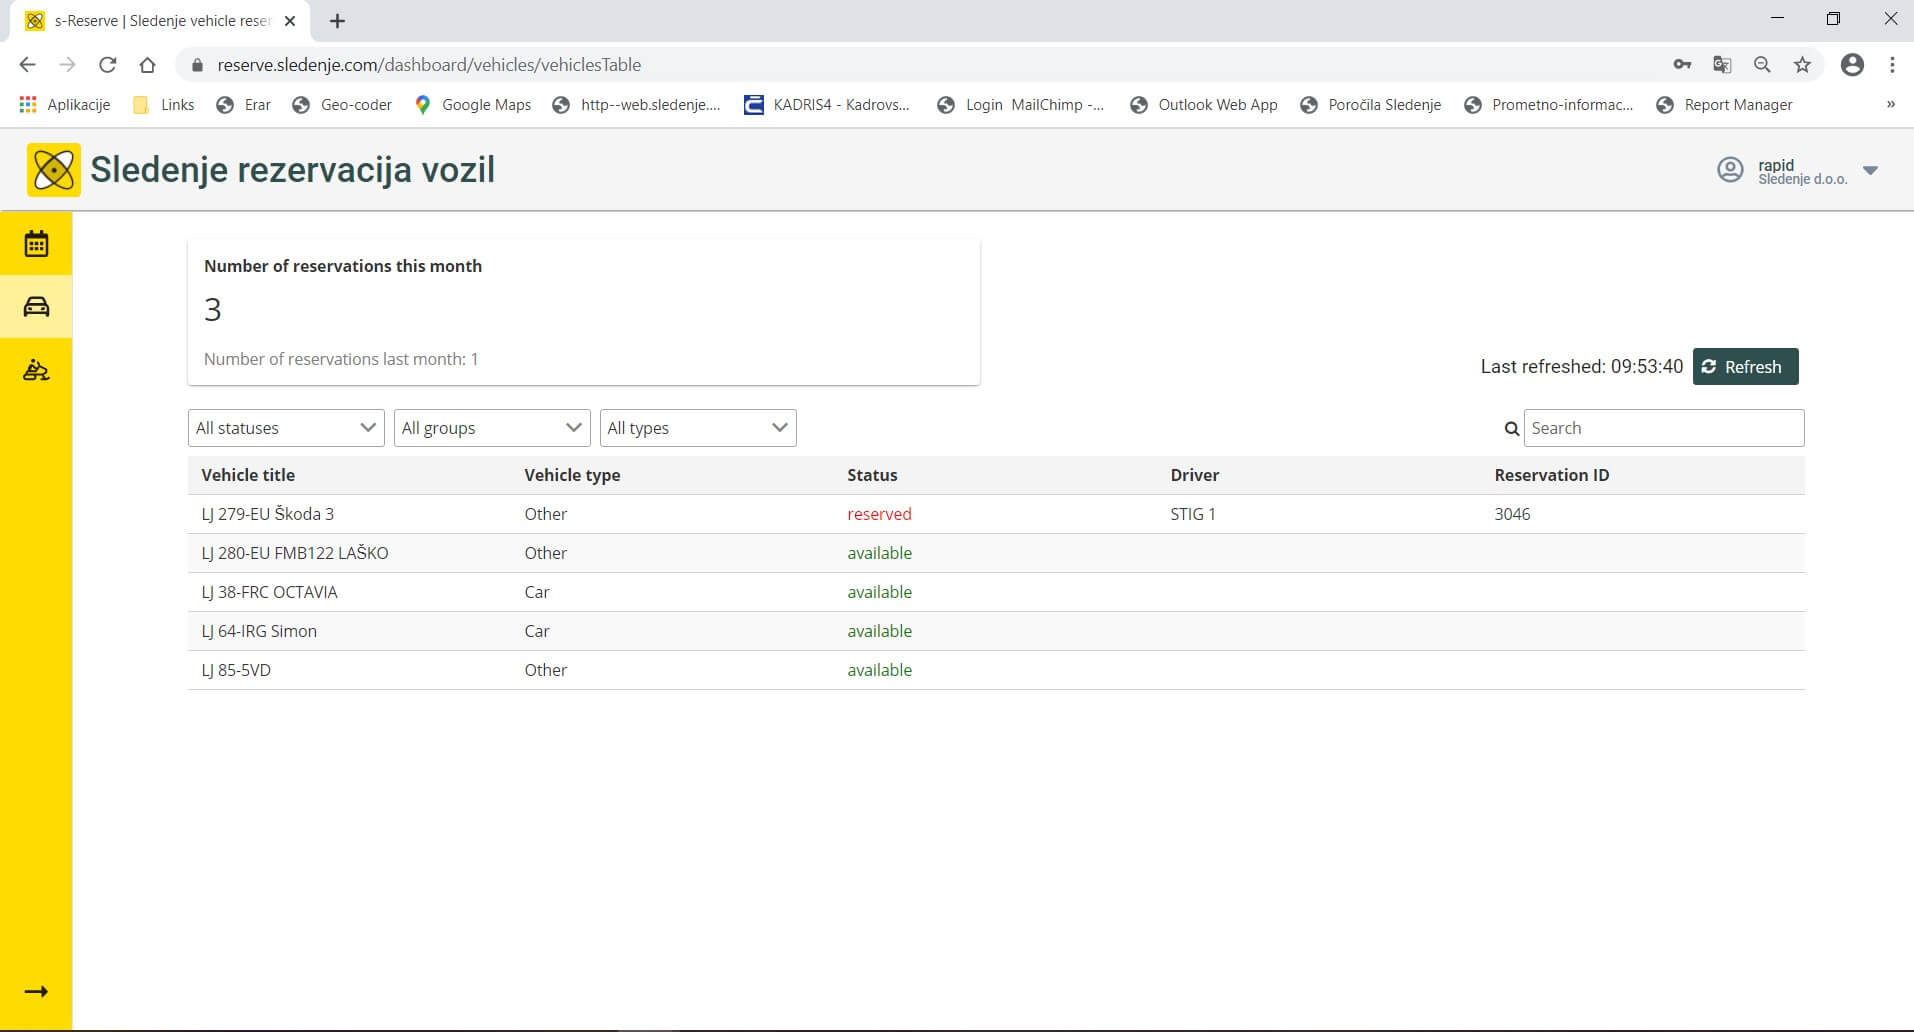
Vehicle reservations view
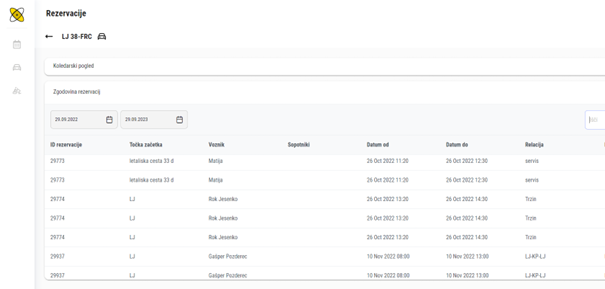
By clicking on a certain vehicle a calendar view just for that vehicle opens up and below it a table view of a history of reservations for that vehicle.
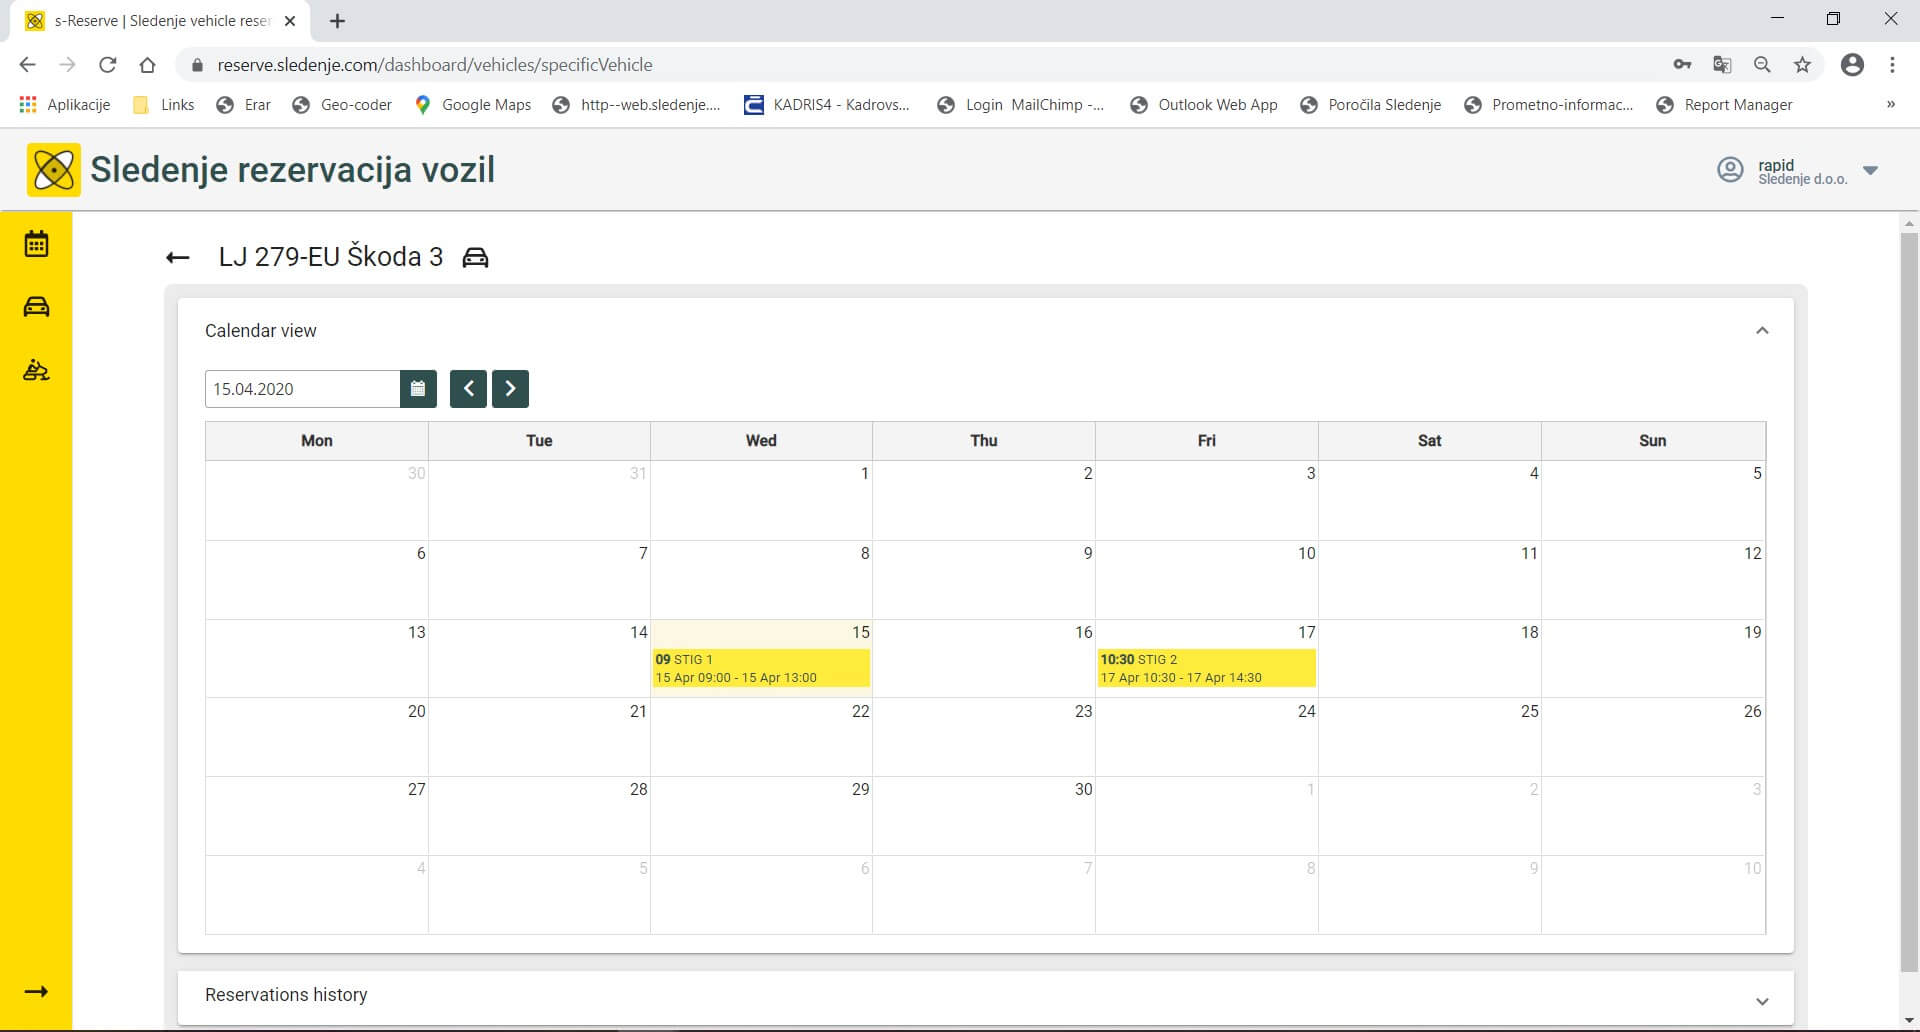
Vehicle reservation calendar per vehicle
In the third tab we can monitor reservation made per driver and driver availability. From the list of the drivers we can choose a certain driver to see their reservation calendar and reservation history.
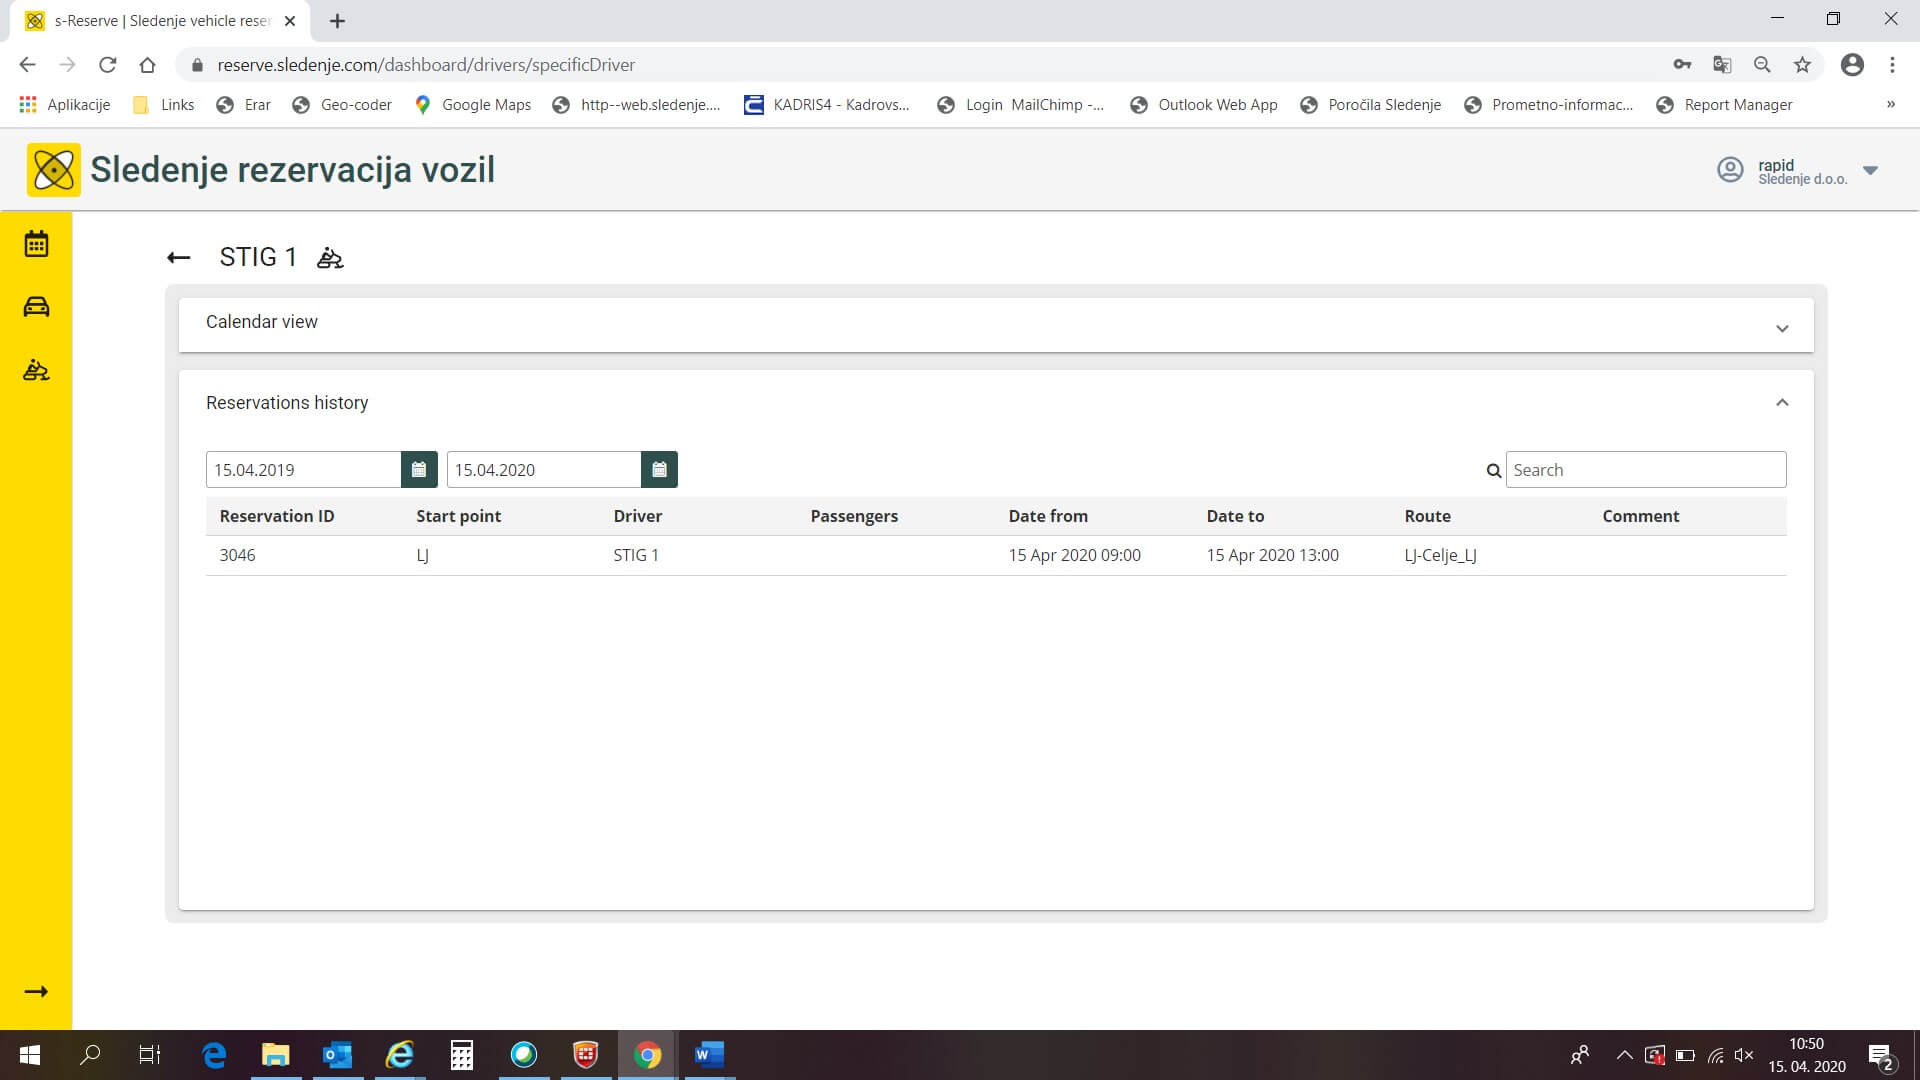
Vehicle reservation history per driver
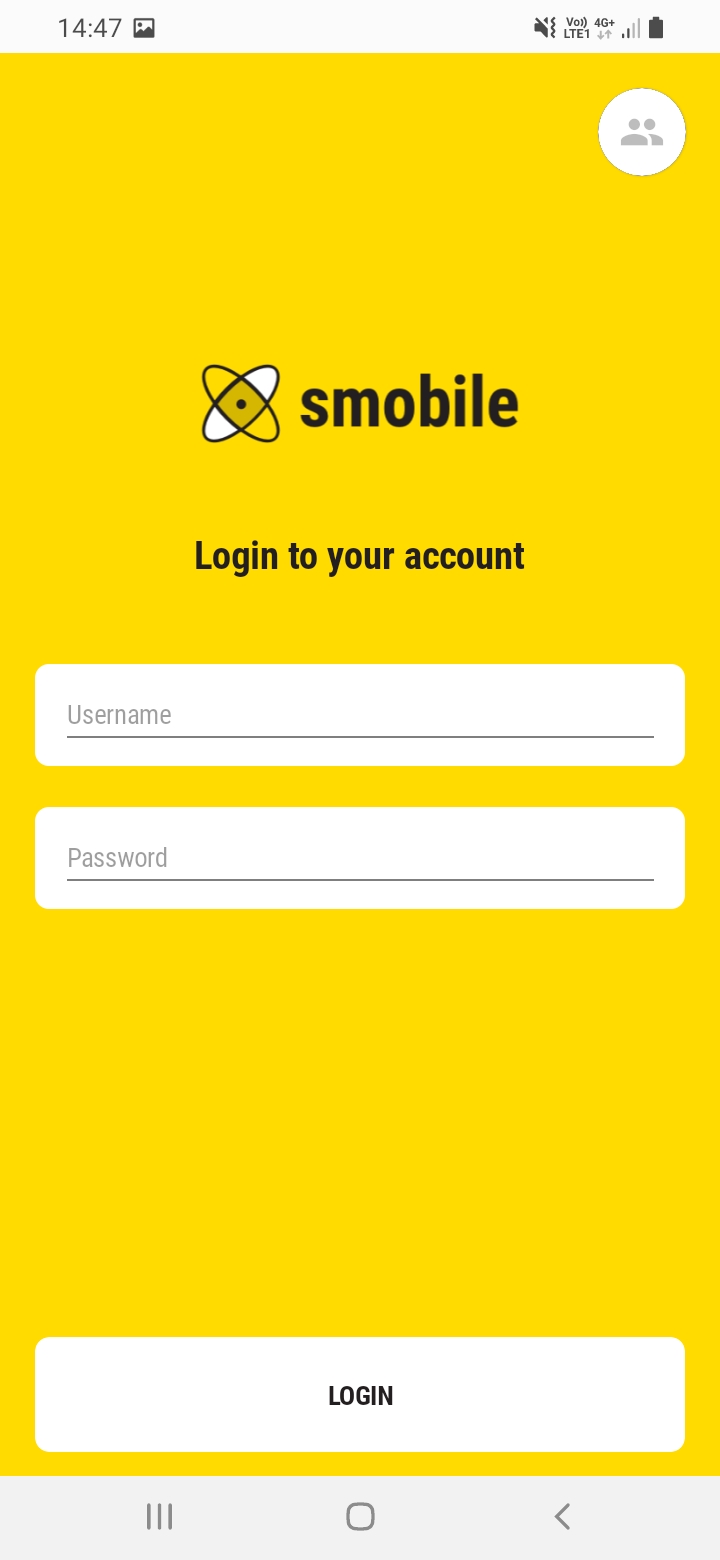
SmobileX mobile application - March 2020
A new mobile application SmobileX has been available since the beginning of this year. It is accessible on GooglePlay for android, as well on the AppStore for iOS. You can find both by entering “SmobileX” into each respective search. Application is different from the previous one Smobile in content, functionalities and visual outlook.
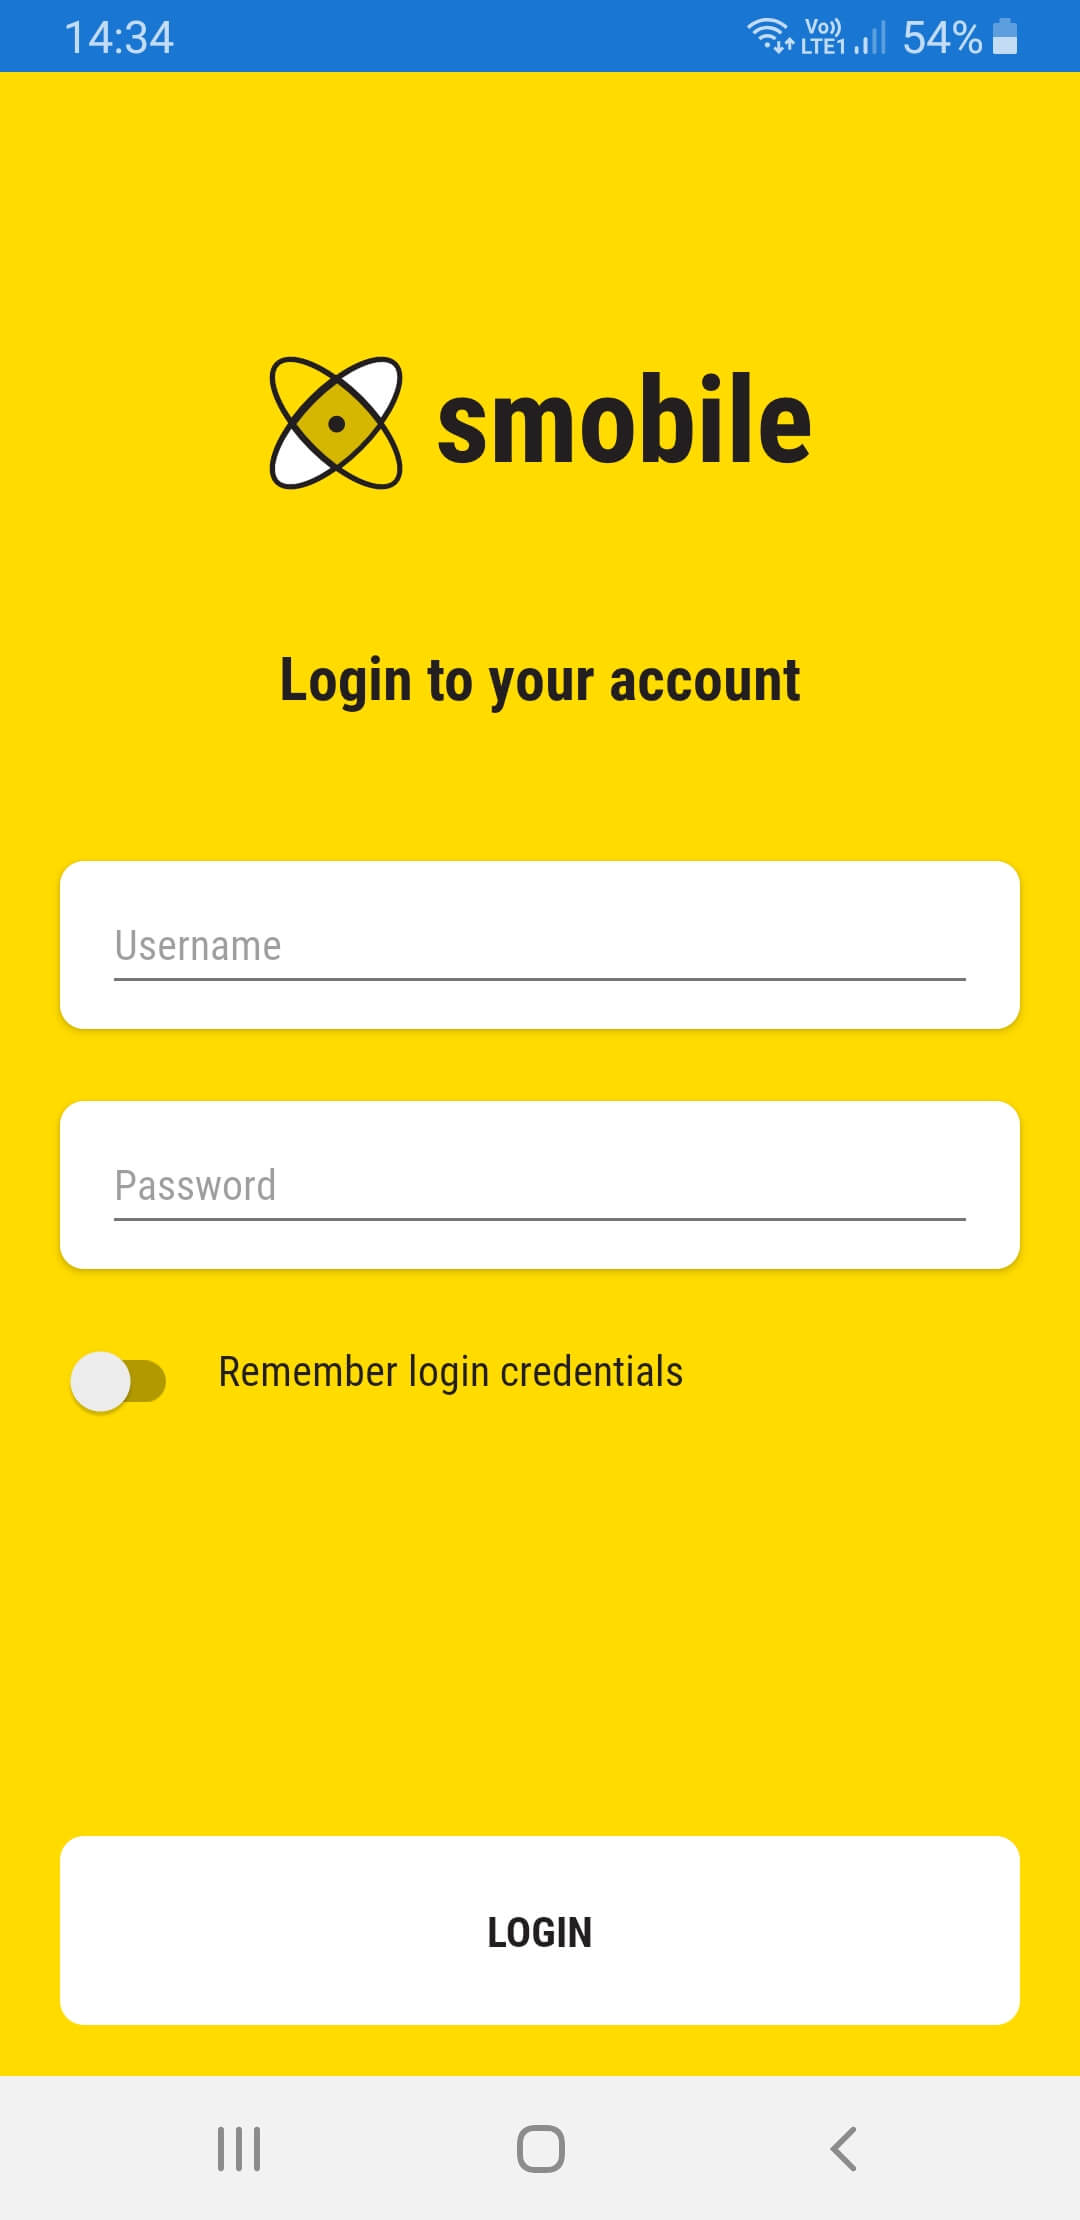
SmobileX login
SmobileX takes the default language settings set on your phone. On the login screen you have the option to automatically save your login data.
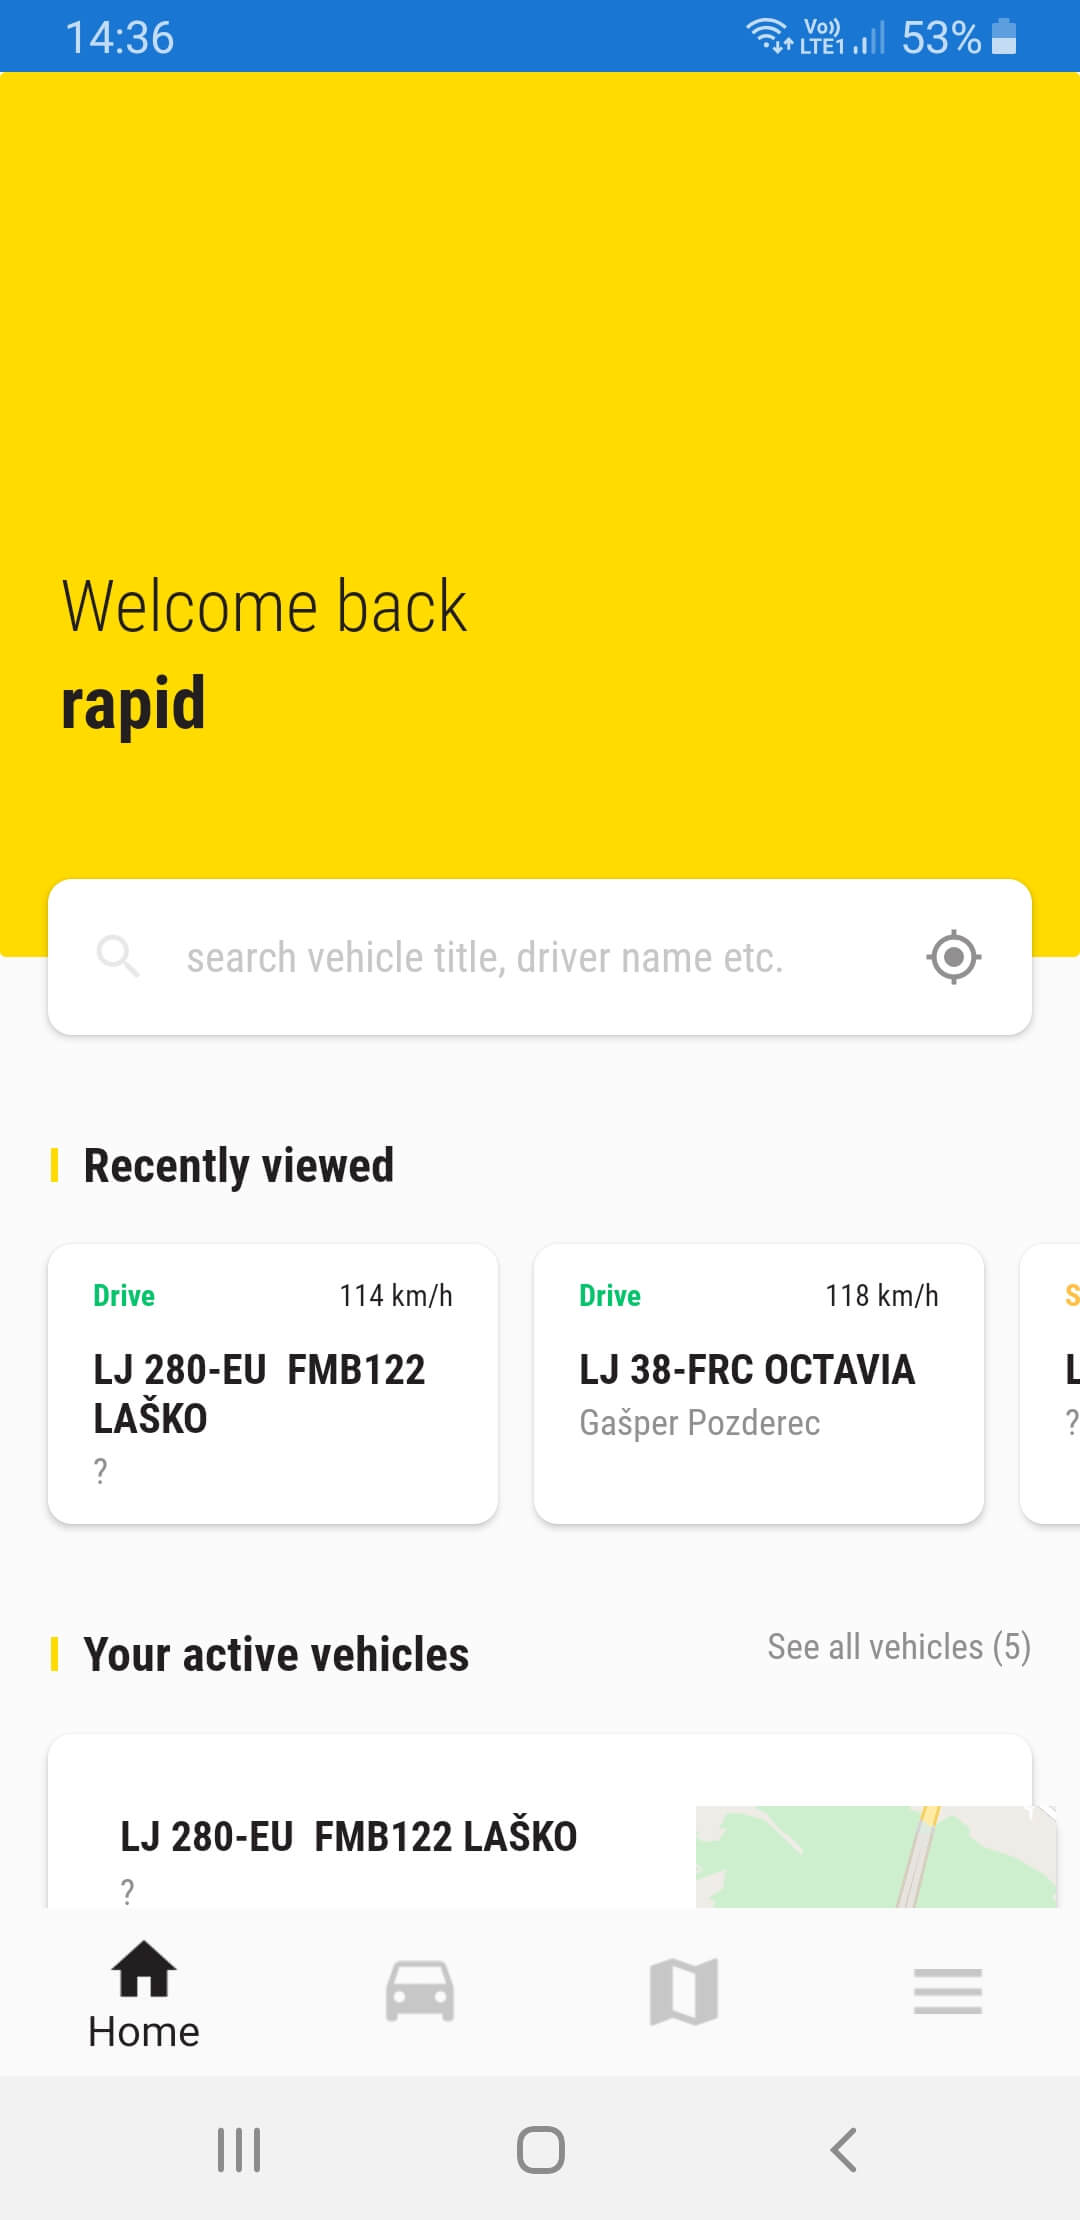
The application consists of three basic tabs: Home, Vehicles and Map.
1 Tab: Home
This view displays data about the vehicles most recently viewed by the user so they can be easily reviewed in the future. Every vehicle card has a map, first position and last position of the day information, vehicle status, and current speed. Distance and duration are measured for the current drive drive or stop. An extra search bar can be found at the top.
Recently viewed in Home tab
2 Tab: Vehicles
For better transparency vehicles are divided to active and inactive.
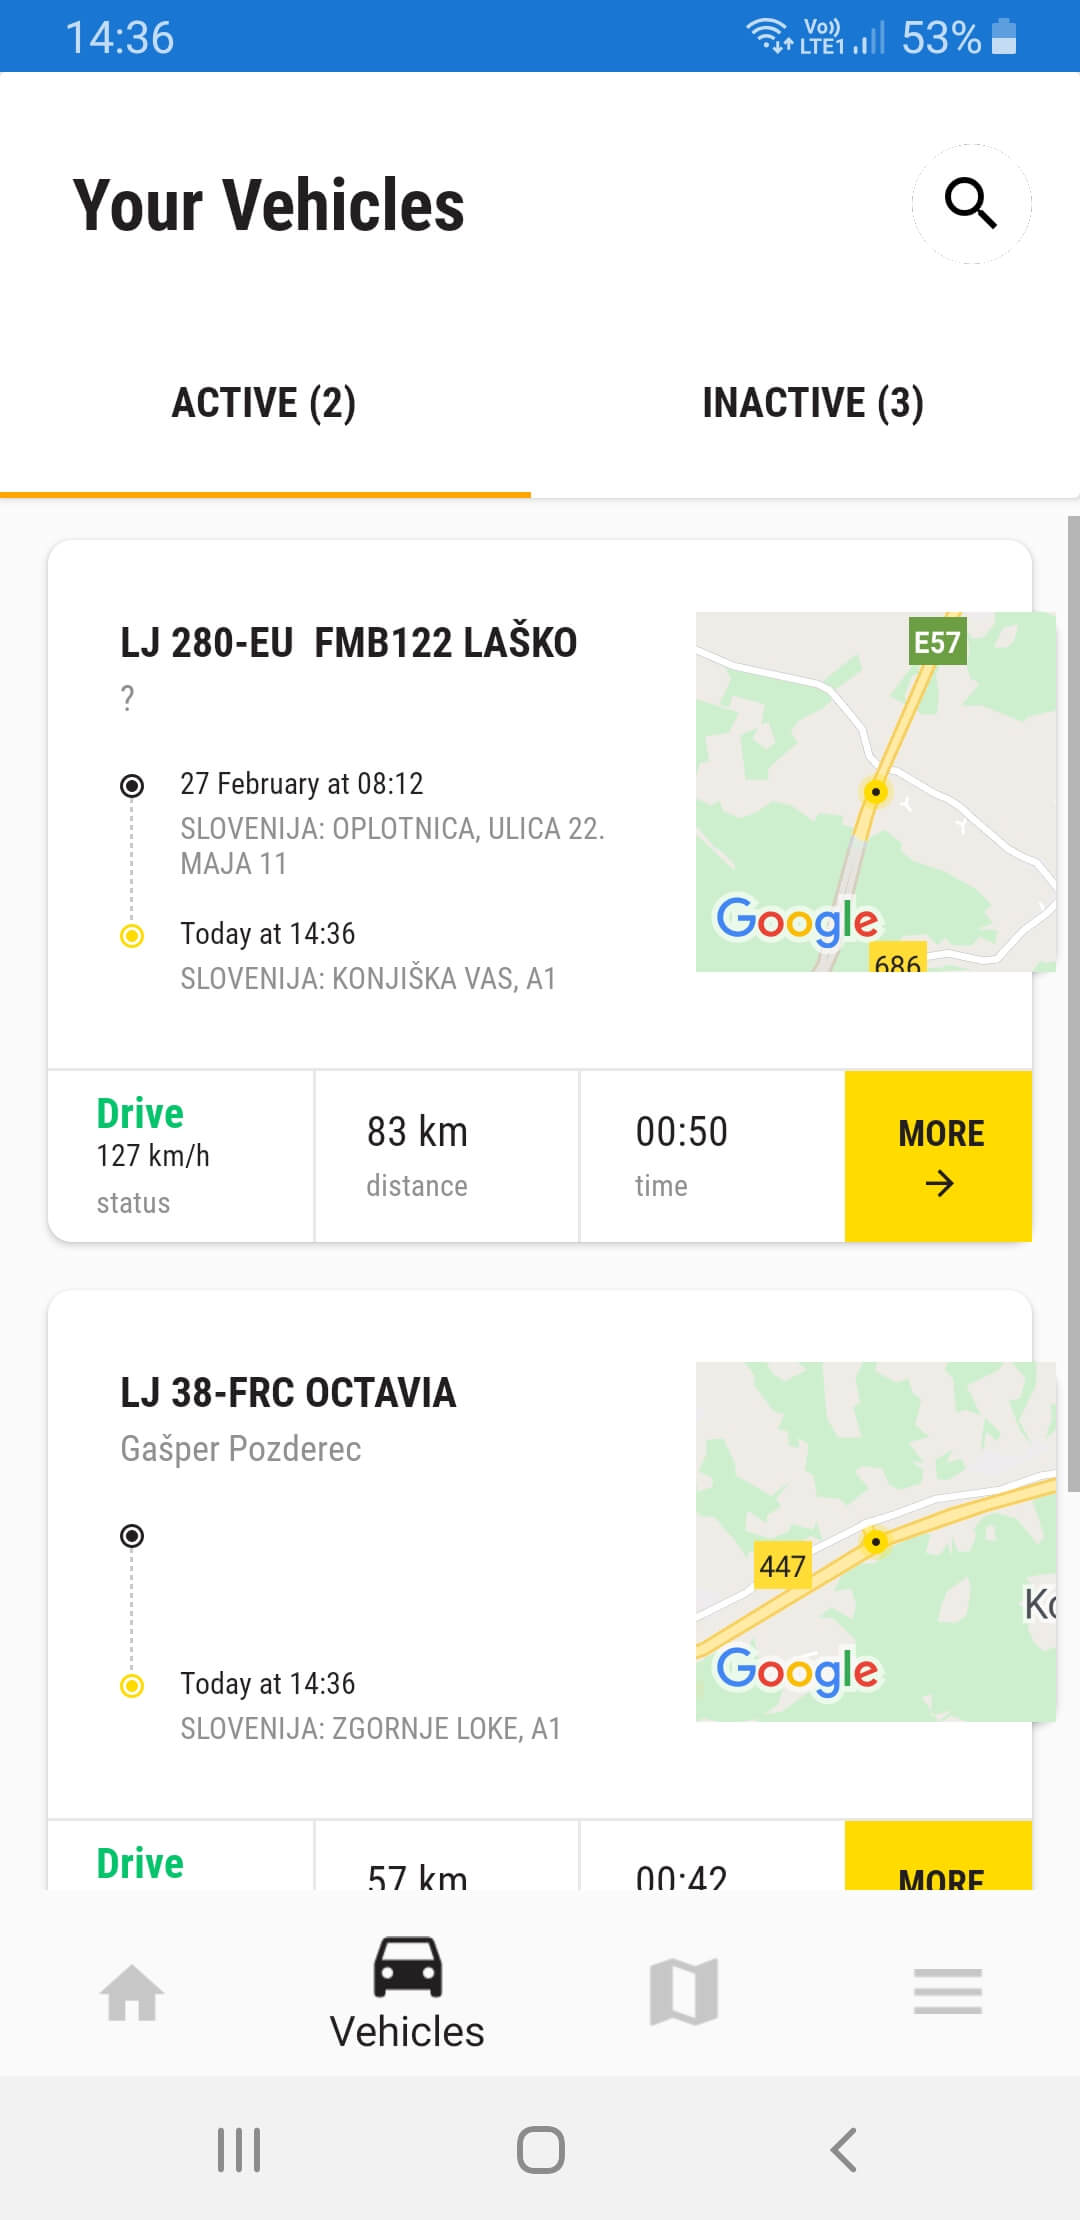
By selection MORE you can review additional information available about the current state of the vehicle and it’s summary for today.
Under the TIMELINE tab a vehicle’s daily history can be reviewed. You can select a specific day at the top of the tab.
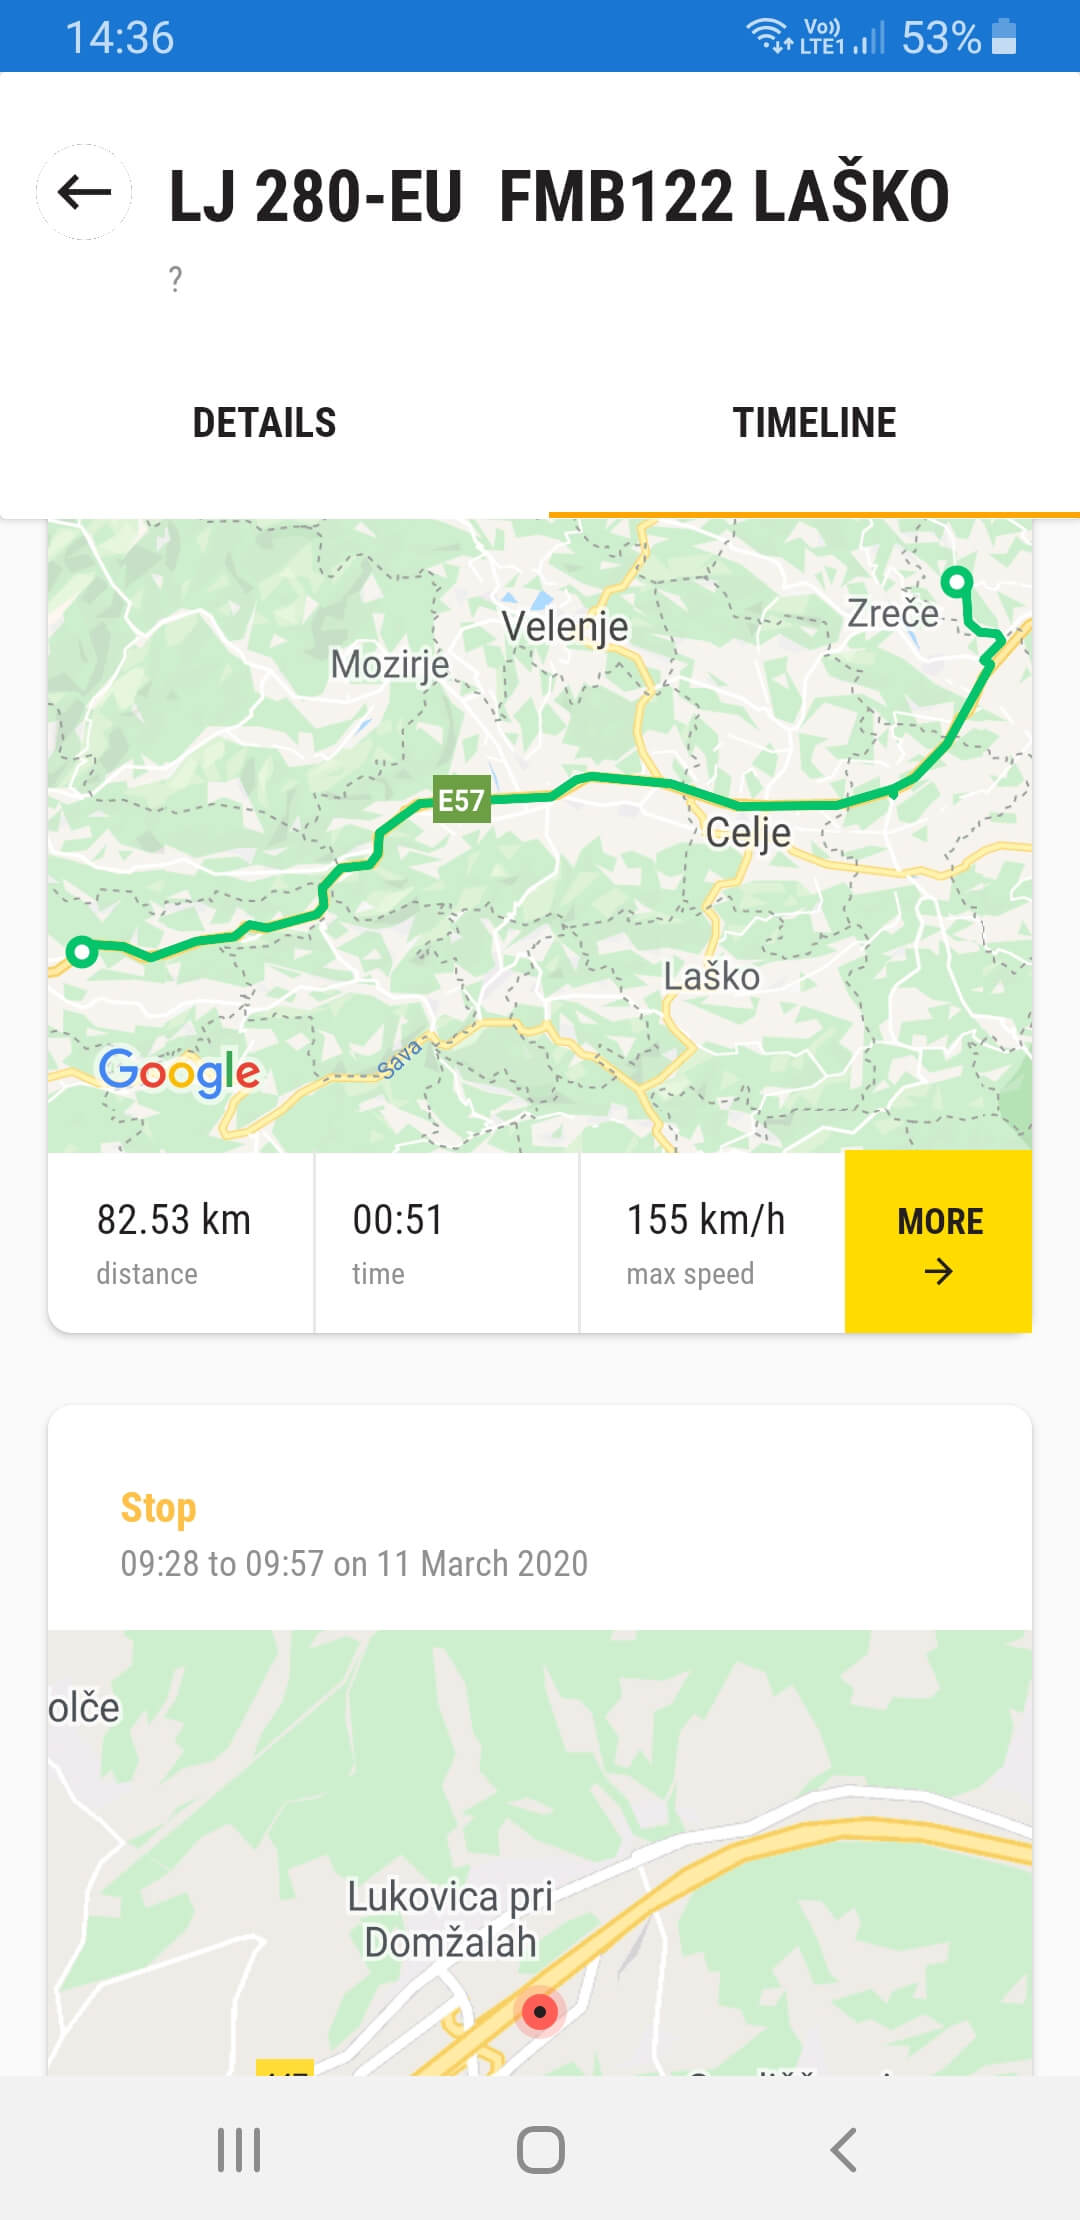
Timeline in SmobileX
Details of each event (stop/drive) are available, including the sensor data, by selecting MORE.
3 Tab: Map
You can monitor and see all the vehicles on a map either by specifically choosing and seeing one or your entire fleet at once. If you have a specific vehicle selected (seen on the bottom) the app zooms to it automatically.
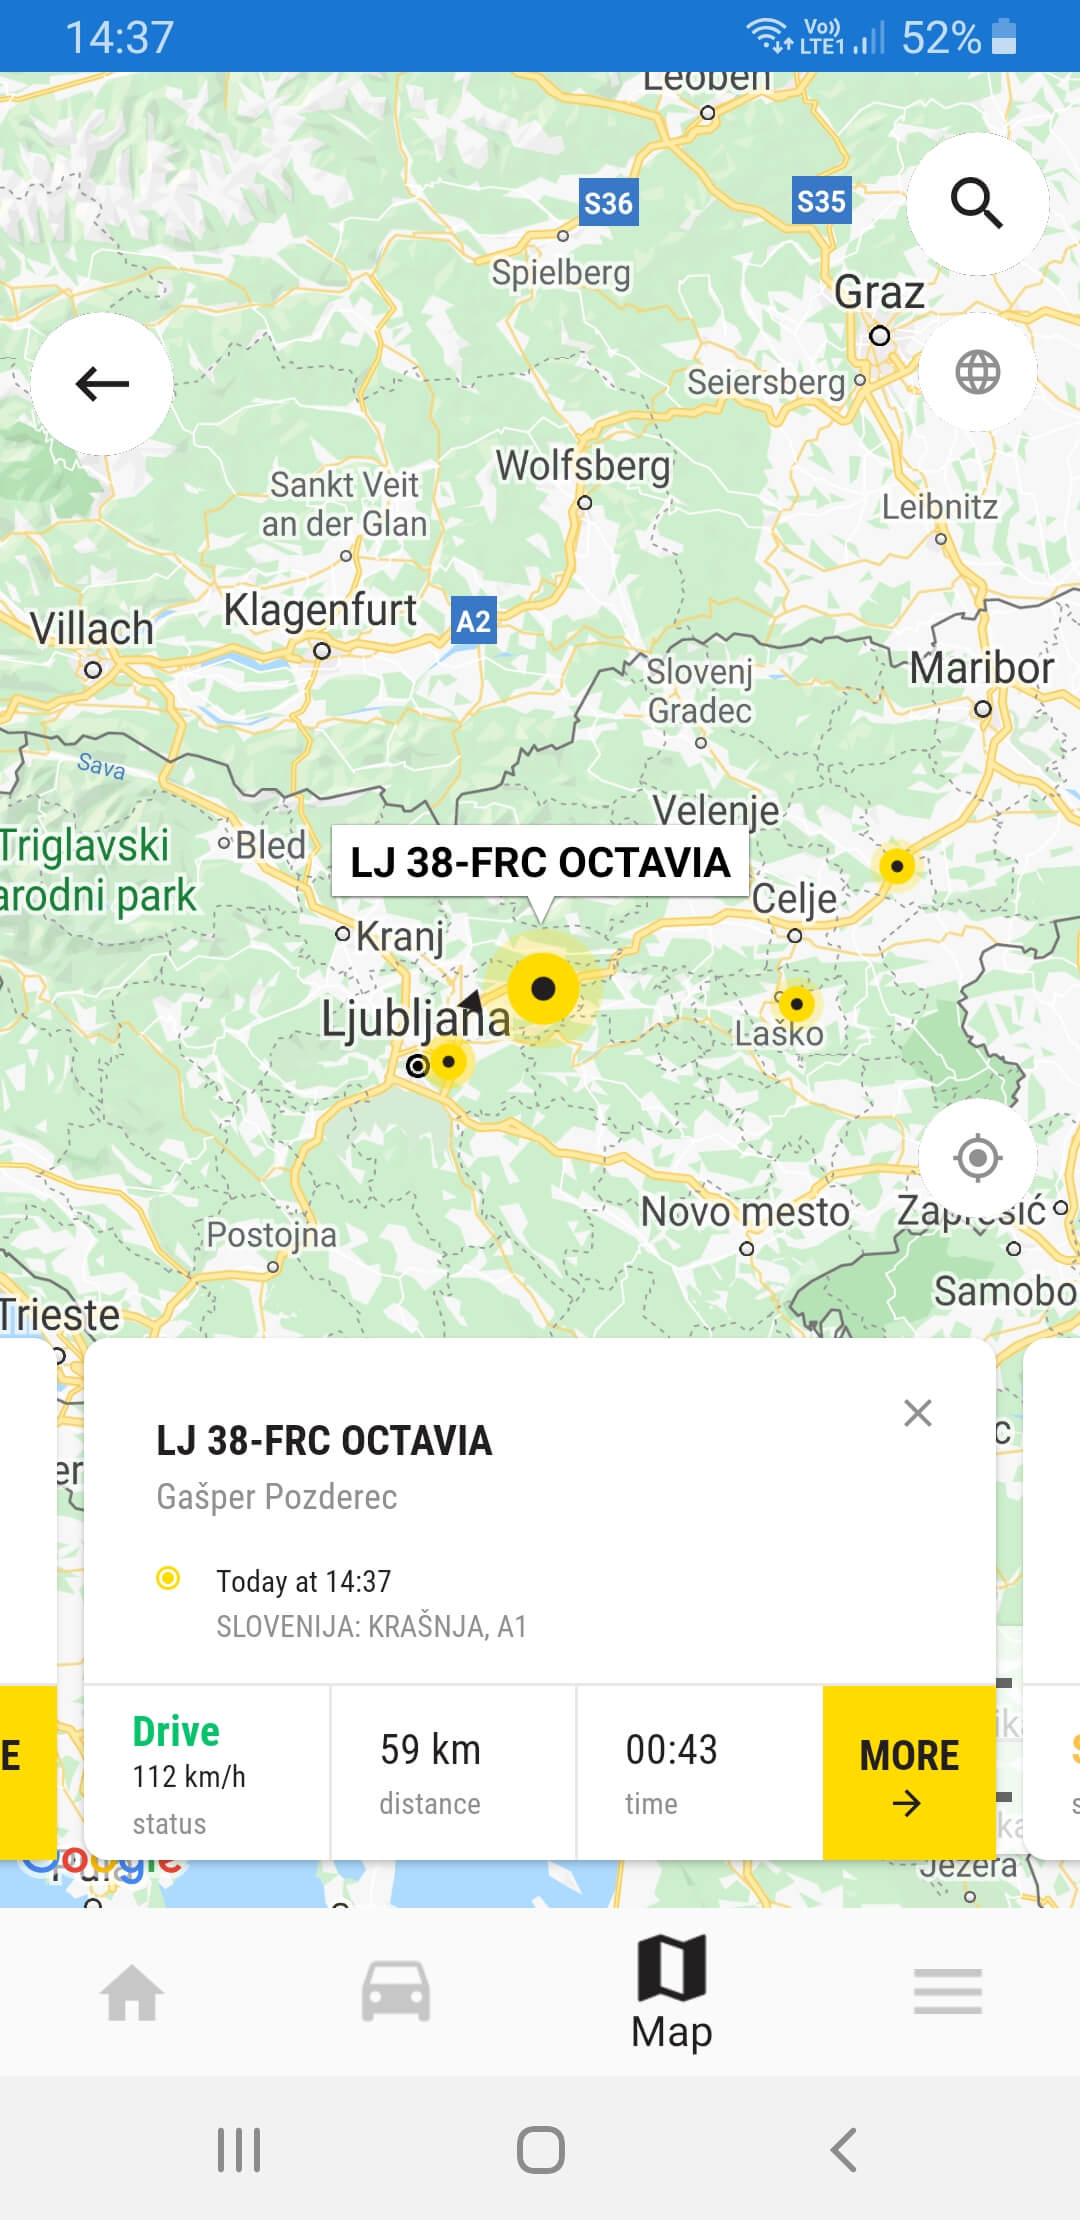
Map view in SmobileX
Some extra features on the map include switching between different map types and turning traffic flow on/off.
GpsWin novelties - February 2020
This month we will introduce two new features that we recently added to GpsWin 2.
Both refer to the Device window.
First, we added the “Speed limit” line under the “Properties” tab where position information is located.

Speed limit indication
The second is found in the new Tachograph tab of the Device window.
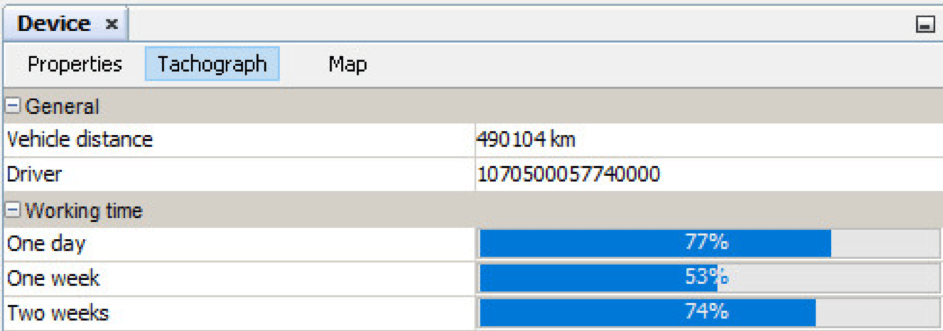
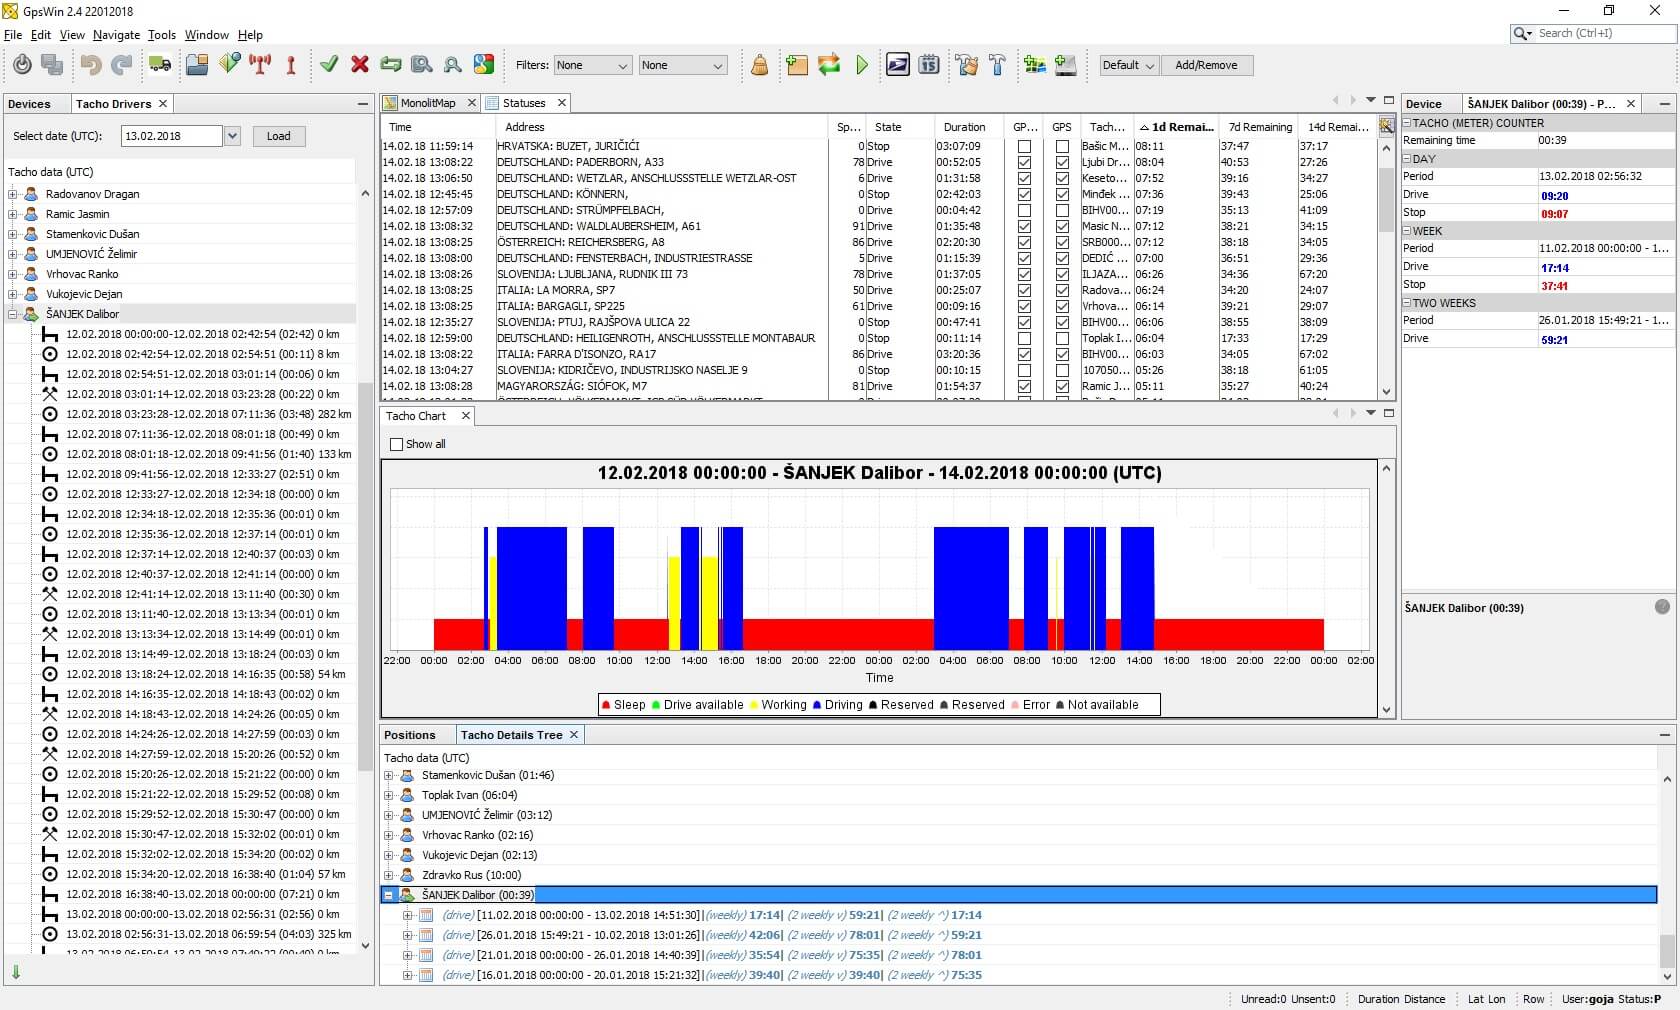
Visual presentation of Tacho states
This gives us a graphical representation of the tacho data for one day, one week and two weeks.
Travel Orders; Yearly fuel consumption report - January 2020
The new version of sledenje.com mobile application SmobileX is available for use on android and iOS on GooglePlay/AppStore.
We just released an update of the Travel Orders app where we have upgraded the report about average fuel consumption. Anyone that imports Petrol or OMV files in Travel Orders, can now also export a yearly report for fuel consumption. The report gives you quick access to yearly fuel costs and enables easier analysis per vehicle.
Update your Travel Orders app in order to use the new report. We do that by clicking on update icon in the bottom right corner. Afterwards just follow the update process. You can also find updates with Help/Check for updates.
If the files about fuel costs were consistently imported throughout the year all the data is prepared for the yearly report. Alternatively, you can import the files once for the past year and then create the report.
Export can be done in window Filter for selecting forms. You do not need to select the period, just select Expenses when it comes to row Type.
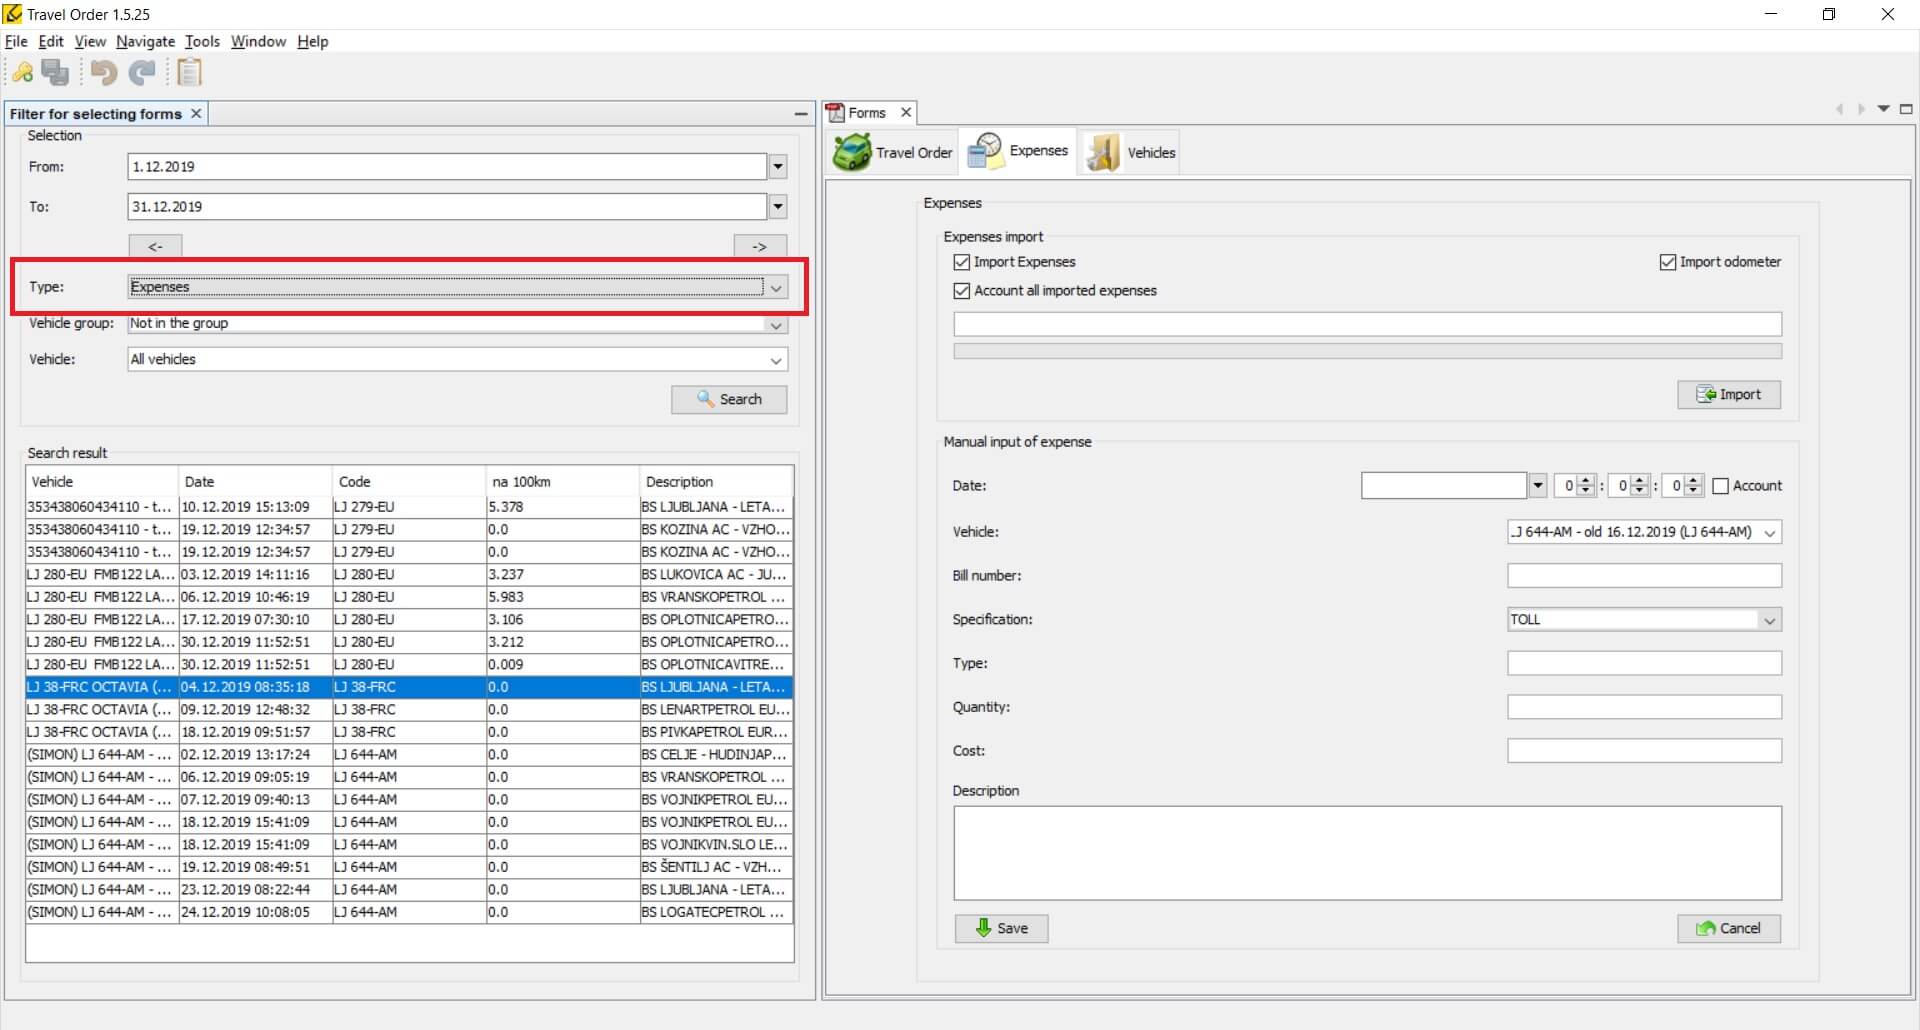
Travel order expenses
Once that is done, you choose vehicle group and vehicle(s). In search results the requested data can be seen. By right clicking one of the results a menu opens, choose option: Print/ Print yearly fuel consumption.
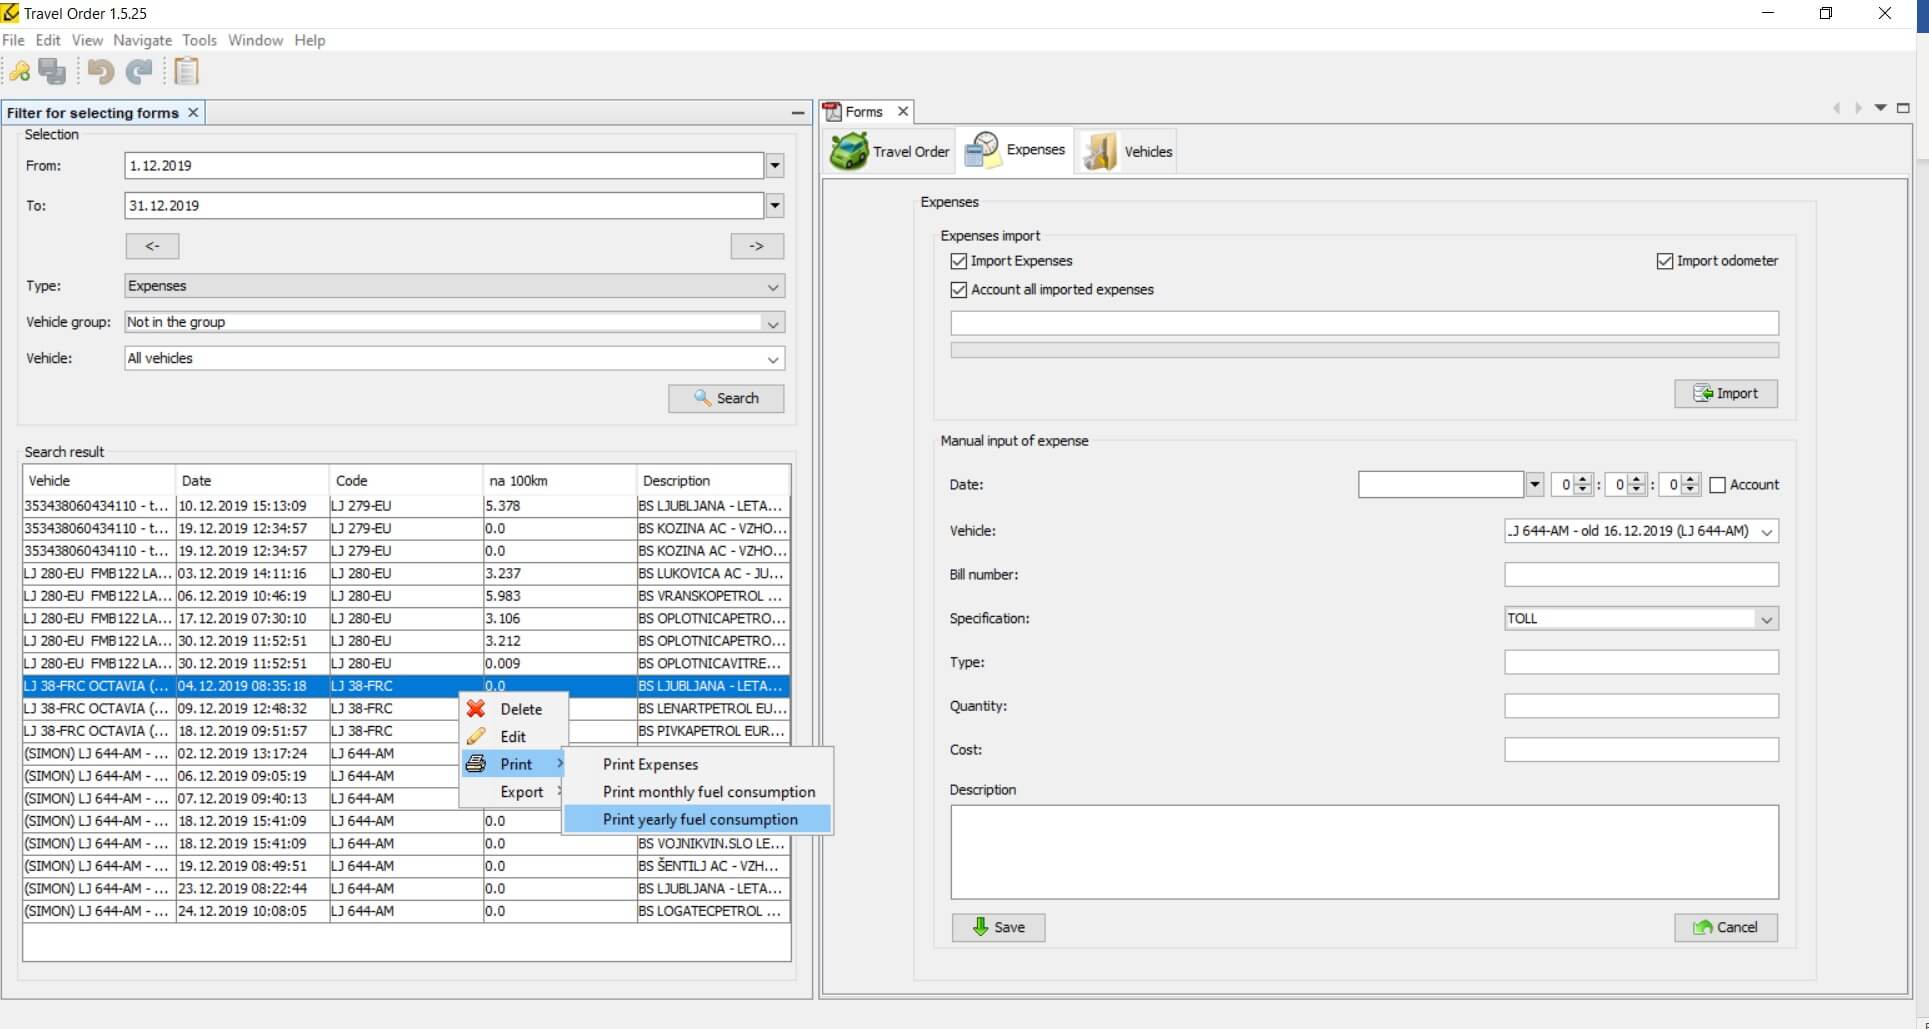
Print expenses menu
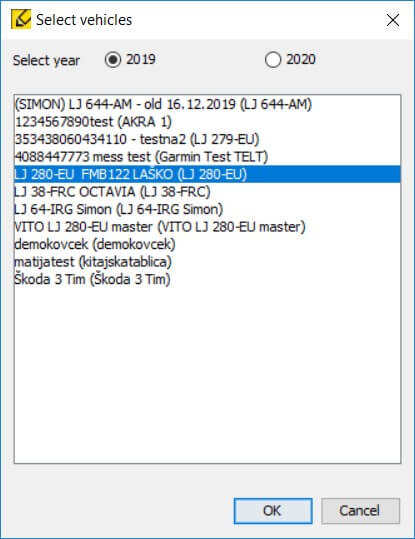
A pop-up window appears, where you can pick a year and vehicle(s). To pick more than one vehicle at once use Ctrl + left click. For all vehicles press Ctrl + A.
Select vehicles for expenses
Click OK button to export the report.
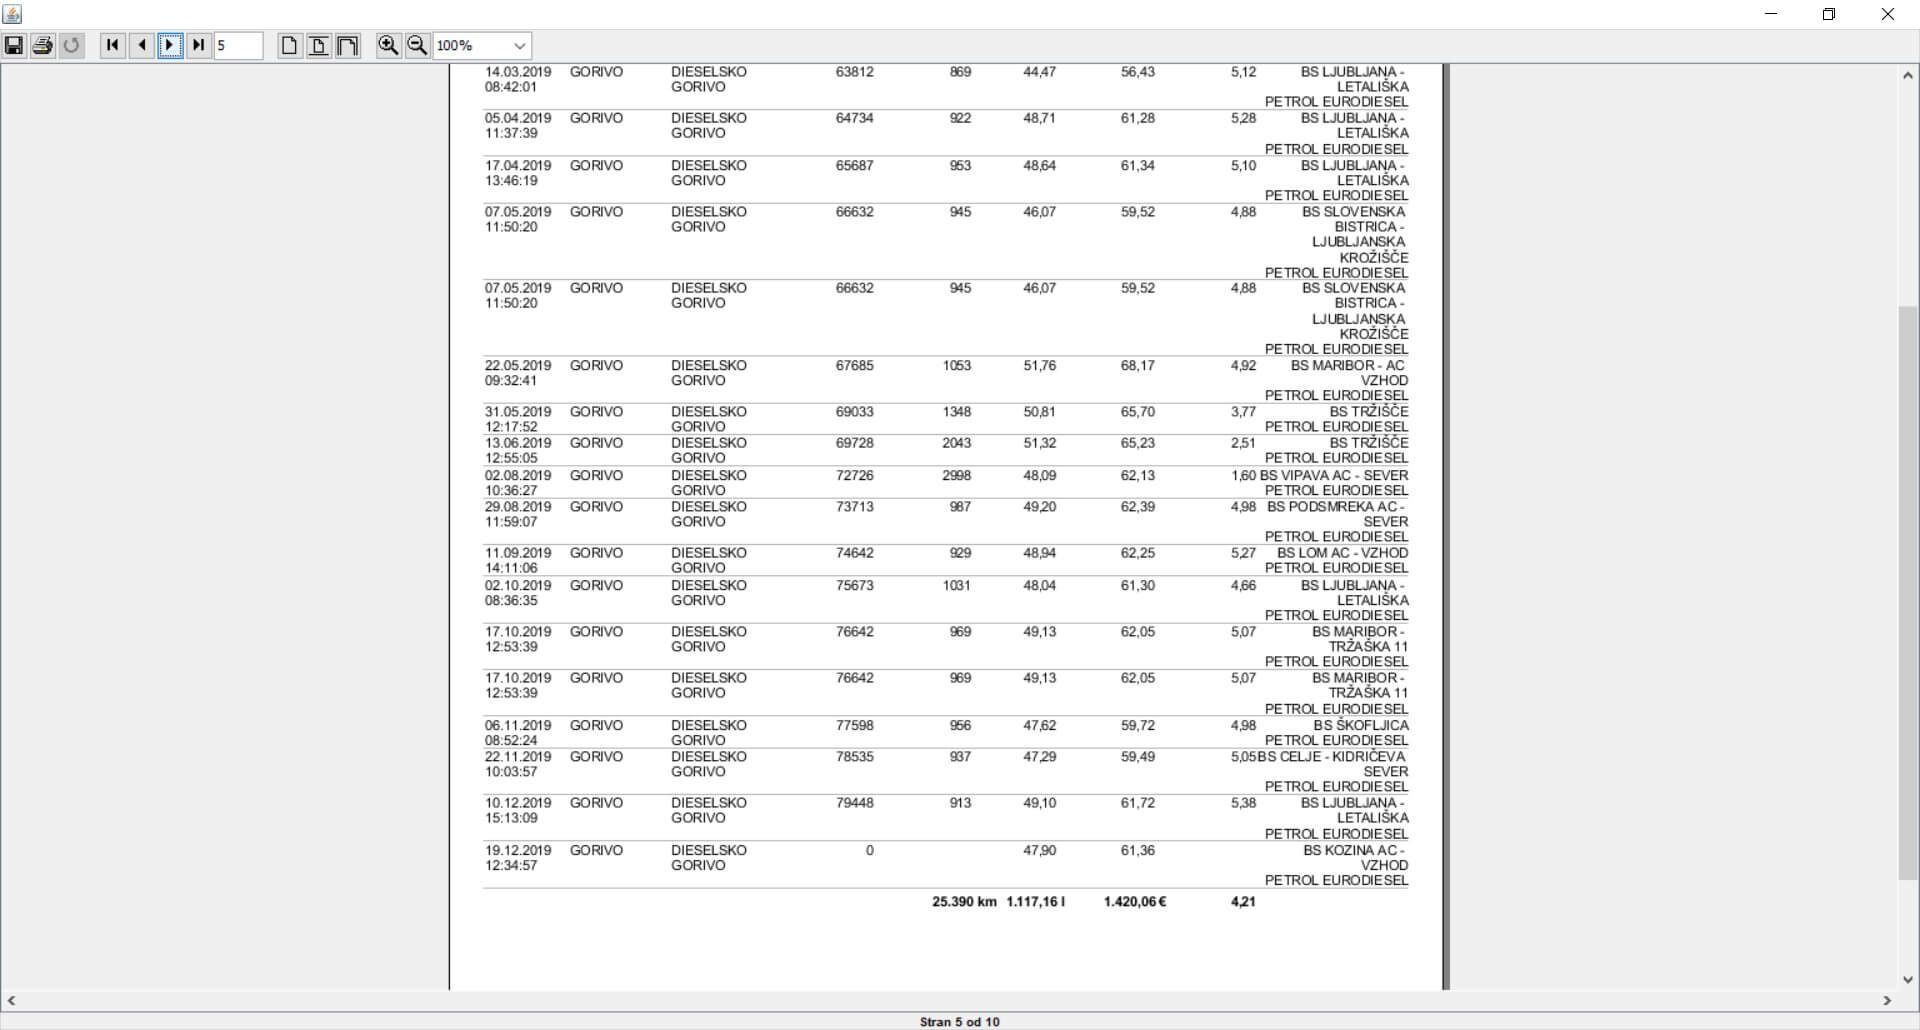
Export yearly expenses report
The report can be printed or saved to a selected file just like a travel order.
Tip of the month 2019
Knowledge base - November 2019
In GpsWin there are instructions already integrated in within the program. They are located at Help/Help contents. Beside instructions you can find a wide knowledge base on our website. There you can find answers to frequently asked questions, tips of the month and video tutorials for GpsWin application.
You can access all the content on the website via the Customers tab that can be found in the upper left corner of the page.
Knowledge base on the website
Choose the tab Knowledge base and a login window will appear. You can login using your username and password that you are already using for GpsWin.
Website knowledge base login
The hub contains a collection of materials to help master the system Sledenje.com. On the first tab there are two tutorials for GpsWin application; basic and advanced functions.
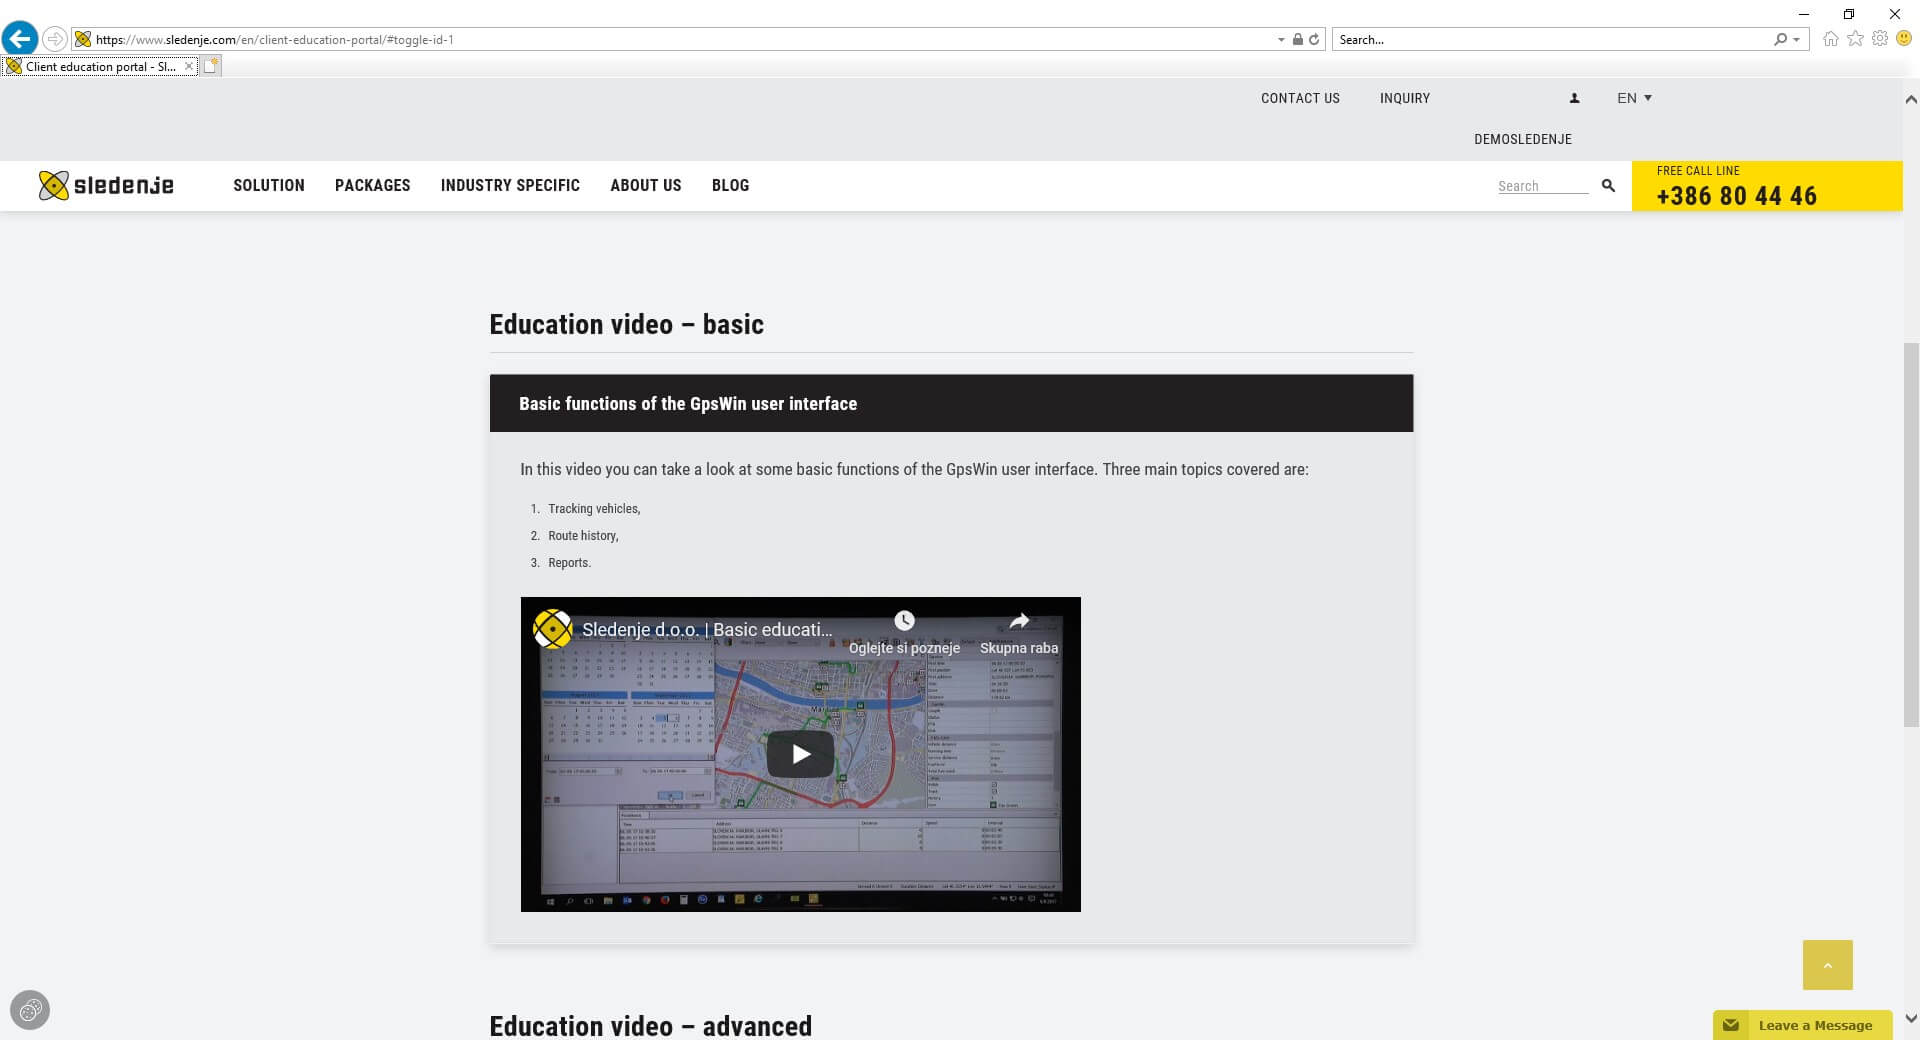
GpsWin education videos
The middle tab includes a list of tips of the month. You can find any past tips that you wish to explore. Tips are meant to explain the use of certain functionalities of in a quick and understandable way.

Tip of the month list
The last tab contains answers to frequently asked questions. Most frequently these questions relate to getting introduces to the solution at the beginning of use. The list is always updated as we go along.
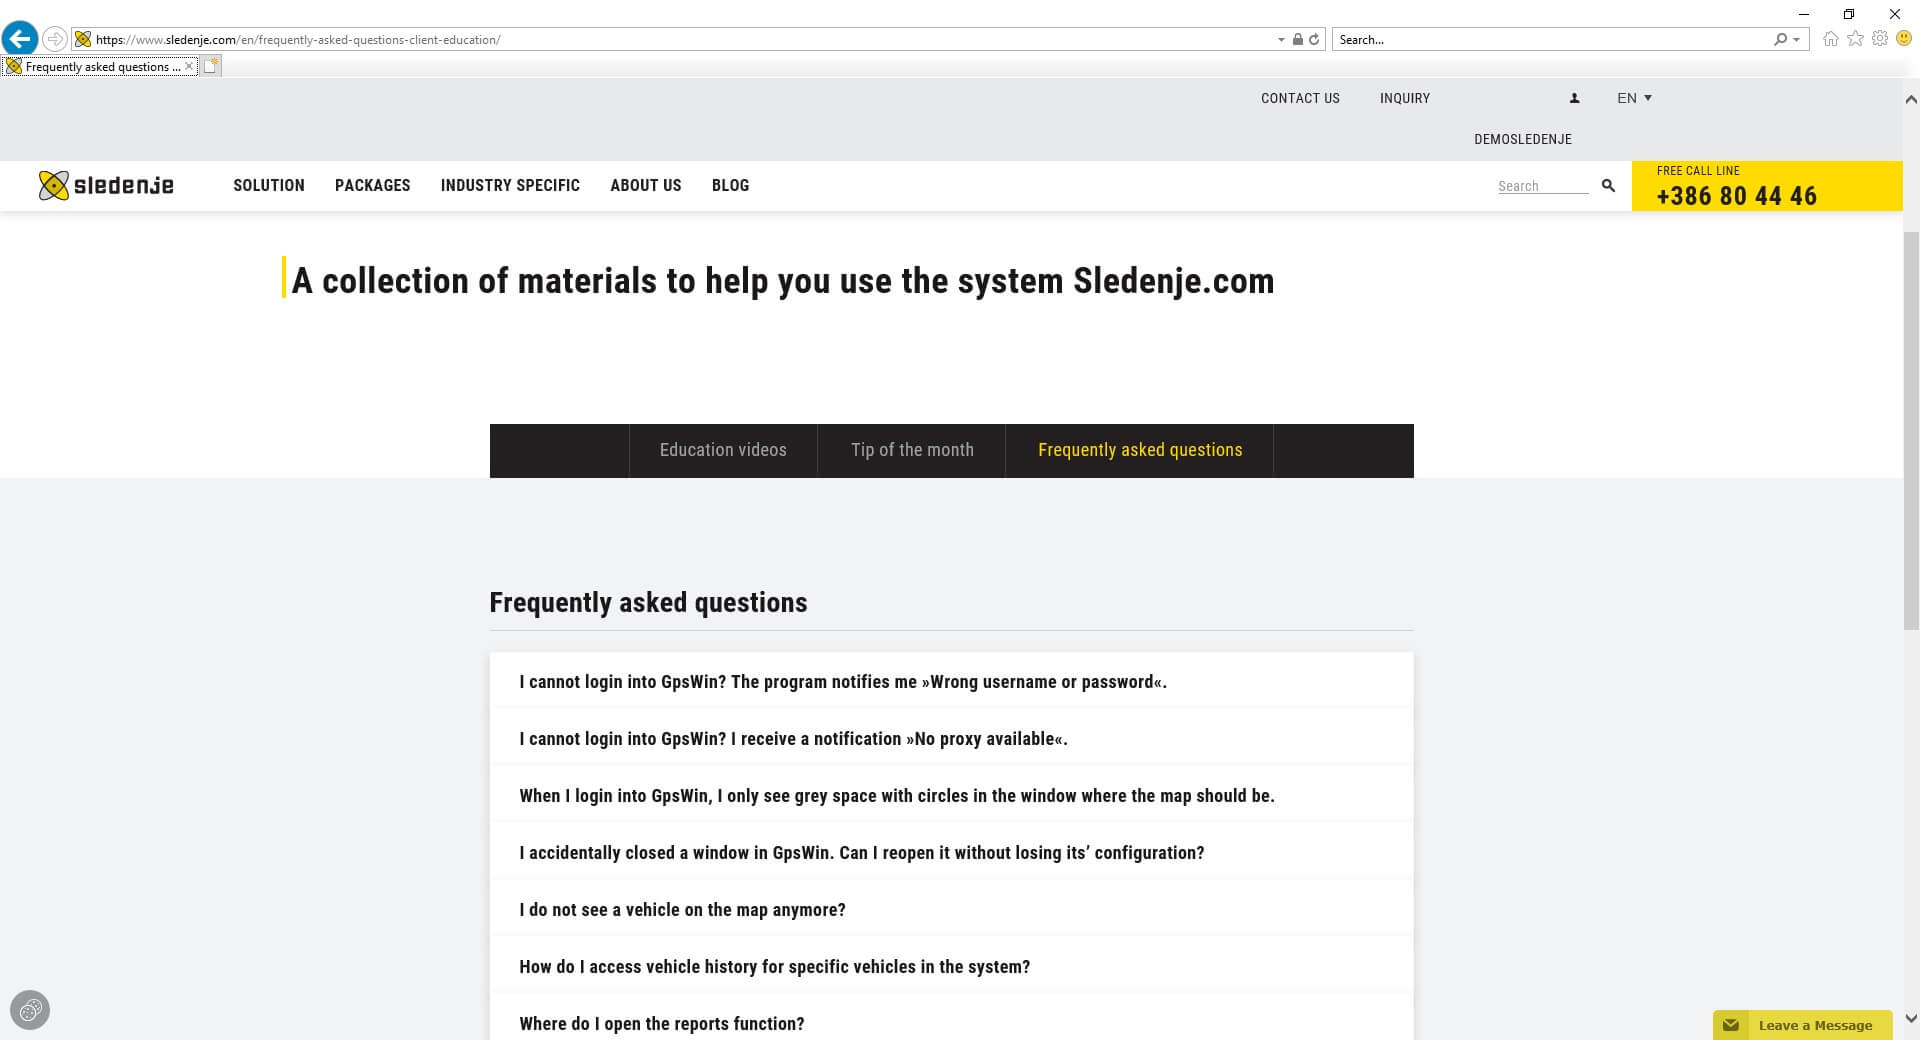
Frequently asked questions
At last we invite you to read an article that was published on 14.11. at SIOL website about car parks and savings: https://siol.net/posel-danes/novice/kako-upravljati-vozni-park-in-pri-tem-prihraniti-511780.
Full Screen mode in GpsWin - October 2019
This month we will show you how to turn on the “Full screen” mode in GpsWin.
To activate this function, click on “View” and select “Full Screen”.
Fullscreen mode in GpsWin
s-Admin application - September 2019
GDPR law came into effect last year and in accordance to that we applied the administration part to the users. For this purpose we developed s-Admin application that is available on: https://sadmin.sledenje.com/login.
After login we have a menu on the left side of application where there are topics. This topics are available to manage. The number of visible topics is dependant on what level of service you have.
s-Admin login
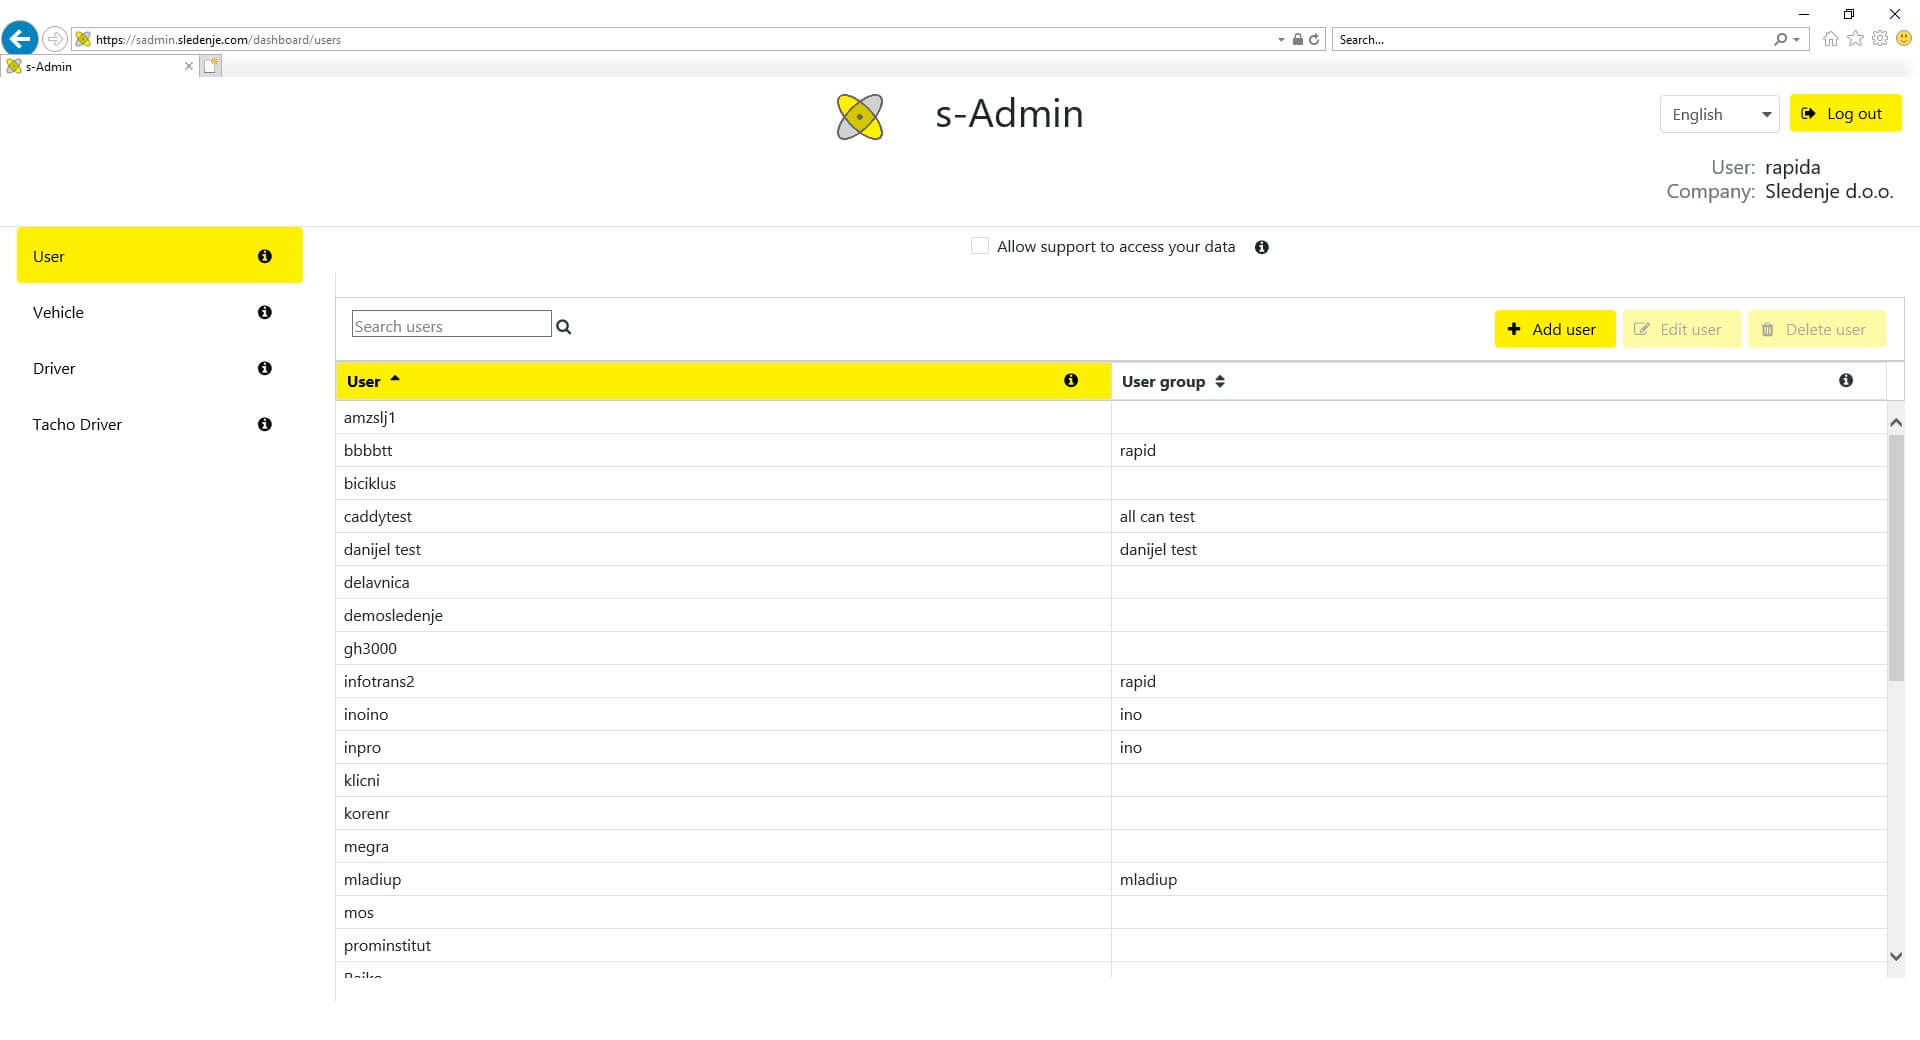
- Topic: User.
In this tab you are able to manage users. They can be changed, deleted or created. New users are created with same user rights that existing user, with editor level access, has. Every change is notified via email the user is associated with on s-Admin so password can be changed. Password is known only to certain user.
s-Admin User topic
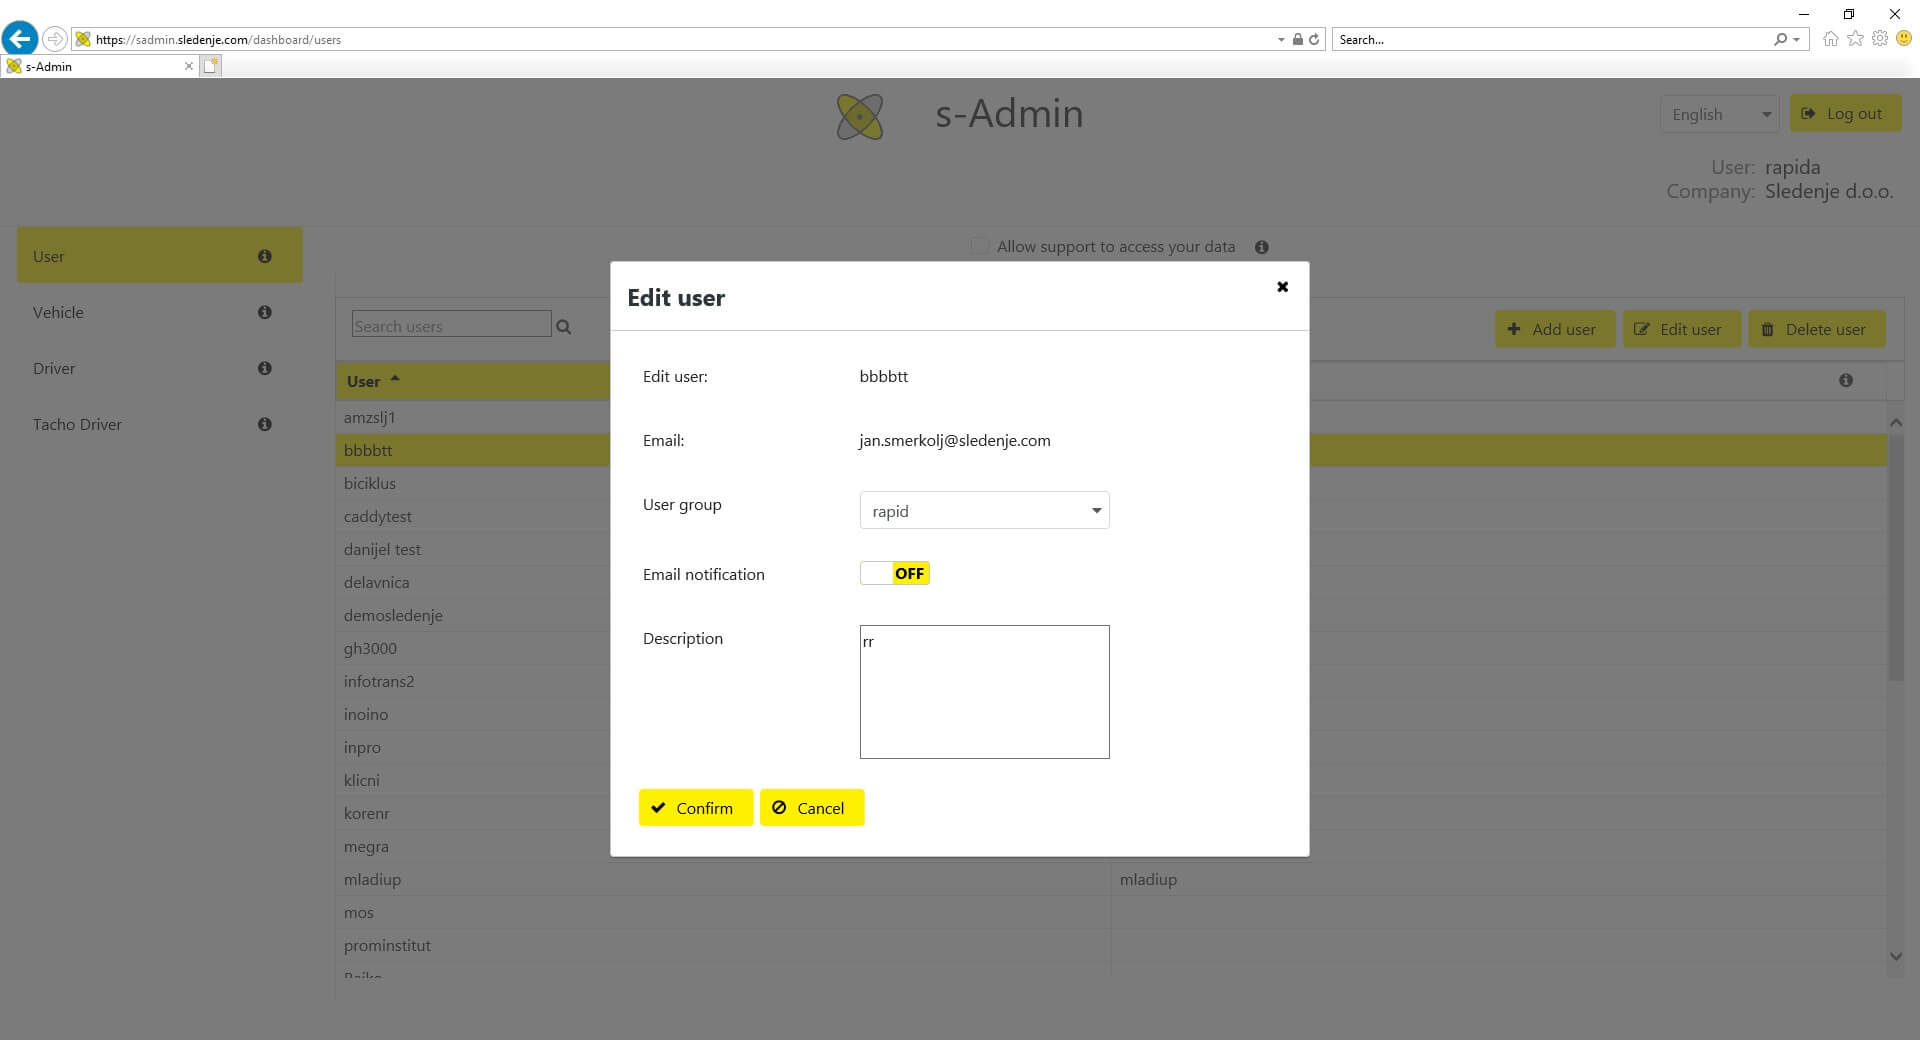
- Topic: Vehicle.
This topic is intended to manage vehicle’s titles that are displayed in GpsWin and other applications. Editing is possible in two ways. One is with the right click on vehicle or with click on the Edit button above the vehicle list. Beside editing we can also see current location of the vehicle on Google maps and the list of all current positions.
s-Admin Vehicle topic
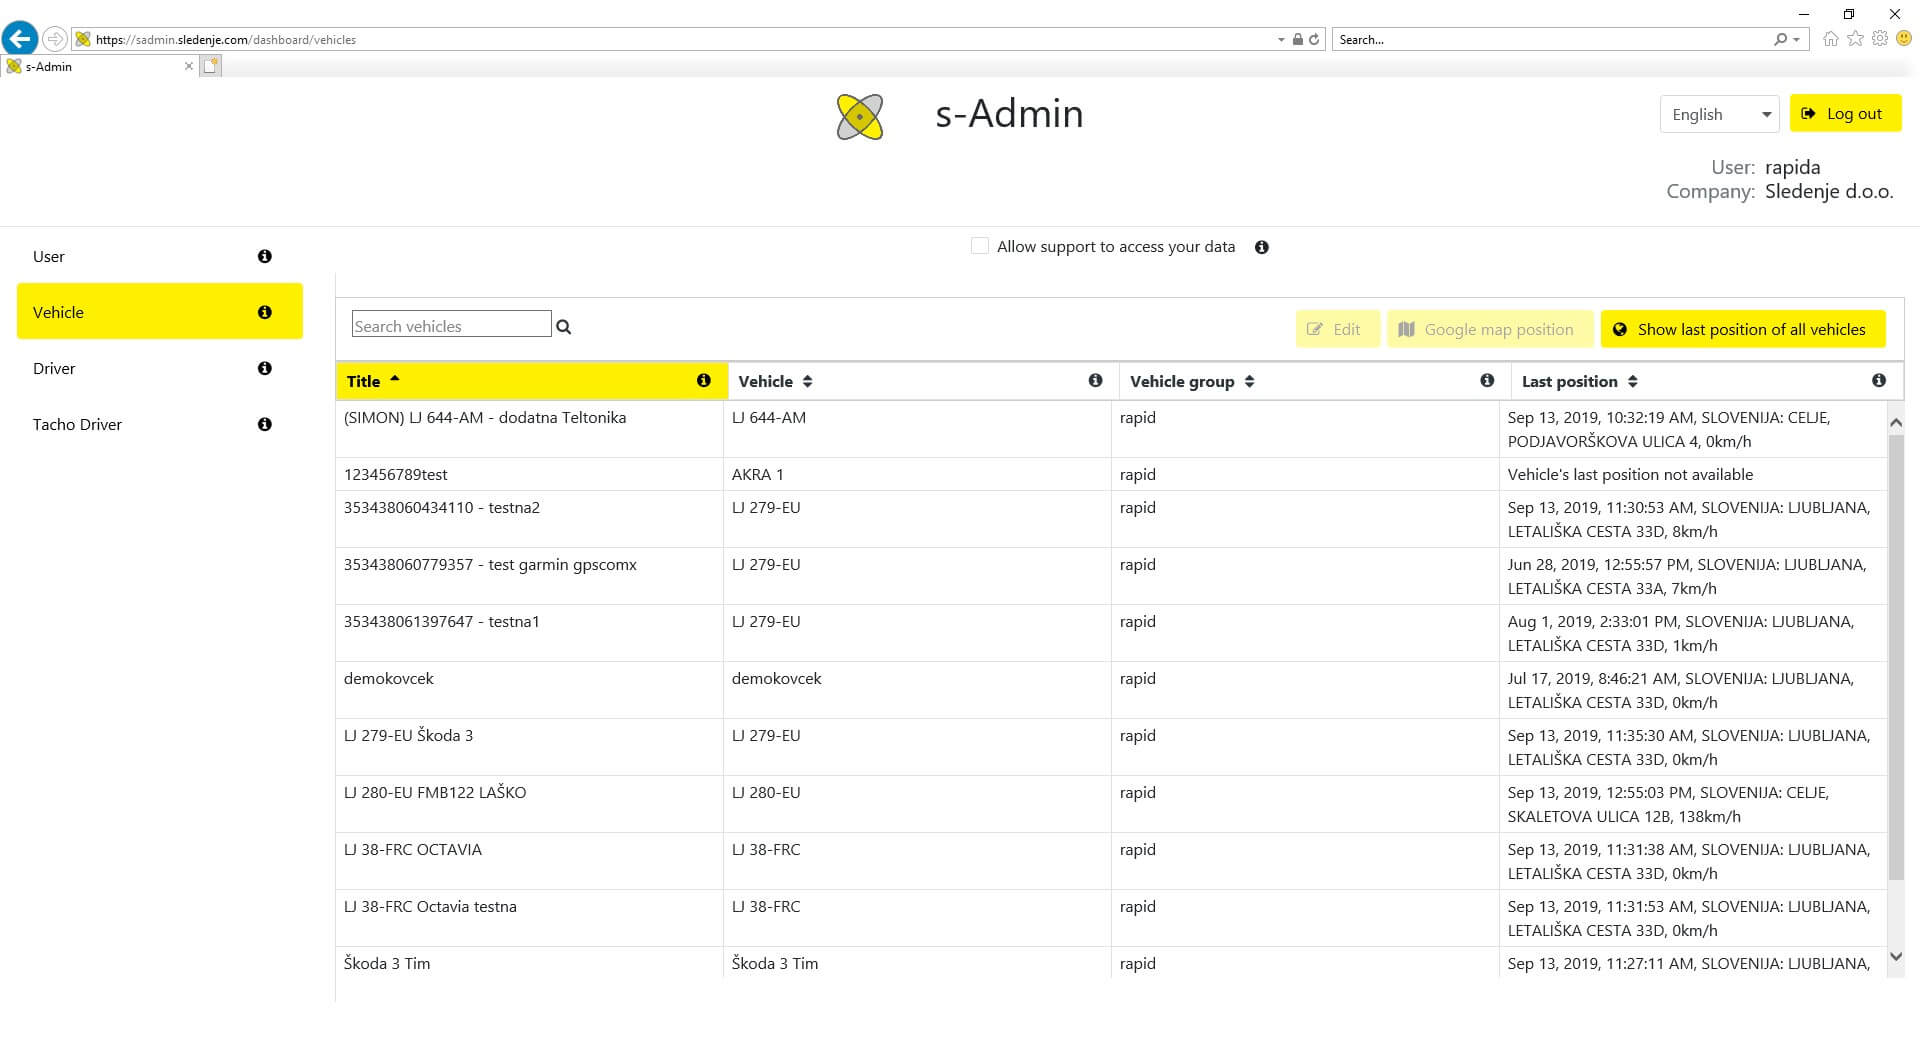
- Topic: Driver.
If you are using id buttons, in the driver topic you have the possibility to name/rename them. The reasons span from the change of employees or loss of an id button.
s-Admin Driver topic
- Topic: Tacho driver.
When we connect sledenje.com to the vehicle’s tachograf the device acquires the driver card number. The number of the driver’s card can then be used to identify it with the driver’s name and surname, which is displayed in GpsWin and other applications.
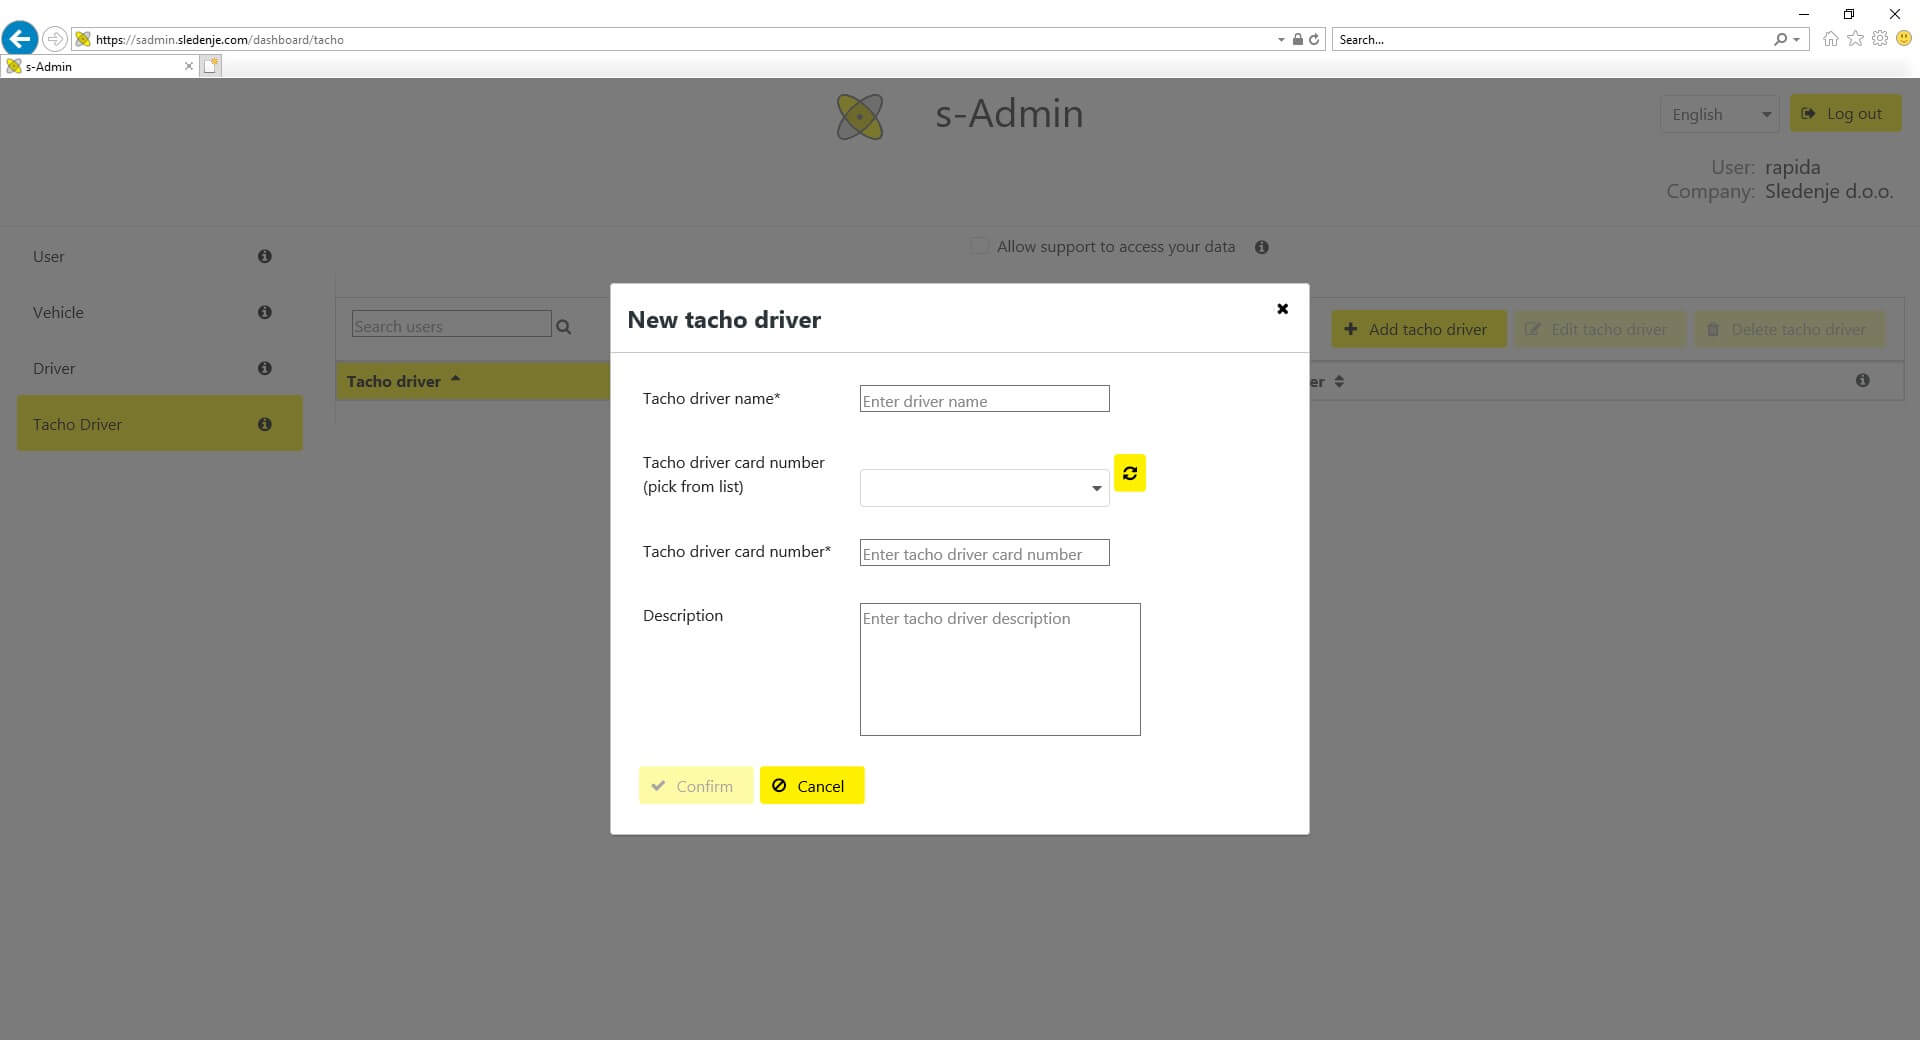
s-Admin Tacho Driver topic
Configuration directory .gpswin - August 2019
If we happen to encounter a very specific error in the program that cannot be resolved with normal troubleshooting measures, we can try deleting the .gpswin configuration folder.
This especially comes in handy if we cannot open a particular window in the application or if the window generally does not work as it should.
The folder can also be used to copy or transfer all of your personalized program settings from one computer to another.
You can find the folder in C: \ Users \ gasper \ AppData \ Roaming \ .gpswin – *gasper is meant to represent the name of the user who logs in to the computer.
Note: When deleting or just copying a folder, we need to make sure that we have closed GpsWin beforehand.
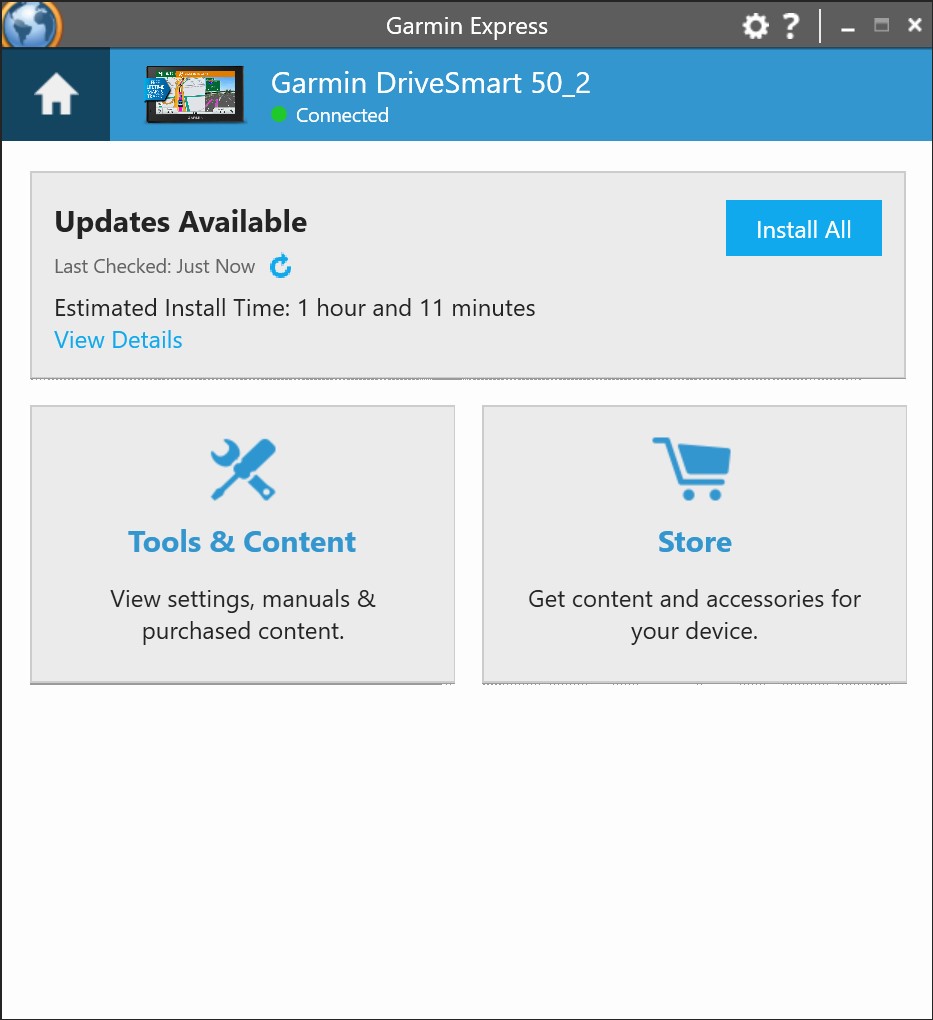
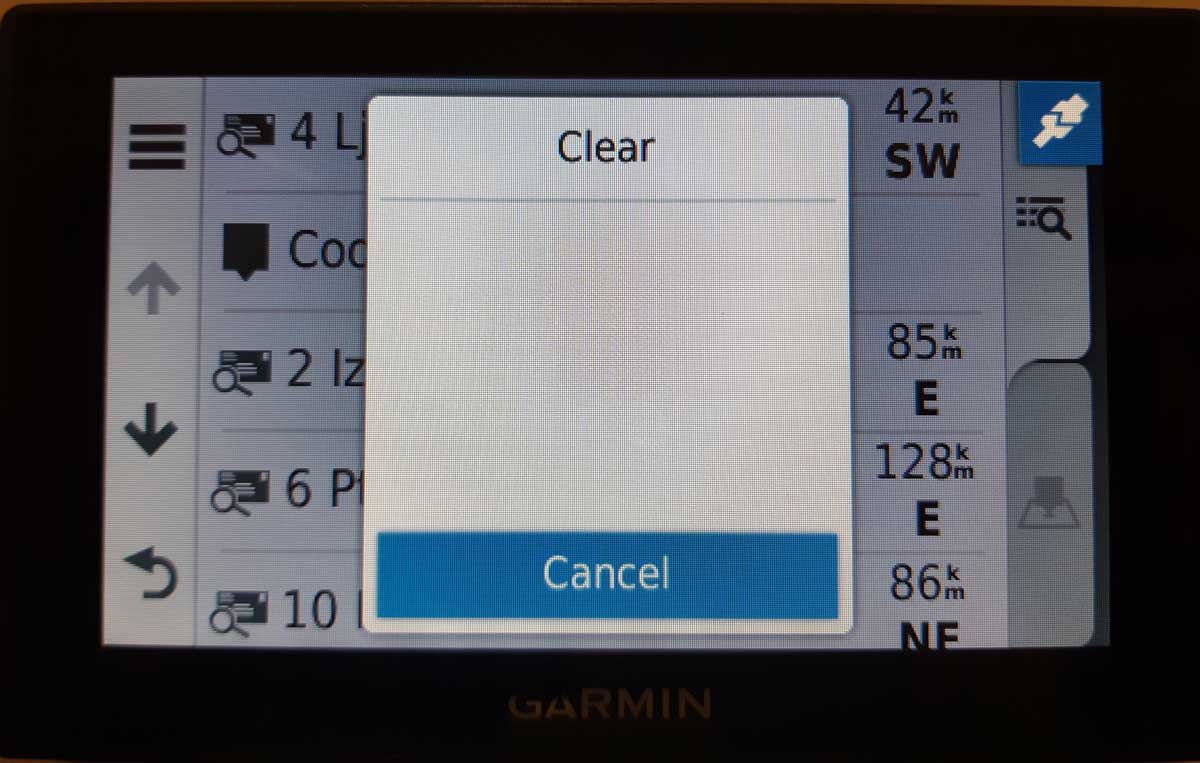
Garmin update - July 2019
Everybody that is using a gps device in combination with Garmin navigation for written commnunication and navigation, has experienced situations, where there were certain problems such as: inaccurate navigation, different route than usual, etc.. Unfortunately these things occur right when you are in a hurry. Though it may look like there is something wrong with the Garmin device, it is not neccessarily so. Most often it occurs due to the Germin’s memory being full from to many recently found adresses and/or outdated software. If we perform software updates regulary and delete history of found locations, we can avoid most situations like this.
Garmin updates are done via Garmin Express application. You connect the Garmin with your computer via a usb cable and then you just follow the steps in application.
Garmin Express
Deleting route history on Garmin
Employee meetup report - June 2019
In this monthly tip, we will present a new employee meetup report that we offer outside our regular service. It comes in handy especially for checking if more than one of your vehicles was stopped at a particular location at the same time.
The employee meetup report is marked by sections that are separated by a blank table row. Each report is read so that the first line in the assembly represents the vehicle we are interested in. The other lines represent all vehicles that were located near the first vehicle and the time of their stops overlap with the time of the first (observed) vehicle.
Employee meetup report
Report SAFE DRIVING - May 2019
Due to overspeeding and obsessive behaviour of drivers on the road, more and more companies are realizing that this reflects in a negative way on the company image. Vehicles that have company logos and branding, give a bad impression to potential buyers that see that kind of driving behavior. One of the ways on how to start solving these issues is the report Safe driving. The report provides information about actual driving behaviour on the road. It is the basis for further decisions and analysis for further measures to be taken on this topic.
The source of these data for the report are positions from the gps device that records speed and acceleration. The parameters are than combined with an up-to-date road network specifications and road signs.
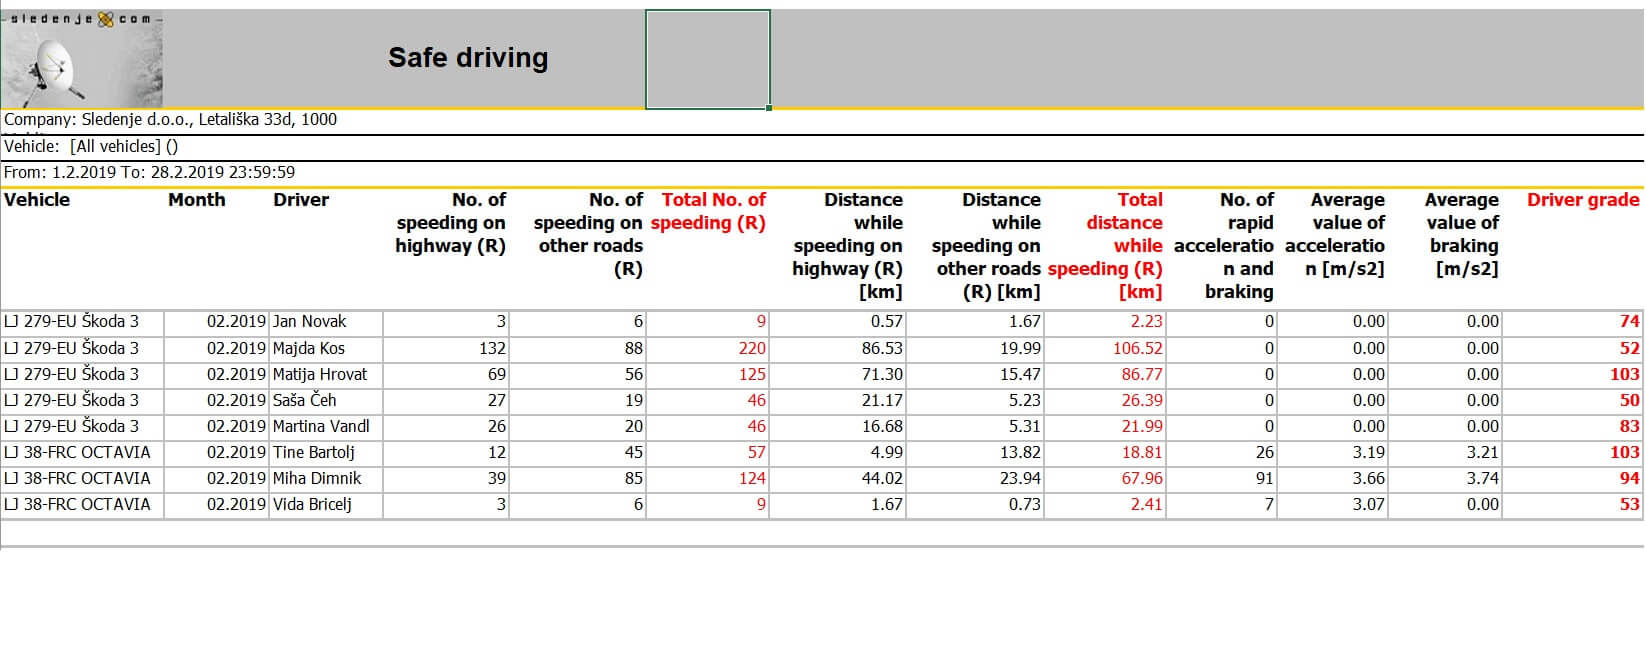
Safe driving report
Average fuel consumption in Travel order application - April 2019
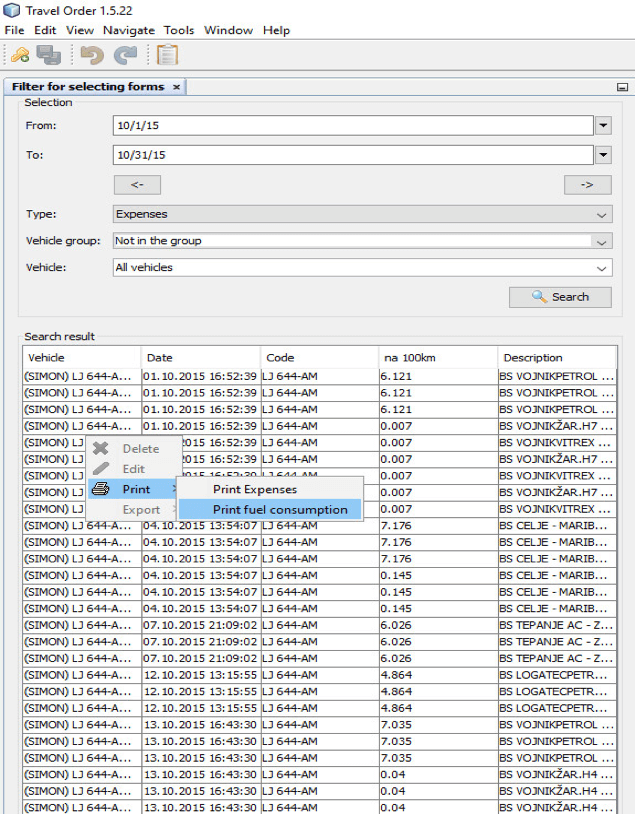
In this months’ tip, we will look at how to export a report about average fuel consumption in the Travel order application. This only applies to the companies that have an integration for importing fuel expenses and the odometer status of the vehicles.
First, we need to set the specific period of time we want the report for and choose the correct form type, which in this case is “Expenses”. Then right-click on the mouse in the results tab, select “Export” and “Export fuel consumption”.
Choosing fuel consumption form
A new window opens up where we can select either one specific vehicle or all of them.
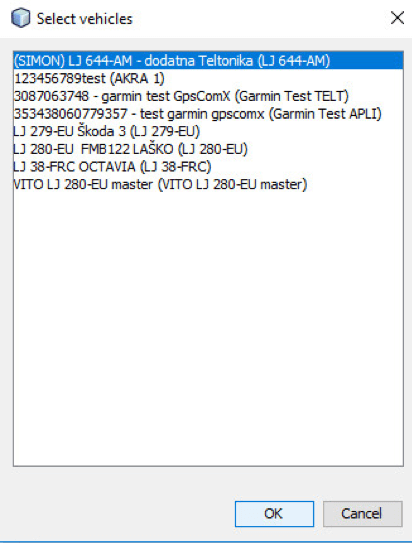
Choosing vehicles for calculation
Upon confirmation, we’ll see a preview of the average fuel consumption report and the associated costs.
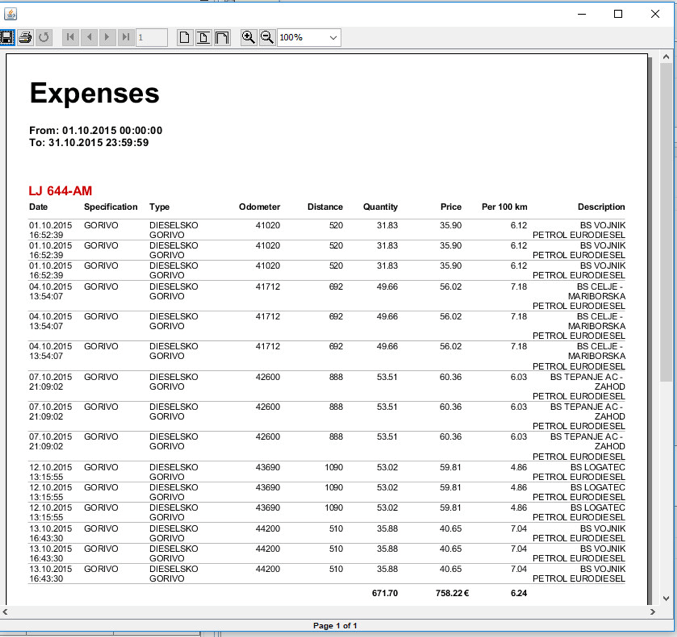
Fuel consumption report preview
Report Vehicle Drive Start - March 2019
Lately we had a lot of interest from our users about the start and end of driving activity. Therefore we made a new report that gives you the information about when exactly the start and end of vehicle activity in a day occurred. The report also indicates the start and end of the drive specifically. The point of the report is that a user can quickly see the time difference between first ignition in the day and the actual start of the drive. The same comparison is also available for the end of the day.
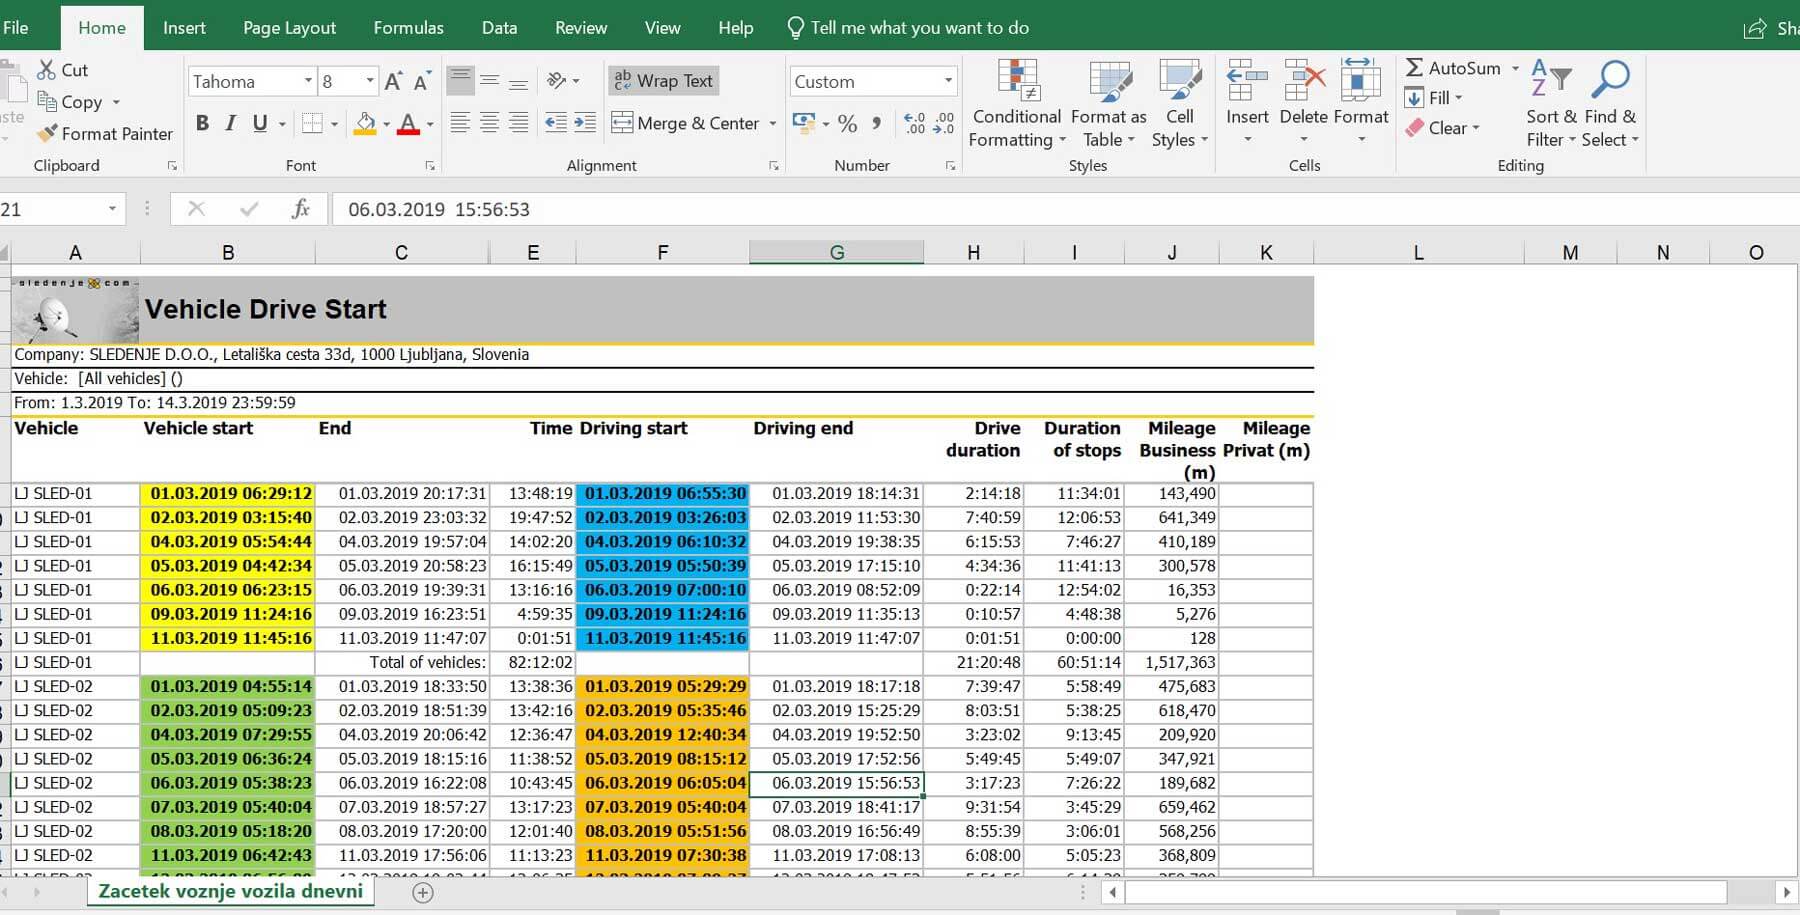
Vehicle drive start report
Group management window - February 2019
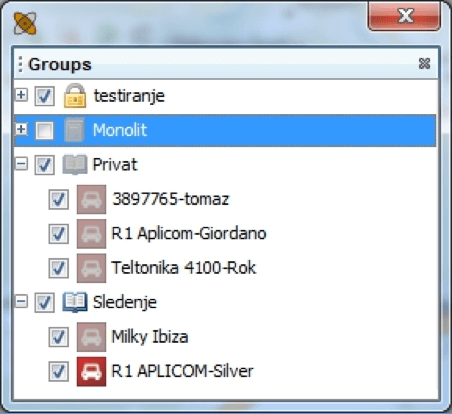
In this months tip, we will look at the group window. It can monitor dynamic and static groups.
By selecting Window > Tracking > Groups option in the toolbar menu you open the Groups window in which devices are grouped together in static and dynamic groups. You can copy devices from the static groups into dynamic groups. Additionally, you can move devices between dynamic groups, as well as cut, delete and paste devices within individual dynamic groups. Managing dynamic groups is possible only if you have Admin rights. You can have the same device in multiple groups. Devices within the groups are displayed the same way as in the Devices window. Things like the states icons and history can only be displayed in static groups.
Group options
Arranging Options
You have the following options available for arranging groups that appear in pop-up menu by right-clicking on selected devices.
- Copy – with this option you copy the selected devices. This is the only option available within static groups and Devices window
- Cut – with this option you cut out the selected devices from dynamic groups
- Delete – with this option you delete the selected devices from dynamic groups
By right-clicking on the dynamic group icon a Paste option appears in the pop-up menu anytime when you copied or cut at least one device beforehand.
More Groups Options
By right-clicking on any group you get some additional options in addition to the Paste option mentioned in the previous chapter.
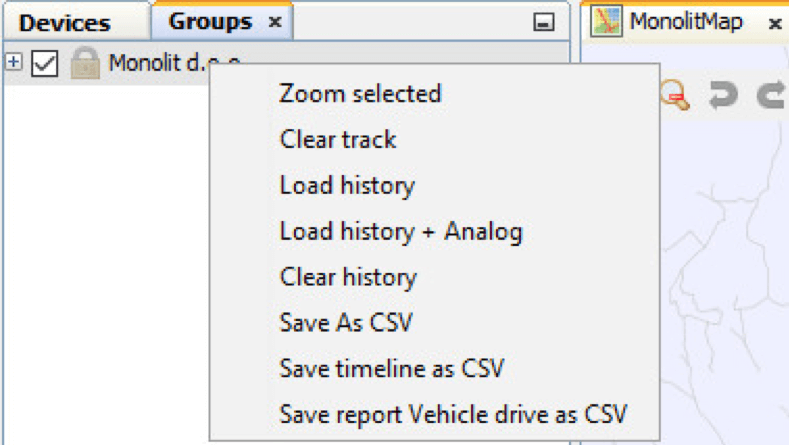
Additional group options
- Zoom selected – zoom on all devices inside the group on the map
- Clear track – clears all tracks of devices within the group
- Load history and Load history + Analog – loads history for all devices within the selected group. History can be seen only within the static group and in the Devices
- Clear history – delete all selected history
- Save As CSV – saves all the history in CSV format
- Save timeline as CSV – saves timeline in CSV format
- Save report Vehicle drive as CSV – saving Vehicle drive report in CSV format
Event Archive in Vehicle Maintenance - January 2019
In the always more often used module for Vehicle maintenance a new function for archiving events has been added.
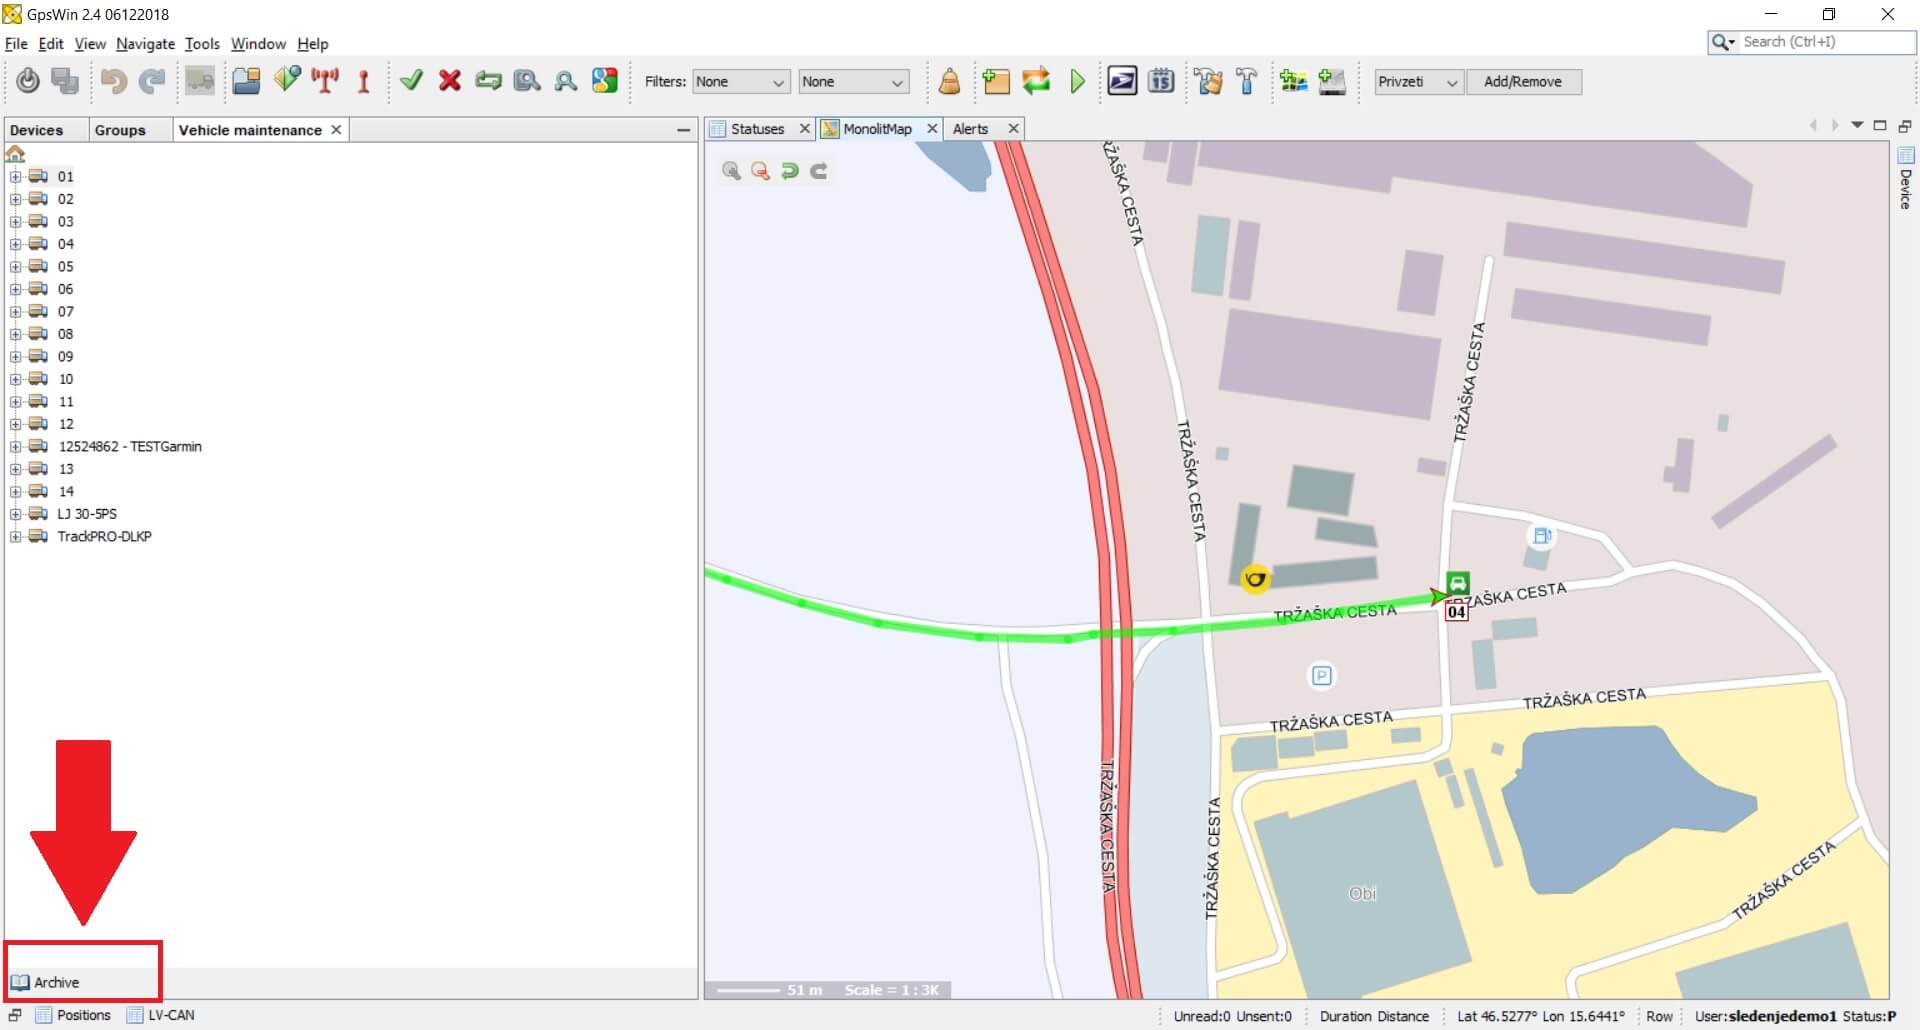
Event archive
The Archive records an entry when we choose the option Archive via the right click on the maintenance event that was accomplished.
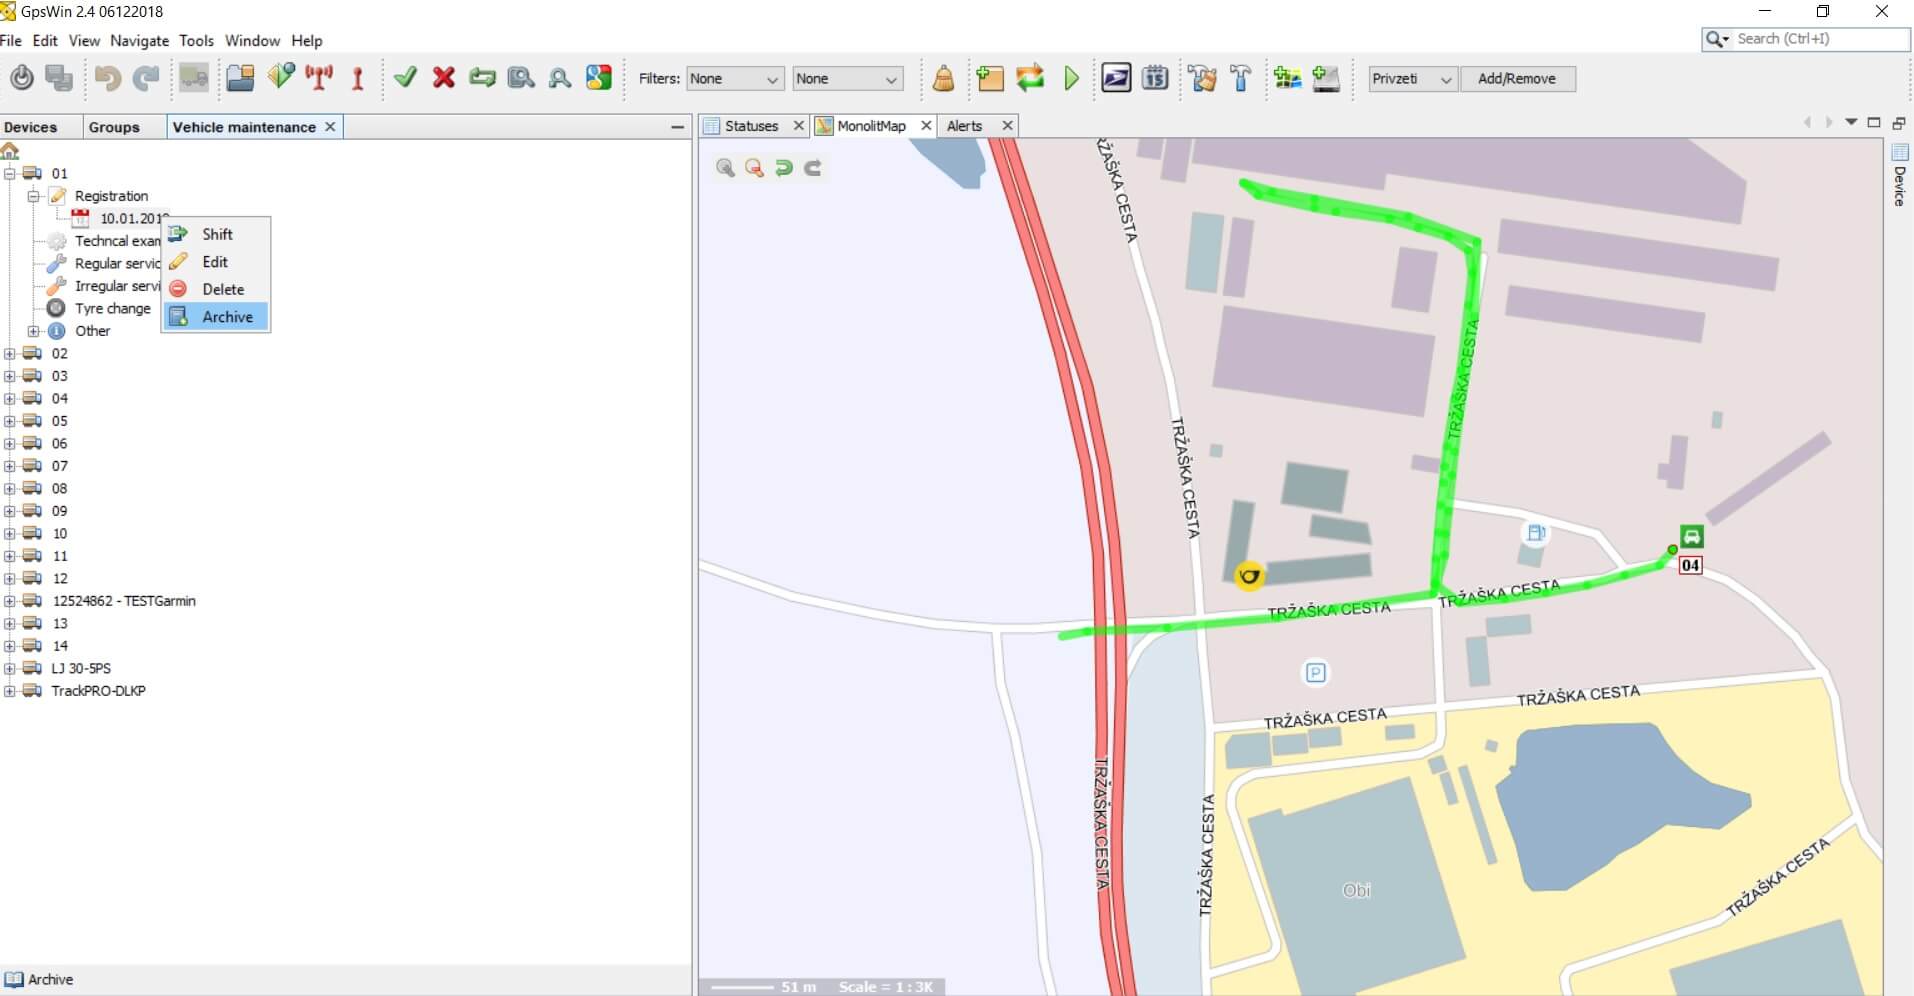
Archive button option
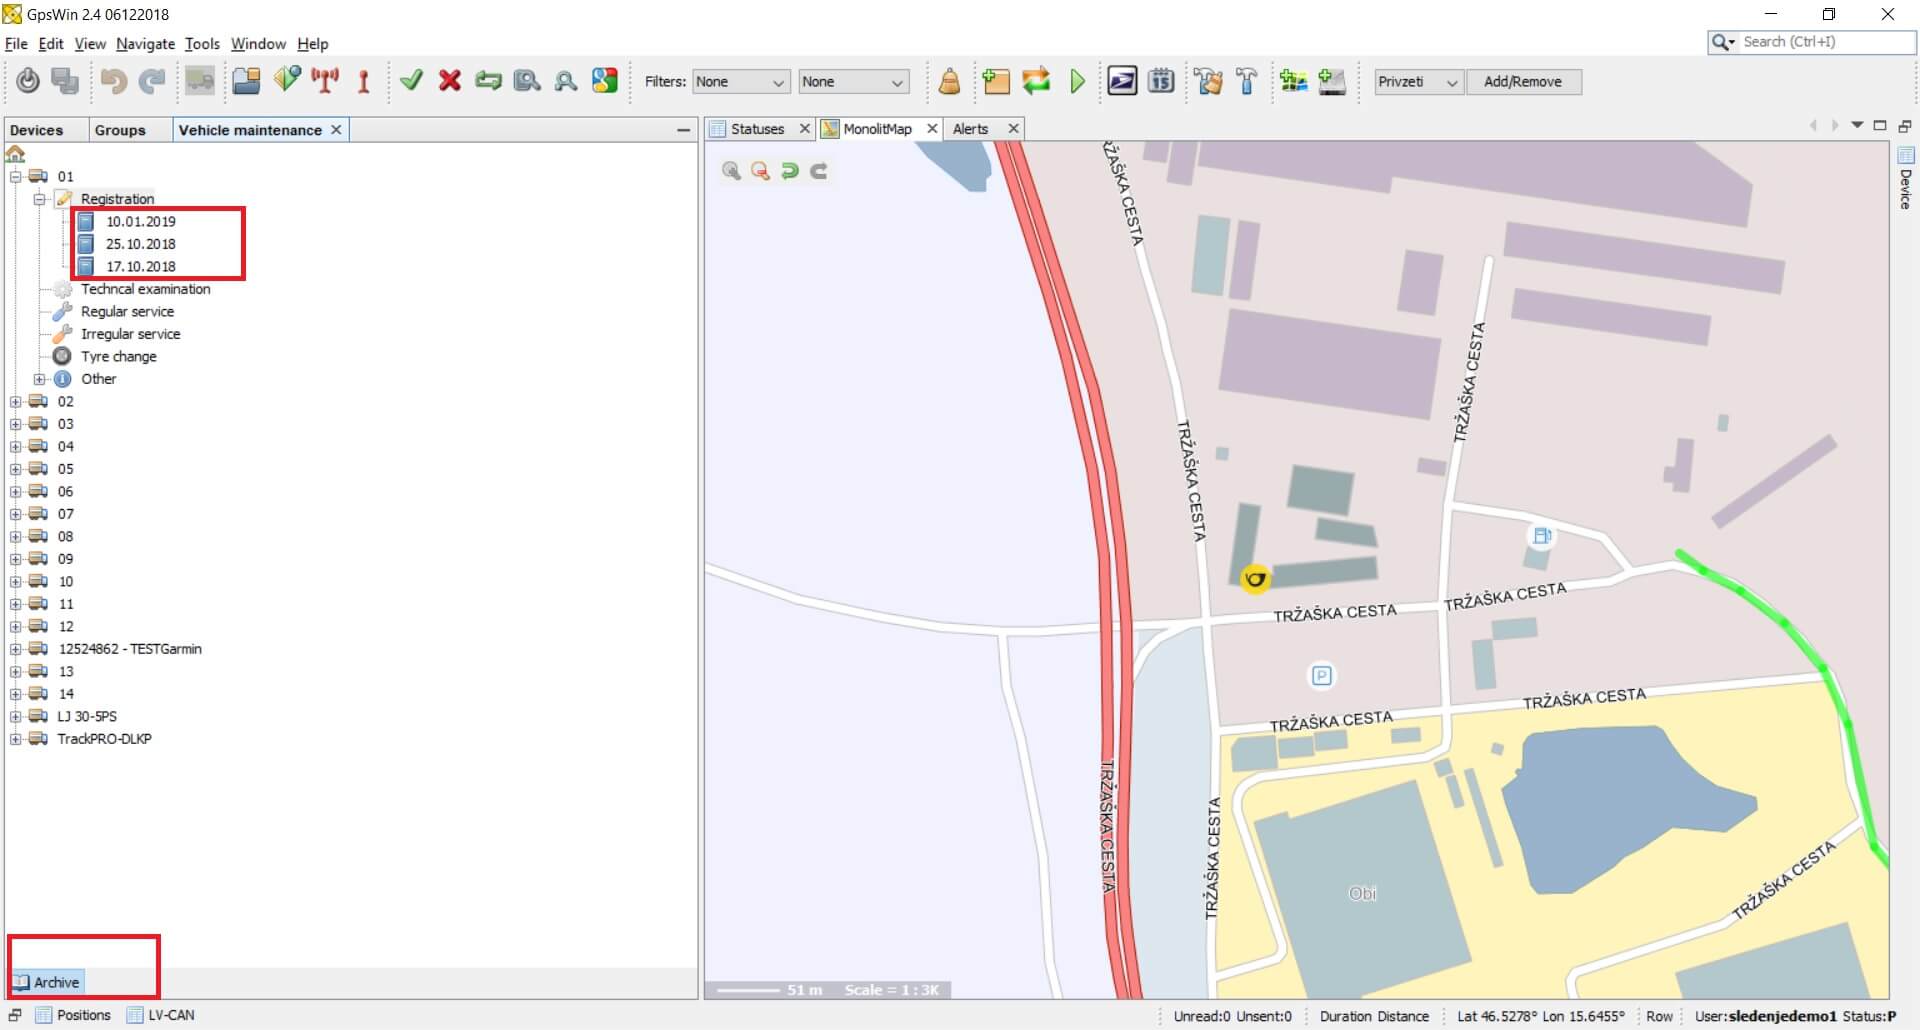
After we choose that option the icon of the event changes and the event is entered into the Archive and seen in the corresponding window. The button Archive in bottom left corner has a function of Hide/Show archived events. When the button is highlighted in blue, we can see the archived events. In the opposite case archived events are not seen.
Event archive display
It is also possible to archive events in the Alerts window which is displayed every time we turn on GpsWin.
There is another novelty in maintenance module under »Other events«. You can now set a reminder for First aid equipment in your vehicles.
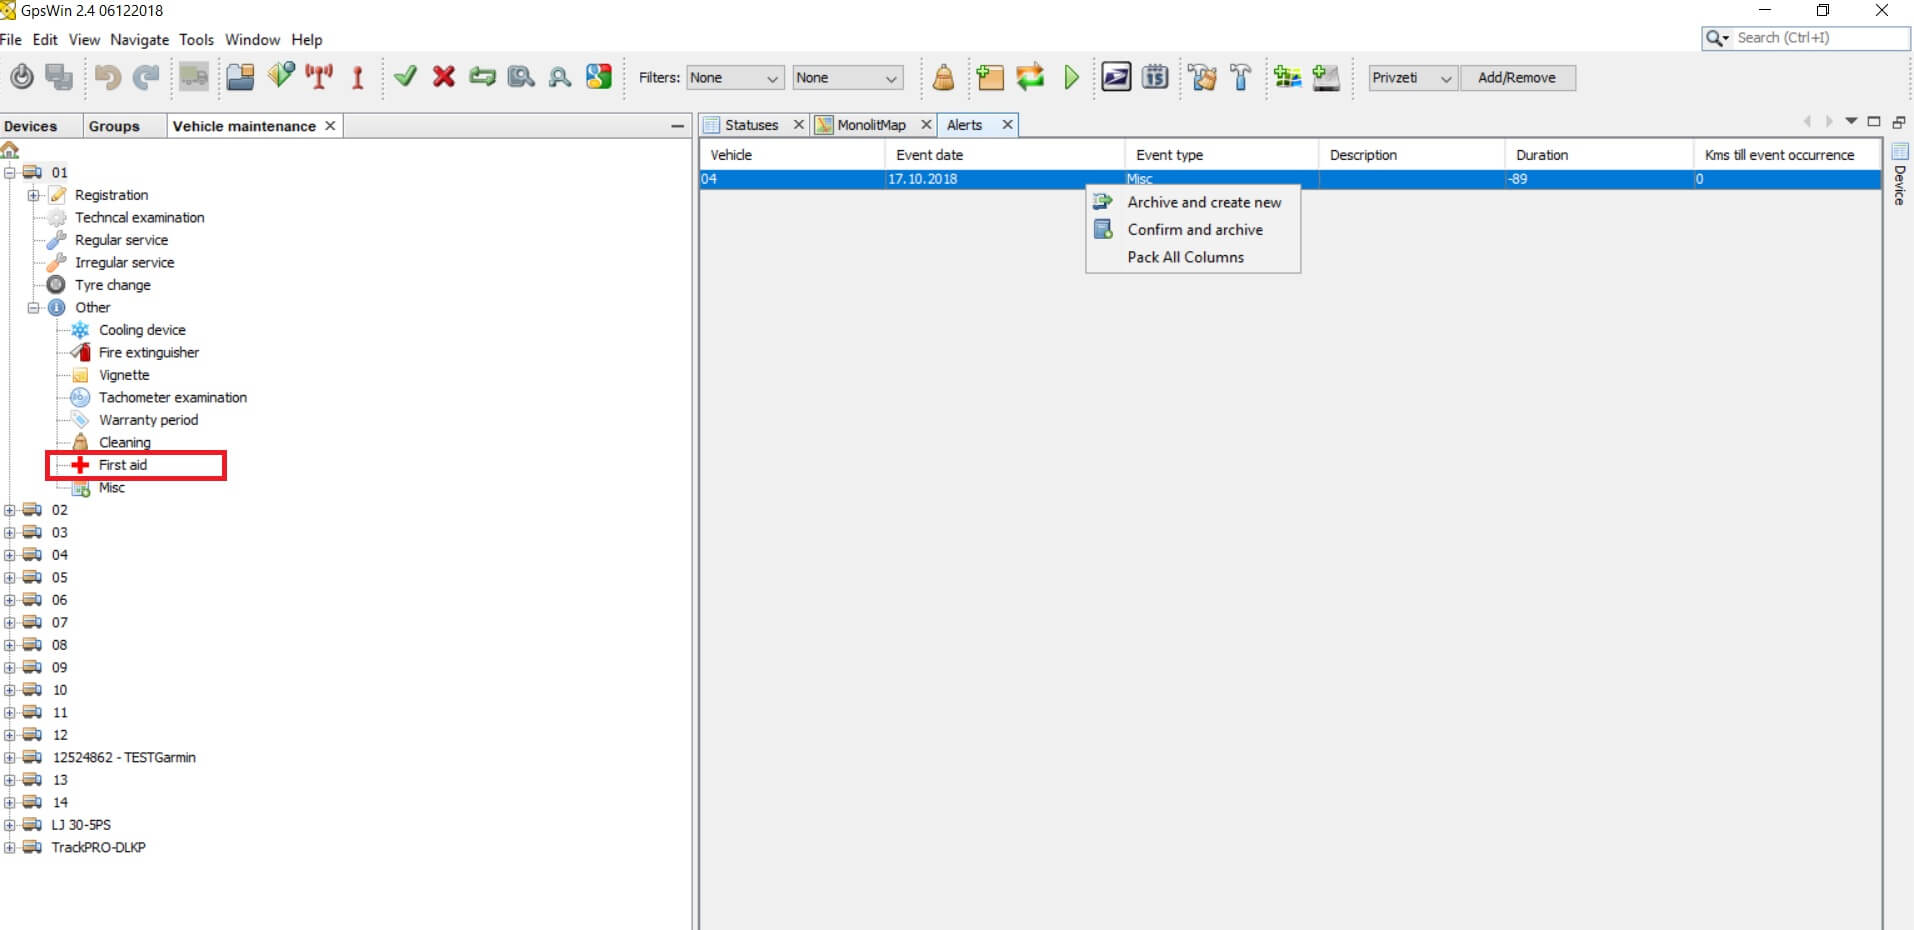
First aid maintenance function
Tip of the month 2018
Transformation of data - December 2018
In this month’s tip of the month series , we will present the meaning of data transformation for four parameters that are visible in the Positions window.
Data Transformation
You can access the transformation window in View > Transformation > … Here you can uncheck specific transformations and with that turning them off. GpsWin does not save the status of transformations therefore the values are reset to default every time you restart the application. By default all transformations are set as enabled (checked). The transformation itself enables the conversion of the device signals into meaningful values/words. In some cases, if the transformation is not set in the system the fields stay empty. If you turned off the transformation then all signals are presented as numeric value.
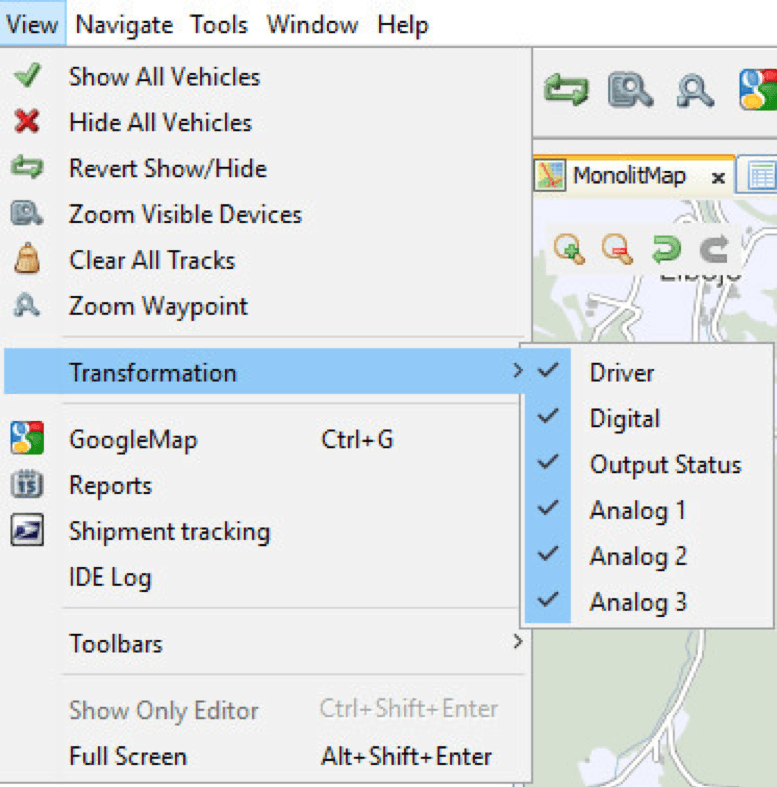
Data transformation window
- Driver – transformation of the drivers identification key into the drivers full name. This transformation is set on server side and can be managed in s-Admin.
- Digital – transformation of digital sensor signal values into meaningful words/actions. The transformation is presented based on a specific value of the digital sensor, this specific value can be linked and converted to a state name.
- Analog 1, Analog 2 and Analog 3 – transformation of analog sensor signal value into a meaningful number (e.g. conversion of analog mV signals into oC). This transformation is set on server side.
- Output status – transformation of output signal value into a meaningful state. The transformation is presented and converted based on a specific output value that signal value is associated with.

Data transformation table
Data search in Positions window - November 2018
In the Positions window we find all the positions for a selected period of time. Because of the density of position sending, there are lots of them. For that purpouse there is a few ways to quick search in the Positions window. Because of the high number of positions the search data is so more precise. As we emphasize regurarly, this window is meant for searching a specific information (for example a speed violation, proofing stop locations at a certain adress at a certain time,…). A few way to search for specific data are described below:
- Sorting from A to Z and reverse:
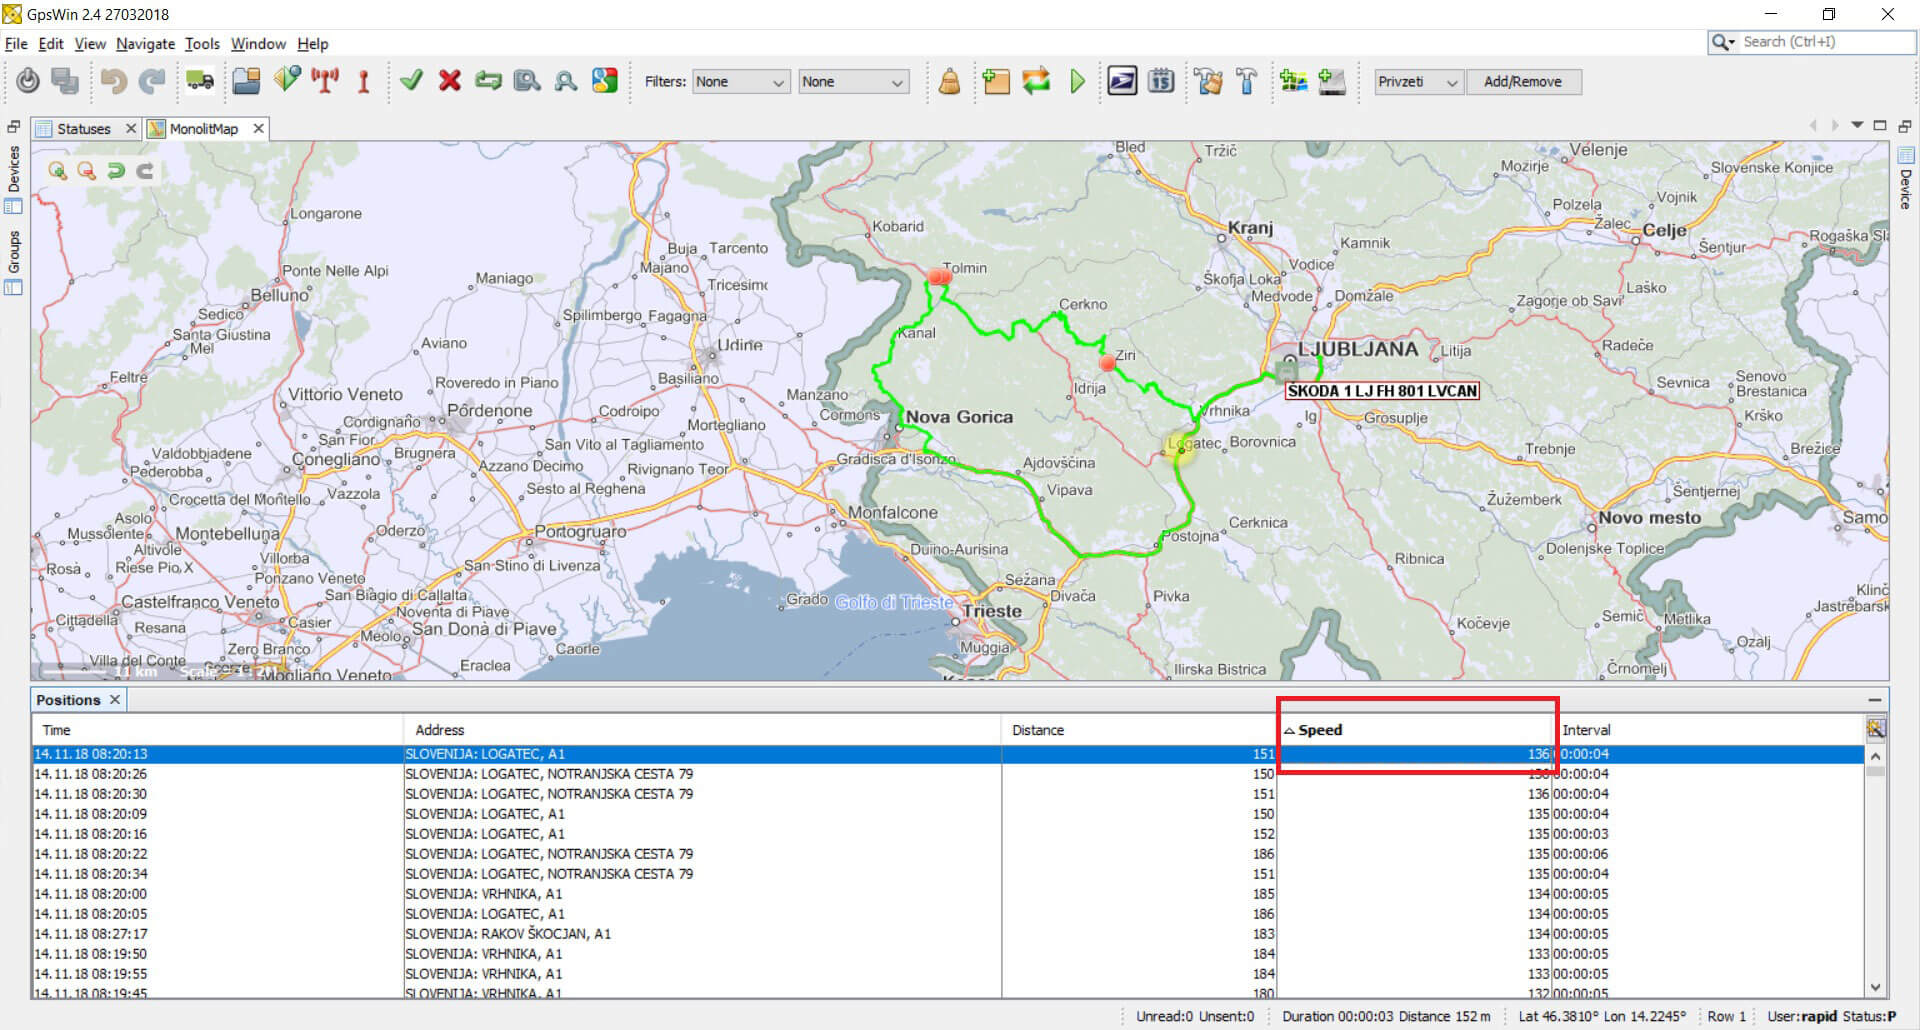
Sorting positions in the positions window
You can sort position by any column in the Positions window. With a mouse clik on the name of the column an arrow is displayed to show that the sorting is enabled. As shown in picture, we can access information about highest speed with one click. The choosen position is also shown on the map (highlighted with yellow).
Tip: if we sort data by Time and then mark the first line, we can move through positions with the Arrow button on the keyboard. This way we simulate the route on the map.
- Selection of sections/group of positions:

Multiple position selection in positions window
With Ctrl key on the keyboard combined with the mouse we can select a section of positions on a map that we are interested in. The section is highlighted yellow on map and blue in Positions window. This way we can thoroughly review information about time, speed, etc for the selected section of positions. The process can also be done in reverse. With the combination of Ctrl key and a mouse we can mark rows in the Positions window that we are interseted in and the marked positions are then higlighted yellow on the map.
- Quick search:
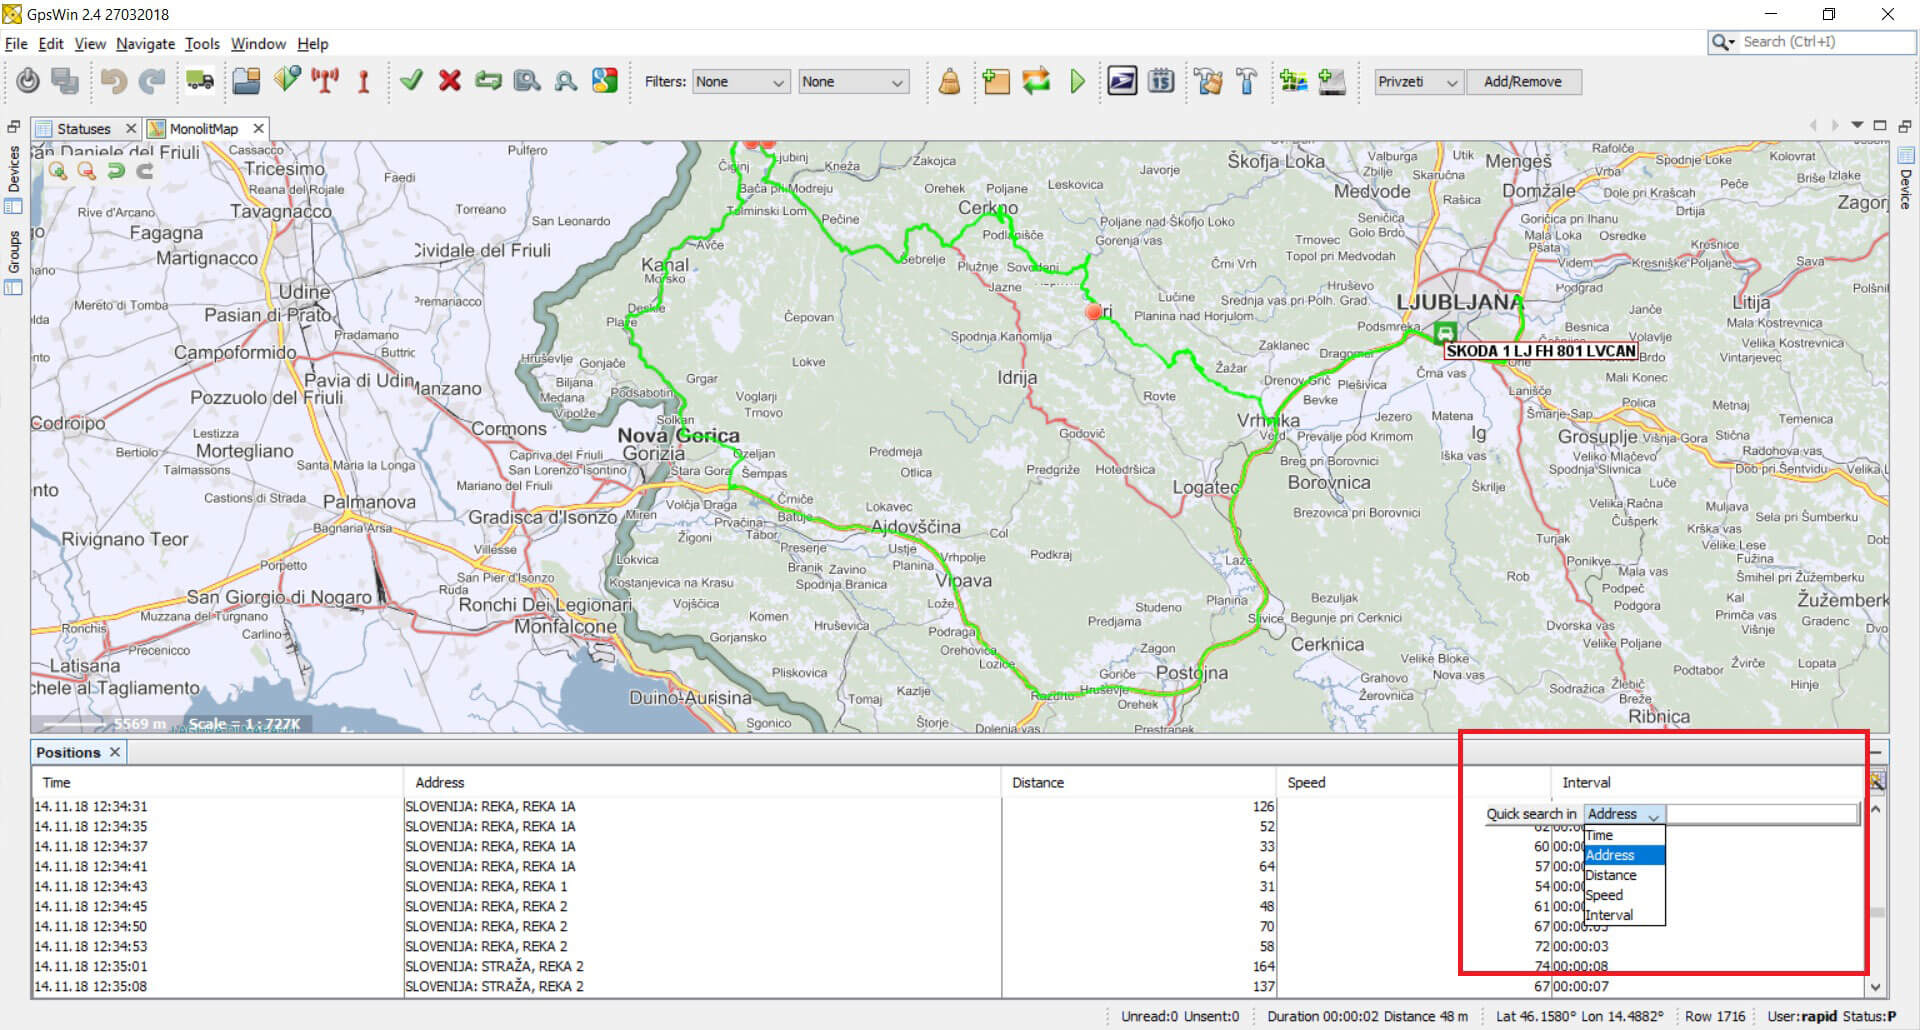
Quick search in the positions window
With the key q on the keyboard we can open a Quick search in the Positions window. In the drop down menu we can choose the column in which we want to search for data. In the row beside the drop down menu we type in the desired information. The program searches for it and it shows it in blue. At the same time the position is highlighted yellow on the map.
Adding a new update centre - October 2018
In this month’s Tip of the month, we will show you how to set up an additional update centre.
This feature is only applicable to those companies that have a large number of additional sensors connected to the devices in their vehicles.
- First we click on Tools>Plugins>Settings
- In window Settings we click on the button Add
- In Name we enter a »Company name Update Center«, in the line URL we enter the next link http://apps.sledenje.com/GpsWin/2.3/………../updates/updates.xml
- Then we close the window Plugins and click on Help>Check for updates.
- At the end we just install the new updates for our new update centre.
Legend: …….. signifies the field where you input the name of the company
Traffic information and Streetview - September 2018
Precise and timely traffic information is more and more important these days so your vehicle can be on time. Saving time also means saving money. For that purpose you can now monitor your vehicles movement and at the same time you can monitor traffic information. We have updated Maps in GpsWin with traffic flow in the area of Slovenia and 50 km area around it. In the future we are planning to expand traffic information to all Europe.
For testing purposes traffic information will be available to all users for a one-month trial period for free. Traffic flow will be shown automatically with each login into GpsWin. However, you will be able to turn it of by clicking on the ![]() button on the map at any time.
button on the map at any time.
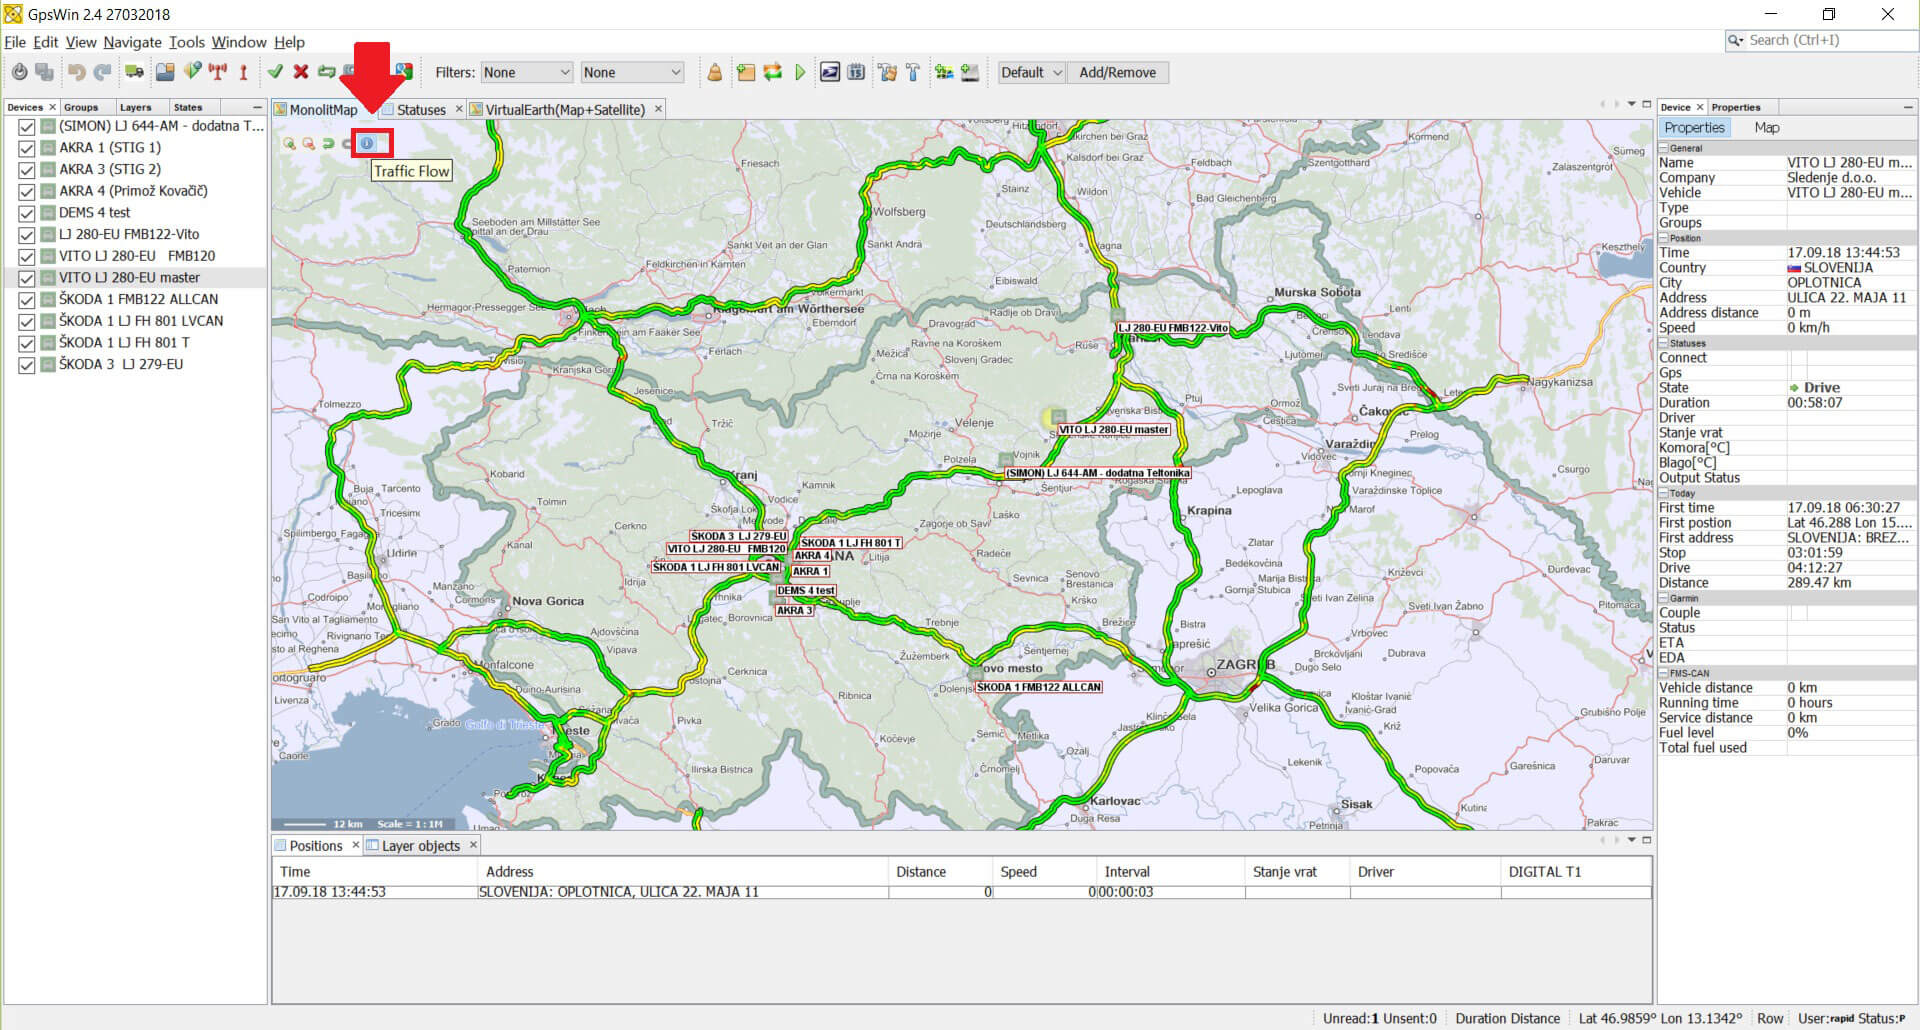
Traffic information and flow
We also updated our Streetview function due to the policy changes made by Google. We had to adjust the Streetview within the Balloon, that you activate by double clicking on the vehicle. The Streetview will update only by clicking on the »refresh« button.
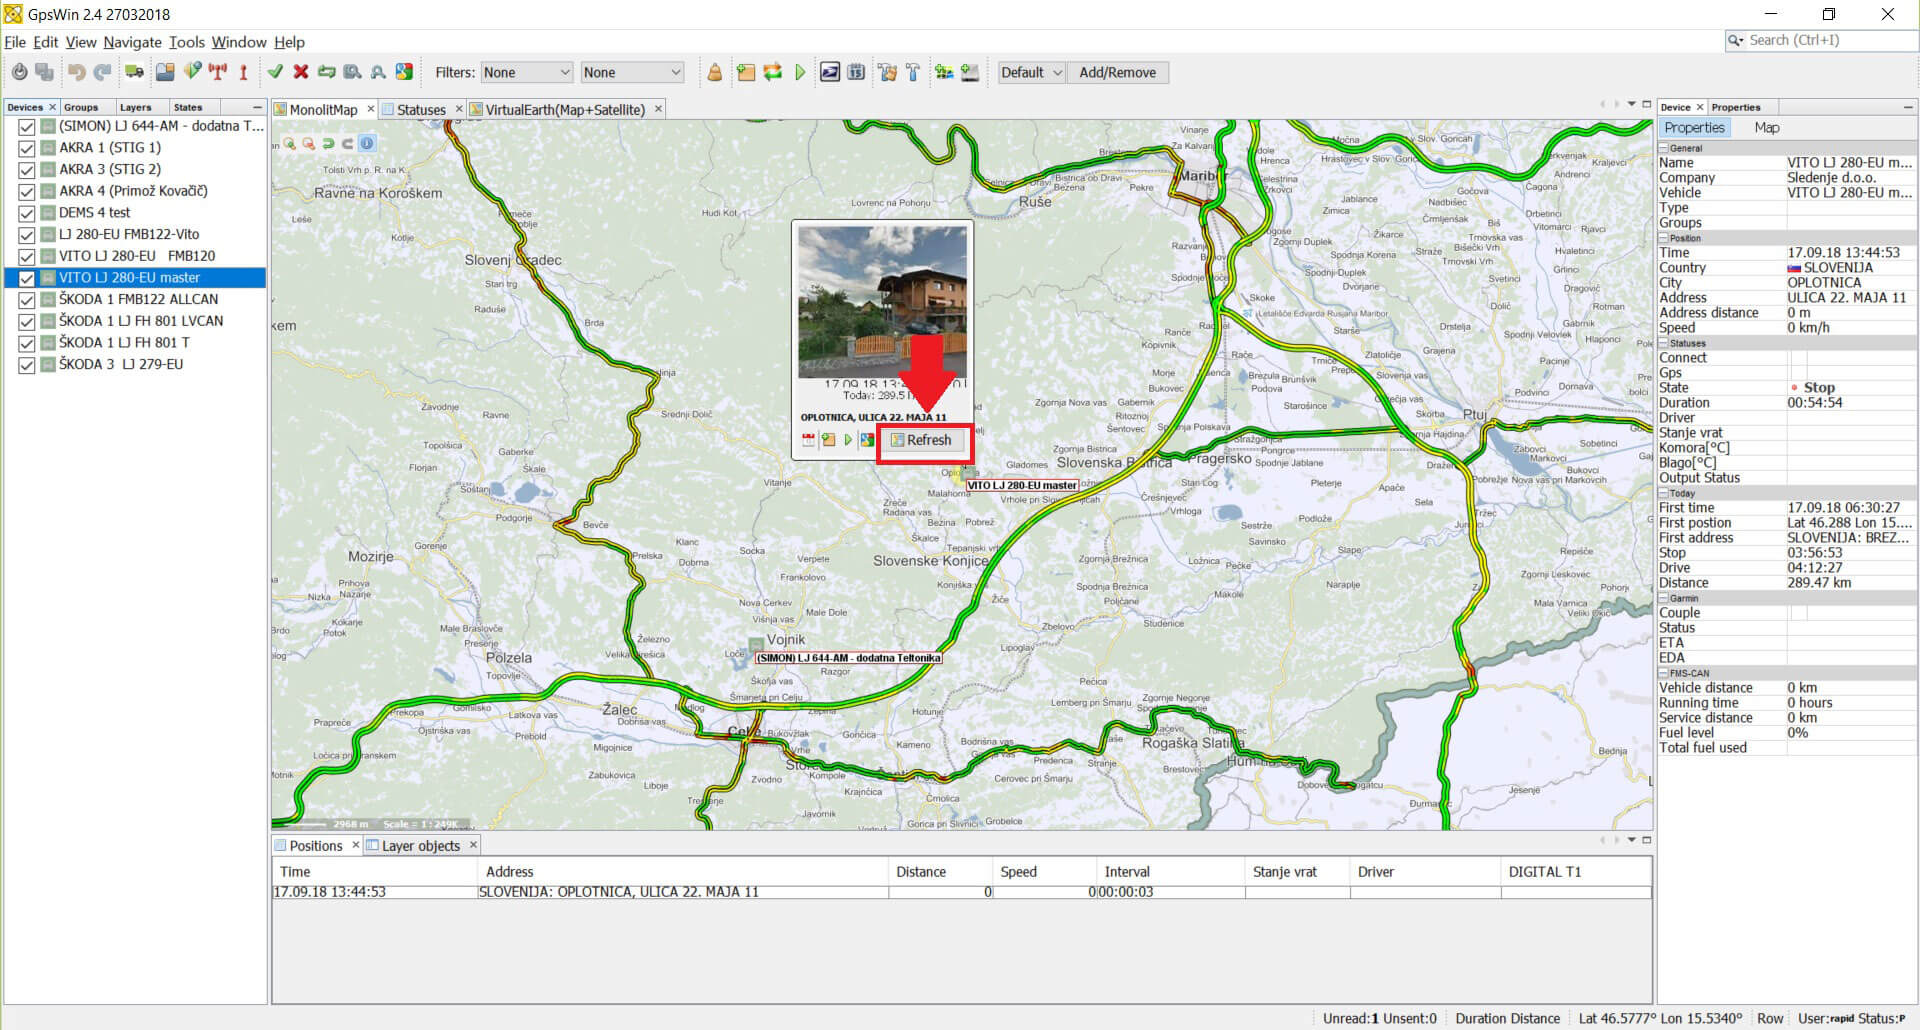
Google streetview refresh button
Changing the memory size in GpsWin - August 2018
This month, we will show you how to change the size of the GpsWin 2 memory.
This comes in handy primarily for companies that monitor a greater number of vehicles and (or) have more digital and analog sensors in their Tracking package.
In the C: \ Program Files \ gpswin \ etc \ gpswin.conf file, we change the line below.
default_options = “- branding gpswin -J-Xms24m -J-Xmx512m -J-Duser.language = en -J-Duser.region = SI”
eg. If we want to increase the memory in the program from 512m to 4g, we do this by changing “512m to 4g”
default_options = “- branding gpswin -J-Xms24m -J-Xmx4g -J-Duser.language = en -J-Duser.region = SI”
Note: To change the settings in the gpswin.conf file, we need to first open Wordpad as Administrators and then the gpswin.conf file from it. It’s also good to know that we always set the memory up to half the total amount of the memory that a computer has.
Export of Vehicle Timeline and Drive reports from GpsWin - May 2018
We made two more shortcuts so that you can access data in GpsWin more quickly. First one is the option to export Vehicle Timelines for an entire group of vehicles. The second one is the option to export Vehicle drive reports for an entire group of vehicles. You can find both options in the window Groups (Window/Tracking/Groups). Both reports are accessible and exported in CSV format (excel).
Vehicle groups tab
First we have to load the histroy for the vehicle group that we are interested in and we do that with a right click on the group name and choose the option »Load history«. A calendar opens up, where you can mark the desired day/period of time.
Loading vehicle group history

History period of vehicle group
When the history for all vehicles in the group is uploaded, we can export the data in a form of a Timeline or as a Vehicle drive report.cBoth shortcuts are availabile with a rigt click on the group’s name.
Choosing timeline or vehicle drive reports
When we pick the option that we wanted the only thing that is left to do, is to choose a folder on the computer where the files should be stored. The CSV file opes in Excel.
Timeline report in excel
GpsWin and proxy server settings - March 2018
Today, we will present how to set up proxy settings.
Namely, certain companies use a proxy server for their Internet connection.
In this case, we must also set up the GpsWin program likewise.
It should be emphasized that if you use a proxy server in your company, you will not be able to login to GpsWin before the program is reconfigured.
Therefore, before entering into the program, press the F12 key on the keyboard.
The “Options” window will open, where under the “General” button and the “Manual Proxy Settings” option you can enter your proxy server.
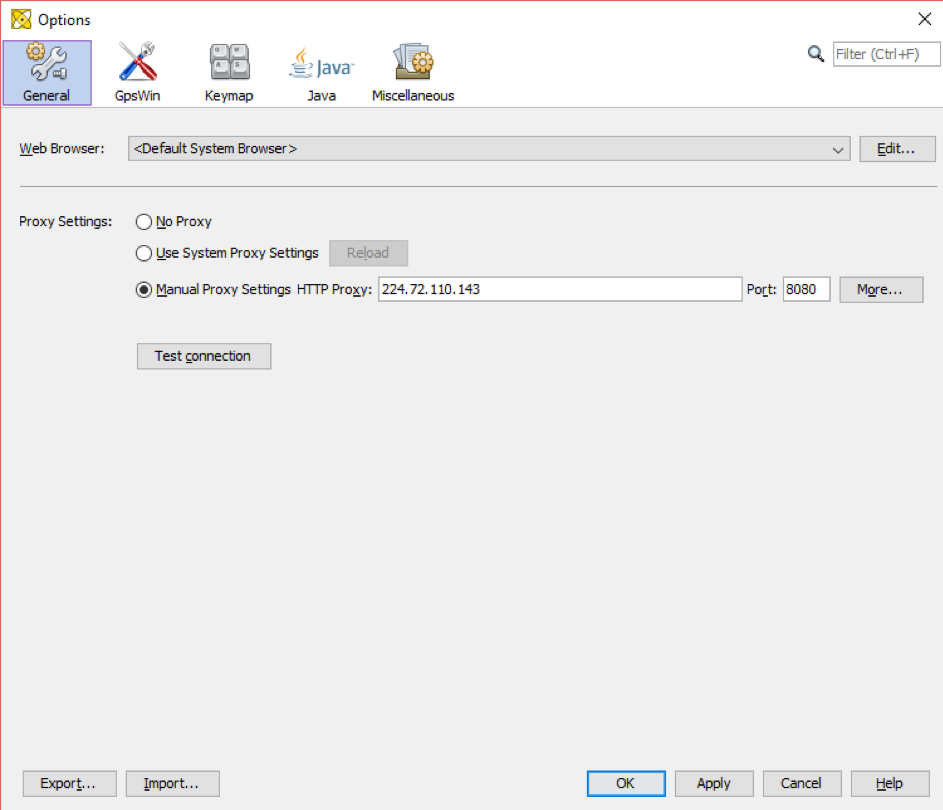
To make sure that the link really works, click on the “Test connection” button.
GpsWin and tacho module - February 2018
Anyone who works in transport and logistics knows how important accurate information about remaining driving time is. The system Sledenje.com enables on-line insight into individual driver’s card status and the history of activities logged on each individual driver’s card (drive, work, rest,…). Beside real-time states and data history, the system also enables remote ddd file transfer. Downloads contain driver card files and tachograph files from the vehicle.
A sophisticated algorithm for on-line Tacho states and remaining driving time gives you accurate information as a cornerstone for planning transport routes, etc. Information is available per each day, week period and two week period.
Tacho module in GpsWin
You no longer have to drive your vehicles to tachograph workshops and empty data from tachograph and driver’s card. If you were doing this yourself, you no longer have to waste time for doing that. The remote file transfer is automatic based on the schedule recorded on the server. All the work that remains for you, is to transfer the files into a programme for processing tacho data.
Sledenje Web Services - January 2018
System Sledenje.com enables easy integration of data with other programs, applications and platforms. Through web services client receive any information to their information systems per request (for example mileage, driver information, stops on points of interest, time and location of stops, digital and analog sensor measurements,…).
Advantage of the integration through web services is that there is no limit with the type of program or system in which the data can be delivered (for example Vasco, SAP, e-accounts, Infotrans, Perftech,…). For integration no additional programming or programs are required.
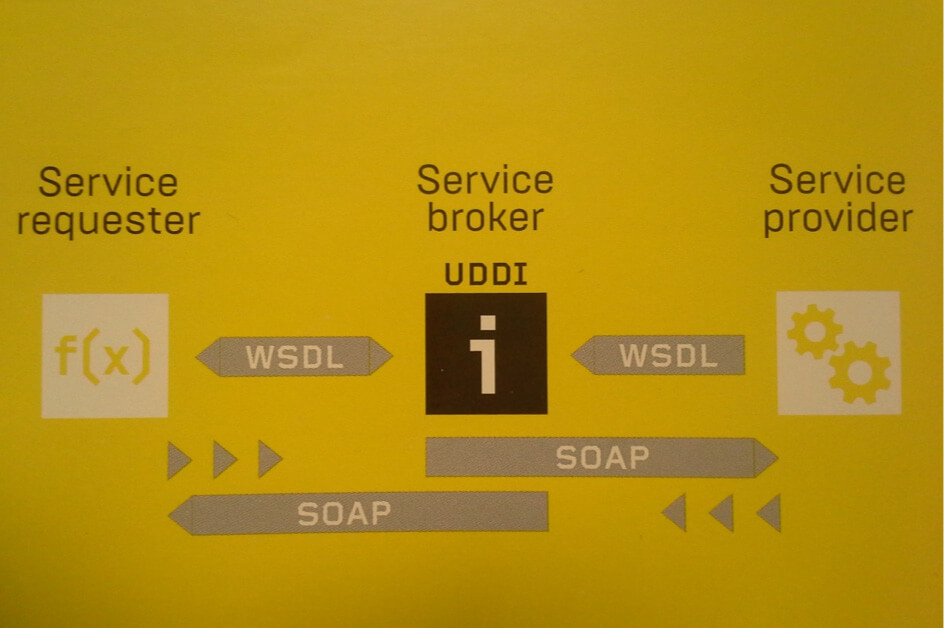
Web Services
Tip of the month 2017
Personalized GpsWin user interface - New Years 17/18
Often when using GpsWin our clients give us feedback that the application is too extensive due to it’s many functionalities. As a tool, GpsWin really does offer lots of functions but that is only because it is intended for clients from a broad specter of industries . Because of wide range of functionalities, GpsWin can be customized for whatever the specific needs are, whether that is for waste disposal companies, cunstruction companies, transport companies, taxi services, etc. The solutions are endless.
Each company only needs specific informations and analysis. They can achieve that customizing GpsWin. A great resource in this process can be our customer support team and customer care specialists that are readliy availabe for our clients. They can help you customize GpsWin based on the nature of work so you always have the desired data at the reach of your hald. Few examples of customization:
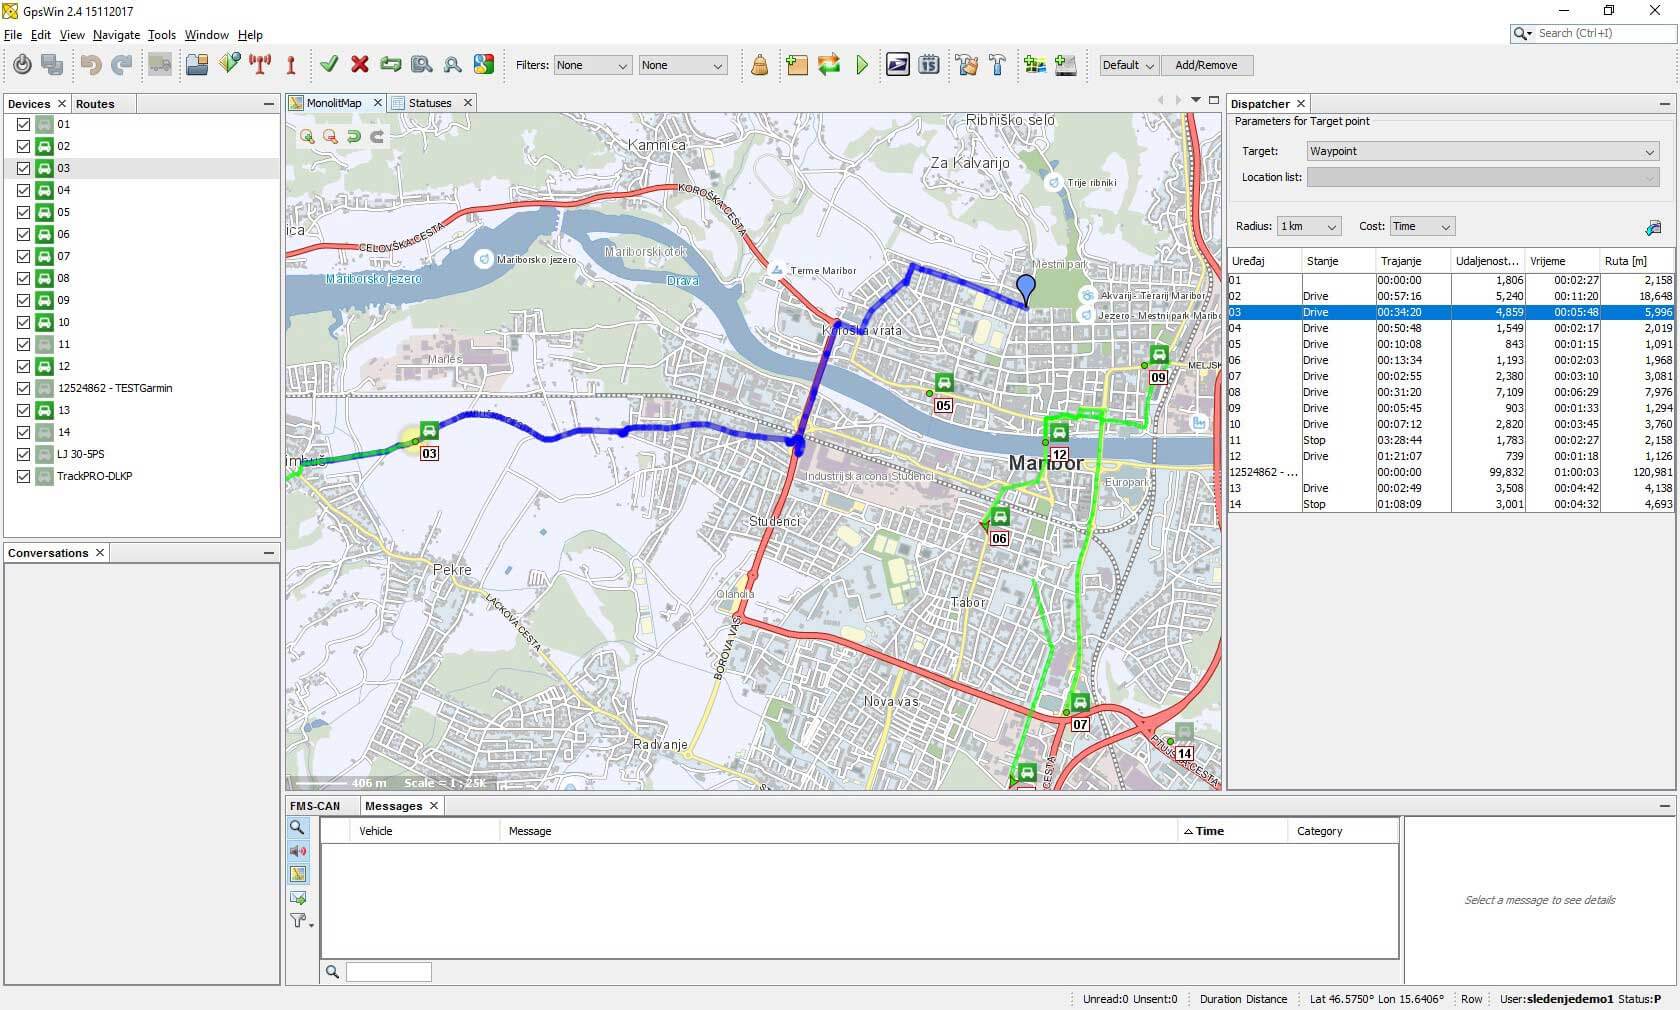
Dispatcher
Delivery and taxi services
Emergency and intervention services
Waste management and disposal companies
Food and pharmacy transport

We are trying to pay attention to »user friendliness« as much as possible. We wish to accomplish that clients can always access the needed information in the fastest way possible. For that purpose clients can use alarms, events, e-mail notification for events regarding vehicle maintenance, automatic reports, web service solutions, and more.
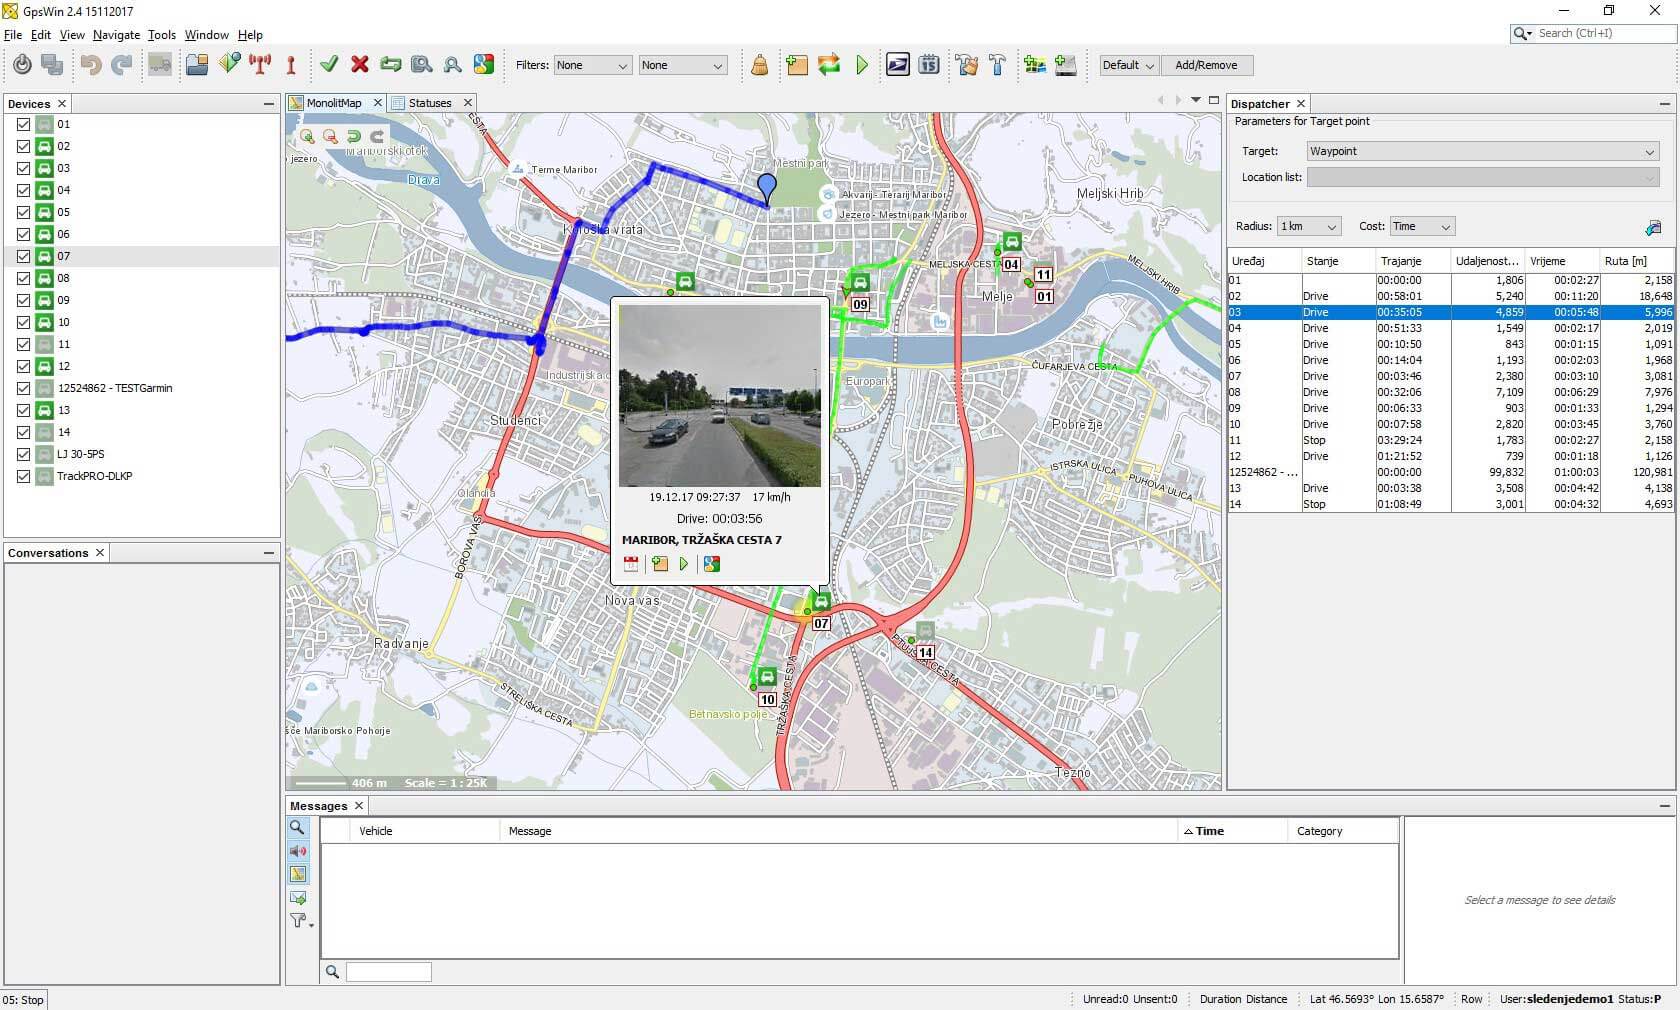
We have recently implemented some new and outstanding features. Communication with the driver is easier and more transparent with the new interface for written communication and navigation. Additionally we have implemented a feature we call »the balloon«. It’s appears by double clicking on the vehicle icon and gives you an easy access to the most relevant vehicle information. It also enables quick access to vehicle history, sending messages, direct navigation, and an access button to Google maps. All new features are availabile via the newest updates (Help/Check for updates).
Team Sledenje wishes you a merry Christmas and a happy New Year!
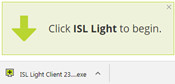
ISL Light session - December 2017
In this months’ tip, we will look at how to connect to the ISL session for Remote Assistance. For those clients who are not yet familiar with the program, we use the ISL program to provide remote help to our customers. Here, we will present how to connect to the ISL session with different Internet browsers. First the client receives the following e-mail from the administrator.
Hello,
you are kindly invited to join the ISL Light session. Please click the link below to join:
http://77.234.159.76/join/83969408
Sent from ISL Light,
Helena Senić
Regardless of what Internet browser the client uses, they must click on the link attached in the email. The following procedure differs, depending on what browser you use.
ISL connection via Internet Explorer

ISL connection via Microsoft Edge

ISL connection via Mozilla Firefox
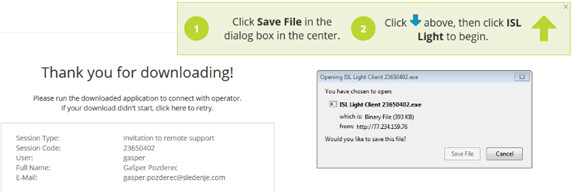
ISL connection via Google Chrome
Thank you and we look forward to hearing from you! 😉
Changing vehicle icon - November 2017
This month’s tip of the month is meant for everybody, who would like to organize their fleet with the help of different icons, which indicate devices/vehicles on the map. This solution is especially useful for companies with different brands as well as types of vehicles in their fleet. Different type of vehicle usually means different type of function so instead of wondering if the vehicle you are planning to send to complete a specific task is the right one, have the icon tell you automatically.
To change the icon of a vehicle, first select the specific vehicle in the Devices, afterwards move onto the corresponding window Device, go under the Map section within that window, select Icon and there you can choose the preferred icon:
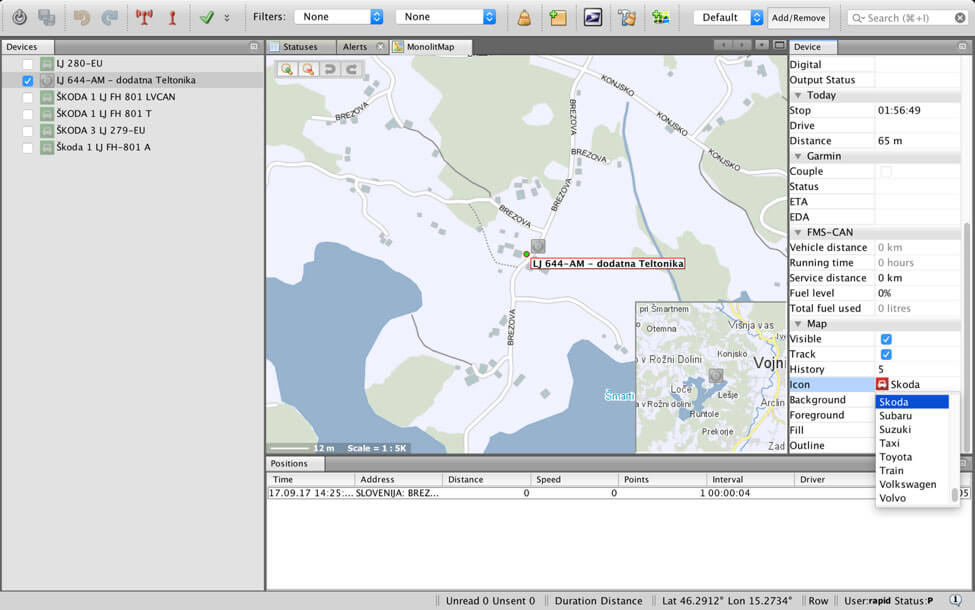
GpsWin user interface
Synchronize messages - October 2017
In this month’s tip we will present “synchronization of messages”.
The function is especially important for transport companies that employ a large number of dispatchers. The function allows you to synchronize all sent reports at once, which dispatchers have to send to devices in the vehicles that are in the field.
First of all, we need to have an open “Messages” window, which can be found by clicking on “Window> Messages”. Then in the window itself, we must check the box named “Synchronize Outbox”.
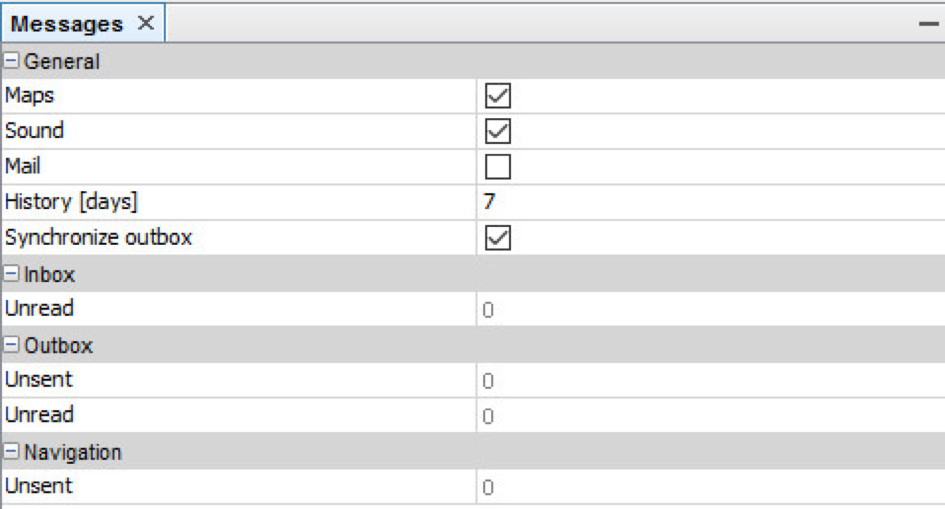 Finally, for successful synchronization, just click on the “Synchronize”
 ![]() button on the toolbar.
button on the toolbar.
Contact information
Sledenje d.o.o.
Letališka cesta 33d, 1000 Ljubljana
E: info@sledenje.com
T: + 386 1 546 67 60
F: + 386 1 546 67 70
Follow us
![]()
![]()
![]()
![]()